I released a first, simple version of zipdump.py, a tool to analyze ZIP files and their content. But I’ve made major changes to the tool (like support for YARA) that I release today.
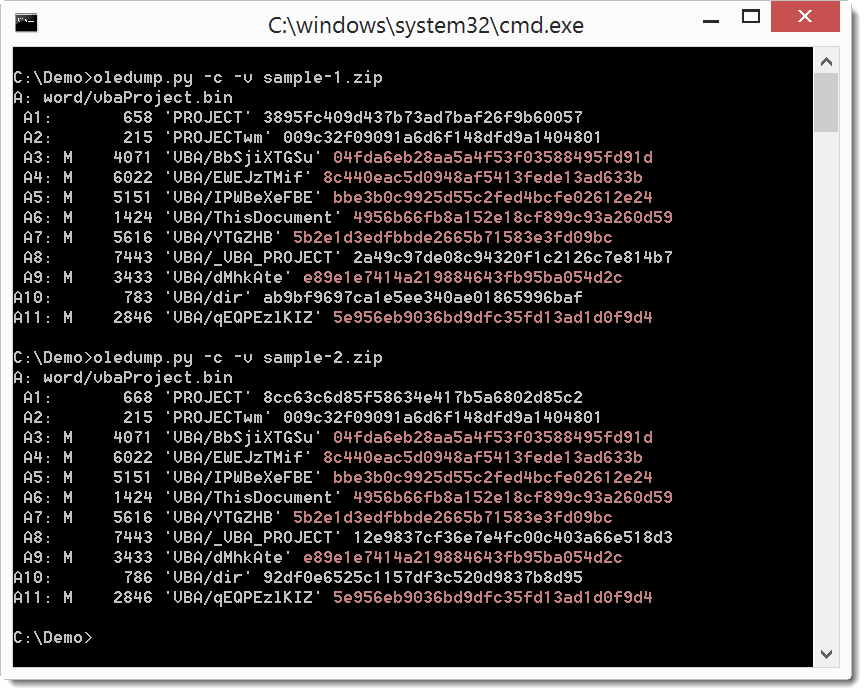
zipdump can also be used to pipe a sample into my other analysis tools like oledump.py.
zipdump_v0_0_3.zip (https)
MD5: 100E4B1E1E9F542EB244C9A0766C35FF
SHA256: A5219D7C88FF78A8D7C93B9EEF19D085F9FA92944CAE492F293164213329988F
Here is the man page:
Usage: zipdump.py [options] [zipfile]
ZIP dump utility

Options:
  --version             show program's version number and exit
  -h, --help            show this help message and exit
  -m, --man             Print manual
  -s SELECT, --select=SELECT
                        select index nr or name
  -S SEPARATOR, --separator=SEPARATOR
                        Separator character (default )
  -o OUTPUT, --output=OUTPUT
                        Output to file
  -d, --dump            perform dump of first file or selected file
  -D, --dumpall         perform dump of all files or selected file
  -x, --hexdump         perform hex dump of first file or selected file
  -X, --hexdumpall      perform hex dump of all files or selected file
  -a, --asciidump       perform ascii dump of first file or selected file
  -A, --asciidumpall    perform ascii dump of all files or selected file
  -e, --extended        report extended information
  -p PASSWORD, --password=PASSWORD
                        The ZIP password to be used (default infected)
  -y YARA, --yara=YARA  YARA rule file (or directory or @file) to check files
                        (YARA search doesn't work with -s option)
  --yarastrings         Print YARA strings
  -C DECODERS, --decoders=DECODERS
                        decoders to load (separate decoders with a comma , ;
                        @file supported)
  --decoderoptions=DECODEROPTIONS
                        options for the decoder
  -v, --verbose         verbose output with decoder errors
  -c CUT, --cut=CUT     cut data
  -r, --regular         if the ZIP file contains a single ZIP file, handle it
                        like a regular (non-ZIP) file
  -z, --zipfilename     include the filename of the ZIP file in the output
  -E EXTRA, --extra=EXTRA
                        add extra info (environment variable: ZIPDUMP_EXTRA)

Manual:

zipdump is a tool to analyze ZIP files.
The ZIP file can be provided as an argument, via stdin (piping) and it may
also be contained in a (password protected) ZIP file.

When providing zipdump with a file to analyze, it will report on the content
of the ZIP file, like in this example:
C:\Demo>zipdump.py example.zip
Index Filename     Encrypted Timestamp
    1 Dialog42.exe         0 2012-02-25 12:08:26
    2 readme.txt           0 2015-11-24 19:40:12

The first column, Index, is an index that zipdump assigns to each file inside
the ZIP file. You can use it with option -s (select) to select a file for
further analysis.
Filename is the filename of the contained file.
Encrypted is a flag indicating if the file is encrypted (1) or not (0).
And the last column (Timestamp) is the timestamp of the file inside the
archive.

Option -s takes the index number or the filename to select a file.

By default, the separator used to delimit columns is the space character. When
the default separator is used, padding is added to lign up the columns.
Another separator character can be selected with option -S. No padding is used
when the separator is provided (even if it is the space character).
C:\Demo>zipdump.py -S ; example.zip
Index;Filename;Encrypted;Timestamp;
1;Dialog42.exe;0;2012-02-25 12:08:26;
2;readme.txt;0;2015-11-24 19:40:12;

When a file is selected, the properties of this file are displayed:
C:\Demo>zipdump.py -s 1 example.zip
Index Filename     Encrypted Timestamp
    1 Dialog42.exe         0 2012-02-25 12:08:26

The content of the selected file can also be dumped.
Use option -x to perform an hexdump:
C:\Demo>zipdump.py -s 1 -x example.zip
4D 5A 50 00 02 00 00 00 04 00 0F 00 FF FF 00 00
B8 00 00 00 00 00 00 00 40 00 1A 00 00 00 00 00
00 00 00 00 00 00 00 00 00 00 00 00 00 00 00 00
...

Use option -a to perform an ascii/hexdump:
C:\Demo>zipdump.py -s 1 -a example.zip
00000000: 4D 5A 50 00 02 00 00 00 04 00 0F 00 FF FF 00 00  MZP.............
00000010: B8 00 00 00 00 00 00 00 40 00 1A 00 00 00 00 00  +.......@.......
00000020: 00 00 00 00 00 00 00 00 00 00 00 00 00 00 00 00  ................
...

Use option -d to perform a raw dump:
C:\Demo>zipdump.py -s 2 -d example.zip
test

A raw dump is useful to pipe the output into another command:
C:\Demo>zipdump.py -s 1 -d example.zip | pecheck.py
PE check for '':
Entropy: 6.425034 (Min=0.0, Max=8.0)
MD5     hash: 9b7f8260724e2cb643ad0729ec995b40
...

When options -x, -a or -d are used without selecting a file (option -s), the
first file in the ZIP file is selected and dumped.
When options -X, -A or -D are used without selecting a file (option -s), all
files in the ZIP file are selected and dumped.

The output produced by zipdump.py can de written to a file with option -o.

If the ZIP file is password protected, zipdump.py will try with password
'infected'. Option -p can be used to provide a different password to open the
ZIP file.

If the ZIP file contains a single ZIP file, the contained ZIP file will be
considered to be the ZIP file to analyze. To prevent this, use option -r.
Option -r handles the contained ZIP file as a regular file.

Option -z can be used to include the name of the zipfile in the report:
C:\Demo>zipdump.py -z -S ; example.zip
Index;Zipfilename;Filename;Encrypted;Timestamp;
1;example.zip;Dialog42.exe;0;2012-02-25 12:08:26;
2;example.zip;readme.txt;0;2015-11-24 19:40:12;

This can be useful when reports of many ZIP files are merged together.

Option -e extends the amount of information reported:
C:\Demo>zipdump.py -e example.zip
Index Filename     Encrypted Timestamp           MD5
Filesize Entropy       Magic HEX Magic ASCII Null bytes Control bytes
Whitespace bytes Printable bytes High bytes
    1 Dialog42.exe         0 2012-02-25 12:08:26
9b7f8260724e2cb643ad0729ec995b40    58120 6.42503434625 4d5a5000  MZP.
13014          6403             1678           19366      17659
    2 readme.txt           0 2015-11-24 19:40:12
098f6bcd4621d373cade4e832627b4f6        4 1.5            74657374 test
0             0                0               4          0

Columns MD5, Filesize and Entropy should be self-explanatory.
The Magic columns (HEX and ASCII) report the first 4 bytes of the file.
The remaining columns provide more statistical data about the contained file.
They count the number of bytes of a particular type found inside the contained
file. The byte types are: null bytes, control bytes, whitespace, printable
bytes and high bytes.

If you need other data than displayed by option -e, use option -E (extra).
This option takes a parameter describing the extra data that needs to be
calculated and displayed for each file. The following variables are defined:
  %INDEX%: the index of the file
  %ZIPFILENAME%: the filename of the ZIP container
  %FILENAME%: the filename of the contained file
  %ENCRYPTED%: encrypted indicator
  %TIMESTAMP%: timestamp
  %LENGTH%': the length of the file
  %MD5%: calculates MD5 hash
  %SHA1%: calculates SHA1 hash
  %SHA256%: calculates SHA256 hash
  %ENTROPY%: calculates entropy
  %HEADHEX%: display first 20 bytes of the file as hexadecimal
  %HEADASCII%: display first 20 bytes of the file as ASCII
  %TAILHEX%: display last 20 bytes of the file as hexadecimal
  %TAILASCII%: display last 20 bytes of the file as ASCII
  %HISTOGRAM%: calculates a histogram
                 this is the prevalence of each byte value (0x00 through 0xFF)
                 at least 3 numbers are displayed separated by a comma:
                 number of values with a prevalence > 0
                 minimum values with a prevalence > 0
                 maximum values with a prevalence > 0
                 each value with a prevalence > 0
  %BYTESTATS%: calculates byte statistics
                 byte statistics are 5 numbers separated by a comma:
                 number of NULL bytes
                 number of control bytes
                 number of whitespace bytes
                 number of printable bytes
                 number of high bytes

Example adding the SHA256 hash to the report:
C:\Demo>zipdump.py -E "%SHA256%" example.zip
Index Filename     Encrypted Timestamp
    1 Dialog42.exe         0 2012-02-25 12:08:26
0a391054e50a4808553466263c9c3b63e895be02c957dbb957da3ba96670cf34
    2 readme.txt           0 2015-11-24 19:40:12
9f86d081884c7d659a2feaa0c55ad015a3bf4f1b2b0b822cd15d6c15b0f00a08

The parameter for -E may contain other text than the variables, which will be
printed. Escape characters \n and \t are supported.
Example displaying the MD5 and SHA256 hash per file, separated by a -
character:
C:\Demo>zipdump.py -E "%MD5%-%SHA256%" example.zip
Index Filename     Encrypted Timestamp
    1 Dialog42.exe         0 2012-02-25 12:08:26 9b7f8260724e2cb643ad0729ec995
b40-0a391054e50a4808553466263c9c3b63e895be02c957dbb957da3ba96670cf34
    2 readme.txt           0 2015-11-24 19:40:12 098f6bcd4621d373cade4e832627b
4f6-9f86d081884c7d659a2feaa0c55ad015a3bf4f1b2b0b822cd15d6c15b0f00a08

If the extra parameter starts with !, then it replaces the complete output
line (in stead of being appended to the output line).
Example:
C:\Demo>zipdump.py -E "!%FILENAME%;%SHA256%" example.zip
Dialog42.exe;0a391054e50a4808553466263c9c3b63e895be02c957dbb957da3ba96670cf34
readme.txt;9f86d081884c7d659a2feaa0c55ad015a3bf4f1b2b0b822cd15d6c15b0f00a08

To include extra data with each use of zipdump, define environment variable
ZIPDUMP_EXTRA with the parameter that should be passed to -E. When environment
variable ZIPDUMP_EXTRA is defined, option -E can be ommited. When option -E is
used together with environment variable ZIPDUMP_EXTRA, the parameter of option
-E is used and the environment variable is ignored.

zipdump supports YARA rules. Installation of the YARA Python module is not
mandatory if you don't use YARA rules.
You provide the YARA rules with option -y. You can provide one file with YARA
rules, an at-file (@file containing the filenames of the YARA files) or a
directory. In case of a directory, all files inside the directory are read as
YARA files.
All files inside the ZIP file are scanned with the provided YARA rules, you
can not use option -s to select an individual file.

Example:
C:\Demo>zipdump.py -y contains_pe_file.yara example.zip
Index Filename     Decoder YARA namespace        YARA rule
    1 Dialog42.exe         contains_pe_file.yara Contains_PE_File

In this example, you use YARA rule contains_pe_file.yara to find PE files
(executables) inside ZIP files. The rule triggered for file 1, because it
contains an EXE file.

If you want more information about what was detected by the YARA rule, use
option --yarastrings like in this example:
C:\Demo>zipdump.py -y contains_pe_file.yara --yarastrings example.zip
Index Filename     Decoder YARA namespace        YARA rule
    1 Dialog42.exe         contains_pe_file.yara Contains_PE_File 000000 $a
4d5a 'MZ'

YARA rule contains_pe_file detects PE files by finding string MZ followed by
string PE at the correct offset (AddressOfNewExeHeader).
The rule looks like this:
rule Contains_PE_File
{
    meta:
        author = "Didier Stevens (https://DidierStevens.com)"
        description = "Detect a PE file inside a byte sequence"
        method = "Find string MZ followed by string PE at the correct offset
(AddressOfNewExeHeader)"
    strings:
        $a = "MZ"
    condition:
        for any i in (1..#a): (uint32(@a[i] + uint32(@a[i] + 0x3C)) ==
0x00004550)
}

To deal with encoded files, zipdump supports decoders. A decoder is a type of
plugin, that will bruteforce a type of encoding on each file. For example,
decoder_xor1 will encode each file via XOR and a key of 1 byte. So
effectively, 256 different encodings of the file will be scanned by the YARA
rules. 256 encodings because: XOR key 0x00, XOR key 0x01, XOR key 0x02, ...,
XOR key 0xFF
Here is an example:
C:\Demo>zipdump.py -y contains_pe_file.yara -C decoder_xor1 example.zip
Index Filename            Decoder             YARA namespace        YARA rule
    1 Dialog42.exe                            contains_pe_file.yara
Contains_PE_File
    3 Dialog42.exe.XORx14 XOR 1 byte key 0x14 contains_pe_file.yara
Contains_PE_File

The YARA rule triggers on file 3. It contains a PE file encoded via XORing
each byte with key 0x14.

You can specify more than one decoder separated by a comma ,.
C:\Demo>zipdump.py -y contains_pe_file.yara -C
decoder_xor1,decoder_rol1,decoder_add1 example.zip

Some decoders take options, to be provided with option --decoderoptions.

Use option -v to have verbose error messages when debugging your decoders.

Option -c (--cut) allows for the partial selection of a file. Use this option
to "cut out" part of the file.
The --cut option takes an argument to specify which section of bytes to select
from the file. This argument is composed of 2 terms separated by a colon (:),
like this:
termA:termB
termA and termB can be:
- nothing (an empty string)
- a positive decimal number; example: 10
- an hexadecimal number (to be preceded by 0x); example: 0x10
- a case sensitive string to search for (surrounded by square brackets and
single quotes); example: ['MZ']
- an hexadecimal string to search for (surrounded by square brackets);
example: [d0cf11e0]
If termA is nothing, then the cut section of bytes starts with the byte at
position 0.
If termA is a number, then the cut section of bytes starts with the byte at
the position given by the number (first byte has index 0).
If termA is a string to search for, then the cut section of bytes starts with
the byte at the position where the string is first found. If the string is not
found, the cut is empty (0 bytes).
If termB is nothing, then the cut section of bytes ends with the last byte.
If termB is a number, then the cut section of bytes ends with the byte at the
position given by the number (first byte has index 0).
When termB is a number, it can have suffix letter l. This indicates that the
number is a length (number of bytes), and not a position.
termB can also be a negative number (decimal or hexademical): in that case the
position is counted from the end of the file. For example, :-5 selects the
complete file except the last 5 bytes.
If termB is a string to search for, then the cut section of bytes ends with
the last byte at the position where the string is first found. If the string
is not found, the cut is empty (0 bytes).
No checks are made to assure that the position specified by termA is lower
than the position specified by termB. This is left up to the user.
Search string expressions (ASCII and hexadecimal) can be followed by an
instance (a number equal to 1 or greater) to indicate which instance needs to
be taken. For example, ['ABC']2 will search for the second instance of string
'ABC'. If this instance is not found, then nothing is selected.
Search string expressions (ASCII and hexadecimal) can be followed by an offset
(+ or - a number) to add (or substract) an offset to the found instance. For
example, ['ABC']+3 will search for the first instance of string 'ABC' and then
select the bytes after ABC (+ 3).
Finally, search string expressions (ASCII and hexadecimal) can be followed by
an instance and an offset.
Examples:
This argument can be used to dump the first 256 bytes of a PE file located
inside the file: ['MZ']:0x100l
This argument can be used to dump the OLE file located inside the file:
[d0cf11e0]:
When this option is not used, the complete file is selected.