I experienced delays in Excel whenever I would copy/paste some cells, like this:
A delay of 1 to several seconds was clearly noticeable and inconvenient.
I started to review what had recently changed on my Windows computer. Turns out this was caused by a printer setting: I had recently set a default printer (a network printer), and whenever that printer was not online, I would experience the delay.
I removed that setting and no longer have the copy/paste delay.
Here are the tools I used to conduct my “Bytes over DNS” tests.
On the server side, I start my dnsresolver.py program with the following custom script:
LOGFILENAME = 'bod-dnsresolver-test.log'

def BoDTest(request, reply, dCommand):
    if request.q.qtype == dnslib.QTYPE.A:
        if len(request.q.qname.label[2]) == 1 and int(request.q.qname.label[1].decode(), 16) == ord(request.q.qname.label[2]):
            with open(LOGFILENAME, 'a') as fOut:
                print(f'BYTE_EQUAL {request.q.qname.label[1]} {request.q.qname.label[2]}', file=fOut)
            qname = request.q.qname
            answer = '. 60 IN A 127.0.0.1'
            for rr in dnslib.RR.fromZone(answer):
                a = copy.copy(rr)
                a.rname = qname
                reply.add_answer(a)
            return False, None
        else:
            with open(LOGFILENAME, 'a') as fOut:
                print(f'BYTE_DIFFERENT {request.q.qname.label[1]} {request.q.qname.label[2]}', file=fOut)
    return True, None
Start it as follows: dnsresolver.py -s bod-dnsresolver-test.py type=resolve,label=bytes,function=BoDTest
And make sure your DNS glue records (e.g., for mydomain.com) point to your server.
Then you can do a small test: nslookup bytes.3D.=.mydomain.com.
This will return 127.0.0.1 when the request arrives unaltered, and NXDOMAIN when it is altered. The BoDTest function will also log the results in text file bod-dnsresolver-test.log.
Then, on your workstation, you can run the following script to test all bytes values in the DNS request via the API of your OS:
#!/usr/bin/env python3

import socket
import sys

DOMAIN = '.mydomain.com.'

def DNSResolveA(char: int):
    hostname_ascii = 'bytes.%02x.%s' % (char, chr(char)) + DOMAIN
    hostname_ascii = hostname_ascii.replace('\\', '\\\\')
    print(hostname_ascii)
    try:
        results = socket.getaddrinfo(hostname_ascii, None, family=socket.AF_INET, type=0, proto=0, flags=socket.AI_CANONNAME)
    except socket.gaierror as e:
        print(f"Resolution failed: {e}")
        return 1
    except UnicodeError as e:
        print(f"Resolution failed: {e}")
        return 1

    if not results:
        print("No results returned by getaddrinfo.")
        return 0

    # Collect canonical name (may be empty) and addresses
    canon_names = set()
    addresses = []
    for res in results:
        family, socktype, proto, canonname, sockaddr = res
        if canonname:
            canon_names.add(canonname)
        # sockaddr is a tuple; for IPv4 it's (addr, port), for IPv6 it's (addr, port, flowinfo, scopeid)
        ip = sockaddr[0]
        addresses.append((family, ip))

    if canon_names:
        print("Canonical name(s):")
        for cn in sorted(canon_names):
            print("  -", cn)
        print()

    # Deduplicate and group by family
    unique_ips = {}
    for fam, ip in addresses:
        fam_name = "IPv4" if fam == socket.AF_INET else ("IPv6" if fam == socket.AF_INET6 else str(fam))
        unique_ips.setdefault(fam_name, set()).add(ip)

    for fam_name in sorted(unique_ips.keys()):
        print(f"{fam_name} addresses ({len(unique_ips[fam_name])}):")
        for ip in sorted(unique_ips[fam_name]):
            print("  -", ip)
    print()

    # Optionally, try reverse DNS for each IP (may be slow / not always available)
    print("Reverse DNS (PTR) lookups:")
    for fam_name, ips in unique_ips.items():
        for ip in sorted(ips):
            try:
                host, aliases, _ = socket.gethostbyaddr(ip)
                print(f"  {ip} -> {host}")
            except Exception as e:
                print(f"  {ip} -> (no PTR)  [{e}]")

    return 0

if __name__ == "__main__":
    for char in range(256):
        DNSResolveA(char)
Use this script to perform the tests via the dnspython/dns.resolver Python module:
import dns.resolver

resolver = dns.resolver.Resolver()
DOMAIN = b'.mydomain.com.'

#resolver.nameservers = ['127.0.0.1']
#resolver.nameservers = ['1.1.1.1']
resolver.nameservers = ['8.8.8.8']

for i in range(256):
    if i == 0x2E:
        continue
    if i == 0x5C:
        byte = b'\\\\'
    else:
        byte = bytes([i])
    try:
        answer = resolver.resolve(((b'bytes.%02x.%s' + DOMAIN) % (i, byte)).decode('latin'), "A")
        for rdata in answer:
            print(i, rdata.to_text())
    except (dns.name.LabelTooLong, dns.resolver.NXDOMAIN) as e:
        print(i, e)
And use this script to perform the tests by crafting your own DNS packets:
import socket

DOMAIN = b'mydomain.com.'
DNS = '1.1.1.1'
DNS = '8.8.8.8'

def send_udp_payload(data: bytes, target_ip: str, port: int = 53) -> None:
    """
    Send raw binary data via UDP to a target IP and port (default 53).

    :param data: The binary payload to send (must be bytes).
    :param target_ip: The destination IP address (string).
    :param port: Destination UDP port (default = 53).
    """
    # Create UDP socket
    sock = socket.socket(socket.AF_INET, socket.SOCK_DGRAM)
    try:
        sock.sendto(data, (target_ip, port))
        print(f"Sent {len(data)} bytes to {target_ip}:{port}")
    except Exception as e:
        print(f"Error sending data: {e}")
    finally:
        sock.close()

def DNSEncodeDomain(domain):
    labels = domain.split(b'.')
    if labels[-1] != b'':
        labels.append(b'')
    data = bytearray()
    for label in labels:
        data += bytes([len(label)])
        data += label
    return data

data = bytearray([0x88, 0xea, 0x01, 0x00, 0x00, 0x01, 0x00, 0x00, 0x00, 0x00, 0x00, 0x00, 0x05, 0x62, 0x79, 0x74, 0x65, 0x73, 0x02, 0x32, 0x65, 0x01, 0x2e]) + DNSEncodeDomain(DOMAIN) + bytearray([0x00, 0x01, 0x00, 0x01])

for i in range(256):
    data[1] = i
    data[22] = i
    hexvalue = b'%02x' % i
    data[19:21] = hexvalue
    print(data)
    send_udp_payload(data, DNS)
This is a new tool that I use for IPv4 operations, like generating a list of CIDRs based on ASNs, checking if IPv4 addresses are members of CIDRs, …
Here is the man page:
Usage: myipaddress.py [options] command ...
IP address tool

Arguments:
@file: process each file listed in the text file specified
wildcards are supported

Source code put in the public domain by Didier Stevens, no Copyright
Use at your own risk
https://DidierStevens.com

Options:
  --version             show program's version number and exit
  -h, --help            show this help message and exit
  -m, --man             Print manual
  -u, --uniques         Remove duplicates
  -s, --sort            Sort
  -q, --quiet           Quiet
  -o OUTPUT, --output=OUTPUT
                        Output to file (# supported)
  -v, --invert          Invert selection
  -e, --extra           Include extra info

Manual:

4 commands are available: cidr2ip, asn2cidr, ipincidr and aso2cidr.


Command cidr2ip is used to generate IPv4 addresses for the given
CIDRs.

Example: myipaddress.py cidr2ip 192.168.0.0/24 10.10.10.0/30

Option -u (--unique) will remove all duplicates from the generated
list.

Option -s (--sort) will sort the list.


Command asn2cidr is used to generate a list of IPv4 CIDRs for the
given ASNs (autonomous system numbers).

Example: myipaddress.py asn2cidr 100 1234

Output:
100: 12.30.153.0/24 74.123.89.0/24 102.210.158.0/24 192.118.48.0/24
198.180.4.0/22 199.36.118.0/24 199.48.212.0/22 216.225.27.0/24
1234: 132.171.0.0/16 137.96.0.0/16 193.110.32.0/21

Option -q (--quiet) will produce a simple list of CIDRs, nothing more.

Example: myipaddress.py -q asn2cidr 1234

Output:
132.171.0.0/16
137.96.0.0/16
193.110.32.0/21

Option -u (--unique) will remove all duplicates from the generated
list.

This command requires CSV file GeoLite2-ASN-Blocks-IPv4.csv to be
present in the same folder as script myipaddress.py.
See below for more info.


Command ipincidr is used to generate a list of IPv4 addresses for the
text files.

The text files either contain a list of IPv4 addresses or a list of
IPv4 CIDRs (it can actually be a mix of both in the same file).
Then the command will produce a list for the given IPv4 addresses that
are contained in the given CIDRs.
If a line of the text file contains a / character, it is interpreted
as a CIDR, otherwise it is interpreted as a IPv4 address.
CIDRs can also be followed by an ASO with the tab character as
separator.

Example: myipaddress.py ipincidr cidrs.txt ipv4s.txt

Option -v (--inverse) will invert the logic: all given IPv4 addresses
that are NOT contained in the GIVEN CIDRs are listed.


Command aso2cidr is used to generate a list of IPv4 CIDRs for the
given ASOs substrings (autonomous system organisations).

Example: myipaddress.py aso2cidr sans-institute

Output:
SANS-INSTITUTE: 66.35.60.0/24 104.193.44.0/24

Example: myipaddress.py aso2cidr sans-institute amadeus

Output:
SANS-INSTITUTE: 66.35.60.0/24 104.193.44.0/24
Amadeus Data Processing GmbH: 82.150.224.0/21 82.150.248.0/23
168.153.3.0/24 168.153.4.0/22 168.153.8.0/23 168.153.32.0/22
168.153.40.0/22 168.153.64.0/22 168.153.96.0/24 168.153.106.0/24
168.153.109.0/24 168.153.110.0/23 168.153.144.0/22 168.153.160.0/22
171.17.128.0/18 171.17.255.0/24 185.165.8.0/23 193.23.186.0/24
193.24.37.0/24 195.27.162.0/23 213.70.140.0/24
Amadeus Soluciones Tecnologicas S.A.: 94.142.200.0/21
Amadeus is an international computer reservations system. A subsidary
is in Bangalore and t: 168.153.1.0/24
Amadeus India Pvt.Ltd.: 202.0.109.0/24
Amadeus India: 203.89.132.0/24

Option -q (--quiet) will produce a simple list of CIDRs, nothing more.

Example: myipaddress.py -q aso2cidr sans-institute

Output:
66.35.60.0/24
104.193.44.0/24

Option -e (--extra) will add the ASO (with tab character as
separator).

Example: myipaddress.py -q -e aso2cidr sans-institute

Output:
66.35.60.0/24   SANS-INSTITUTE
104.193.44.0/24 SANS-INSTITUTE

Option -u (--unique) will remove all duplicates from the generated
list.

This command requires CSV file GeoLite2-ASN-Blocks-IPv4.csv to be
present in the same folder as script myipaddress.py.
See below for more info.


File GeoLite2-ASN-Blocks-IPv4.csv can be obtained for free by creating
an account on maxmind.com and then download database known as:
GeoLite ASN: CSV Format
It's a ZIP file that contains file GeoLite2-ASN-Blocks-IPv4.csv.
I recently helped a colleague and friend with the reversing of a network protocol to update an IOT device. As I can’t be more specific for the moment, I created a capture file similar to this network protocol to explain how one can reverse engineer a protocol like this with Wireshark and the Lua dissector I developed.
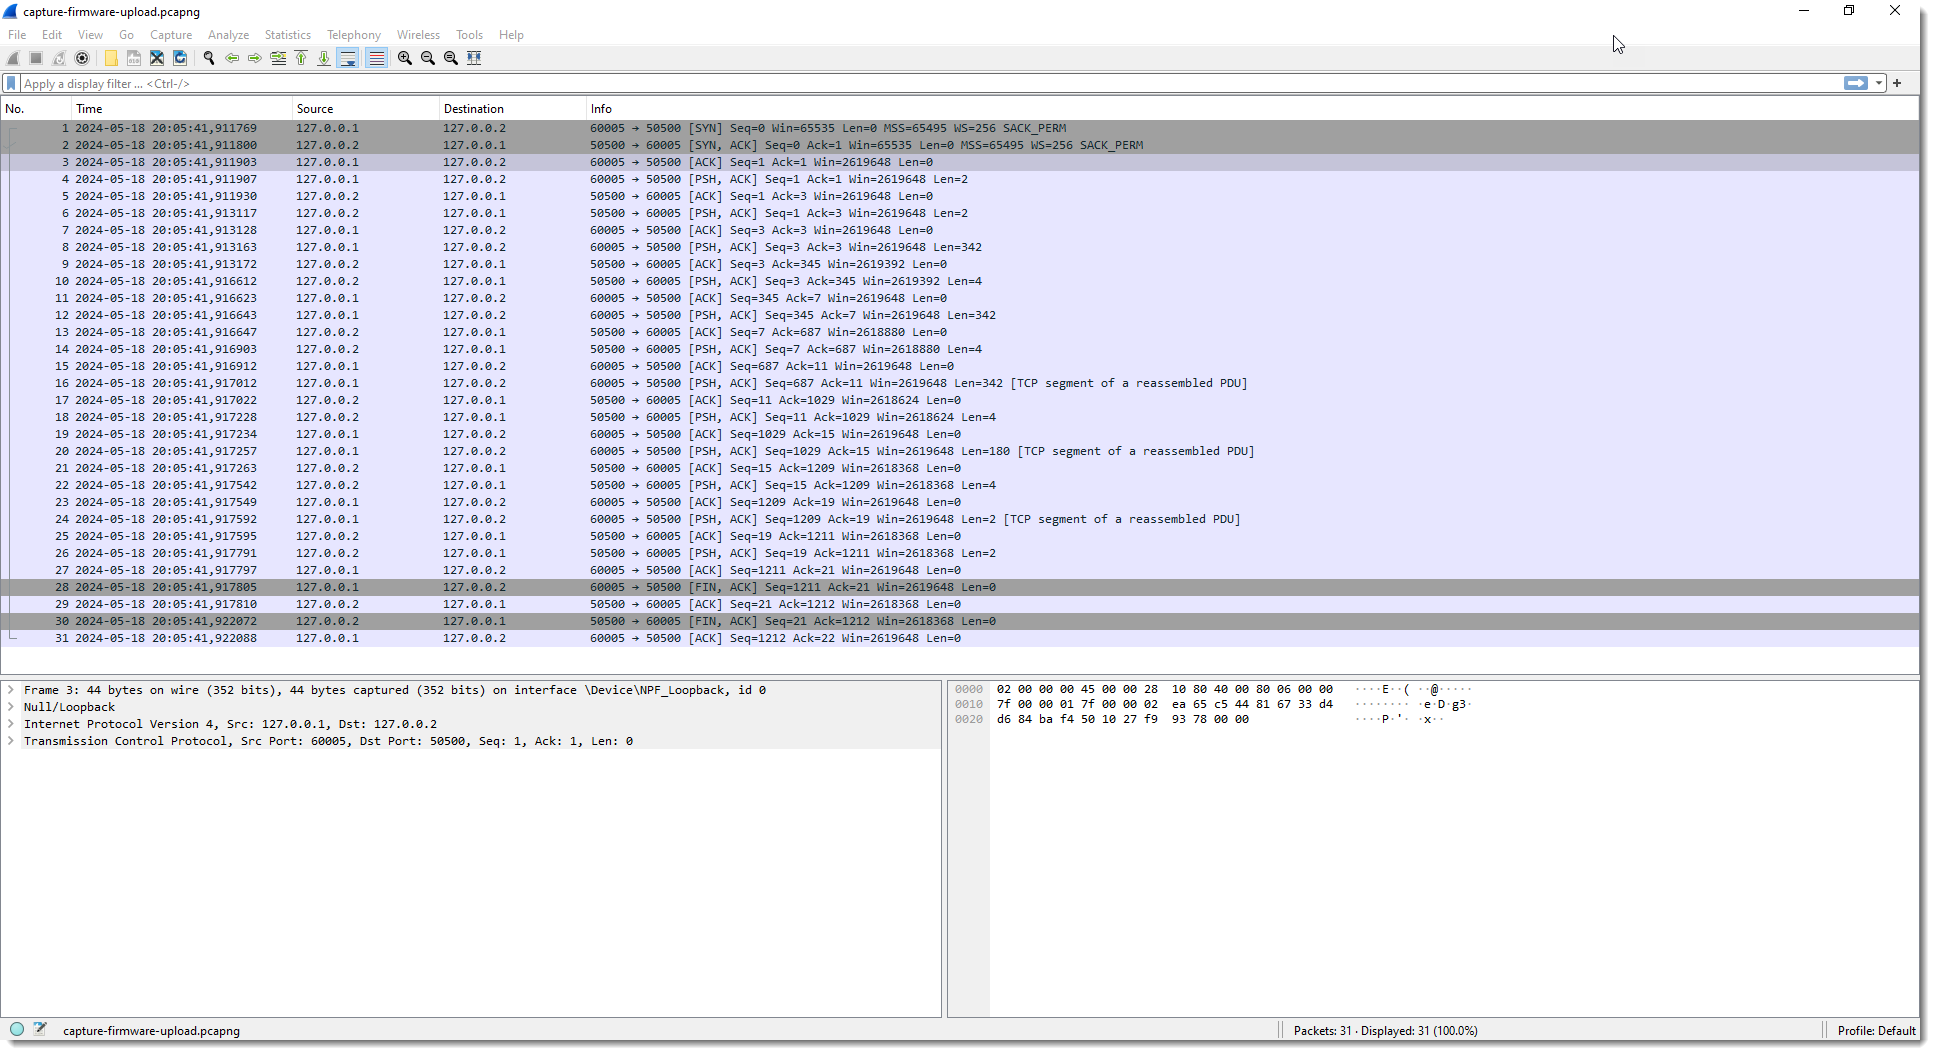
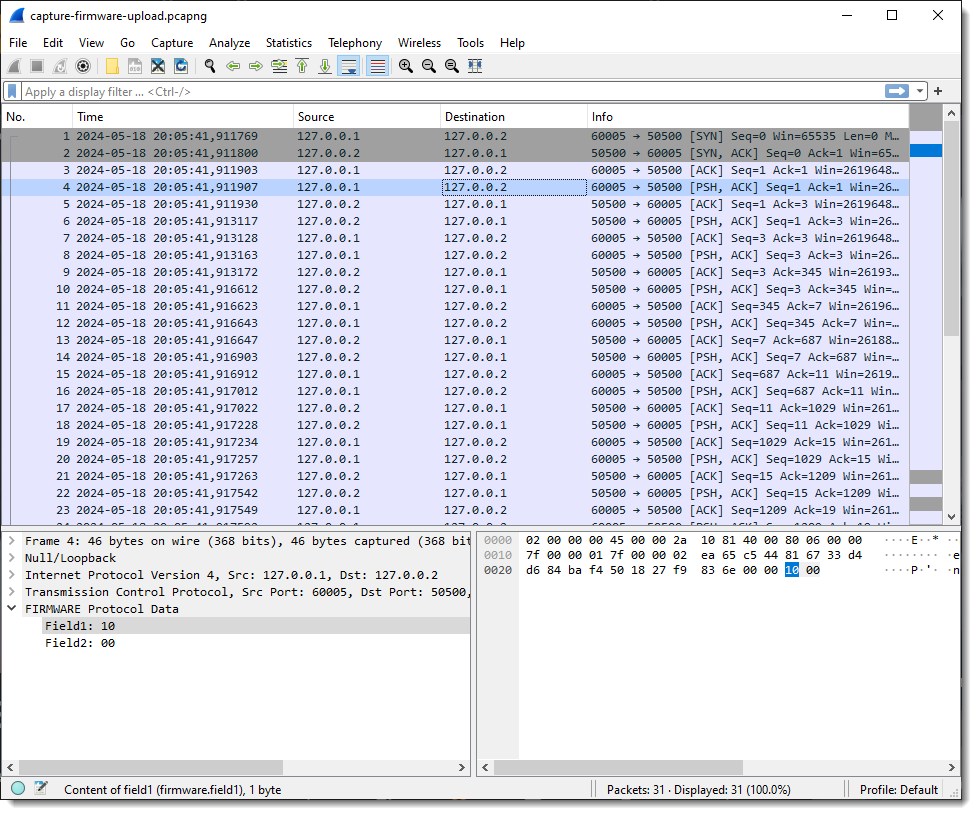
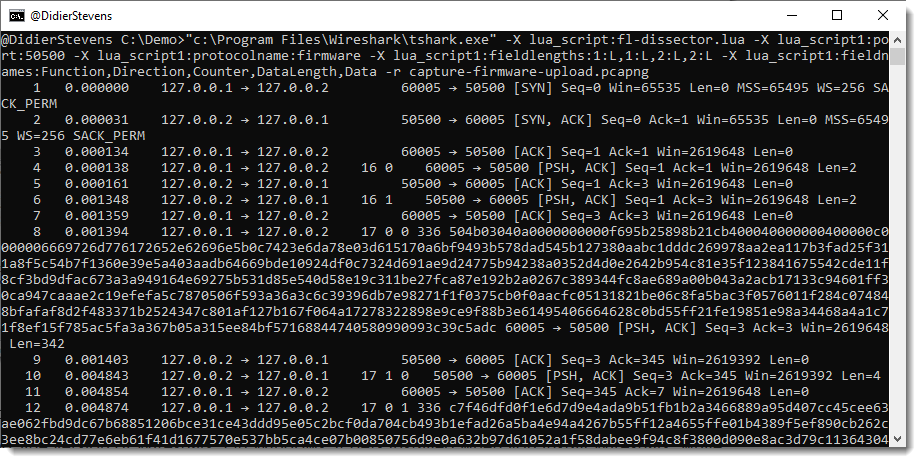
The capture file I created contains TCP traffic to port 50500. The device has IPv4 address 127.0.0.2 and my machine 127.0.0.1.
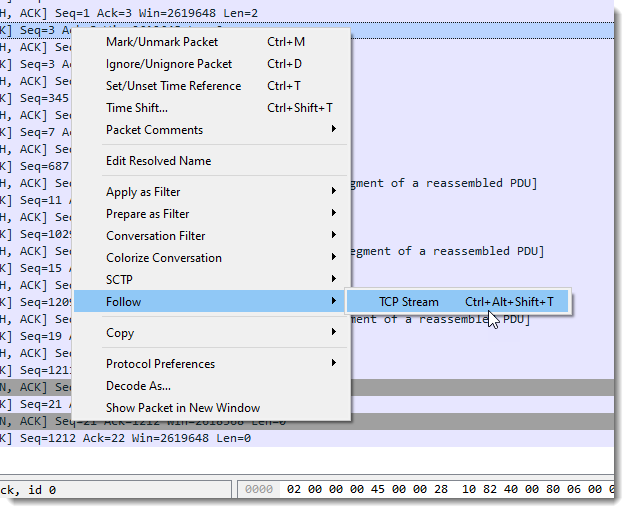
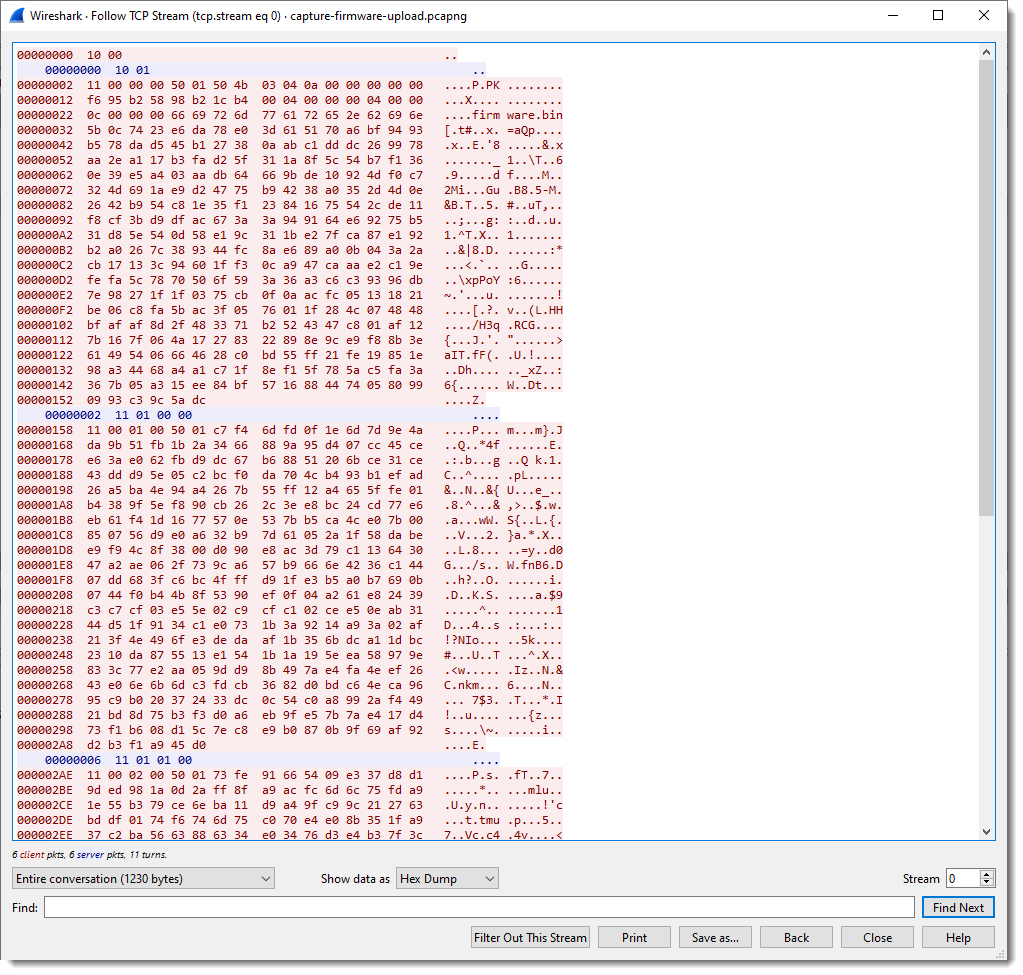
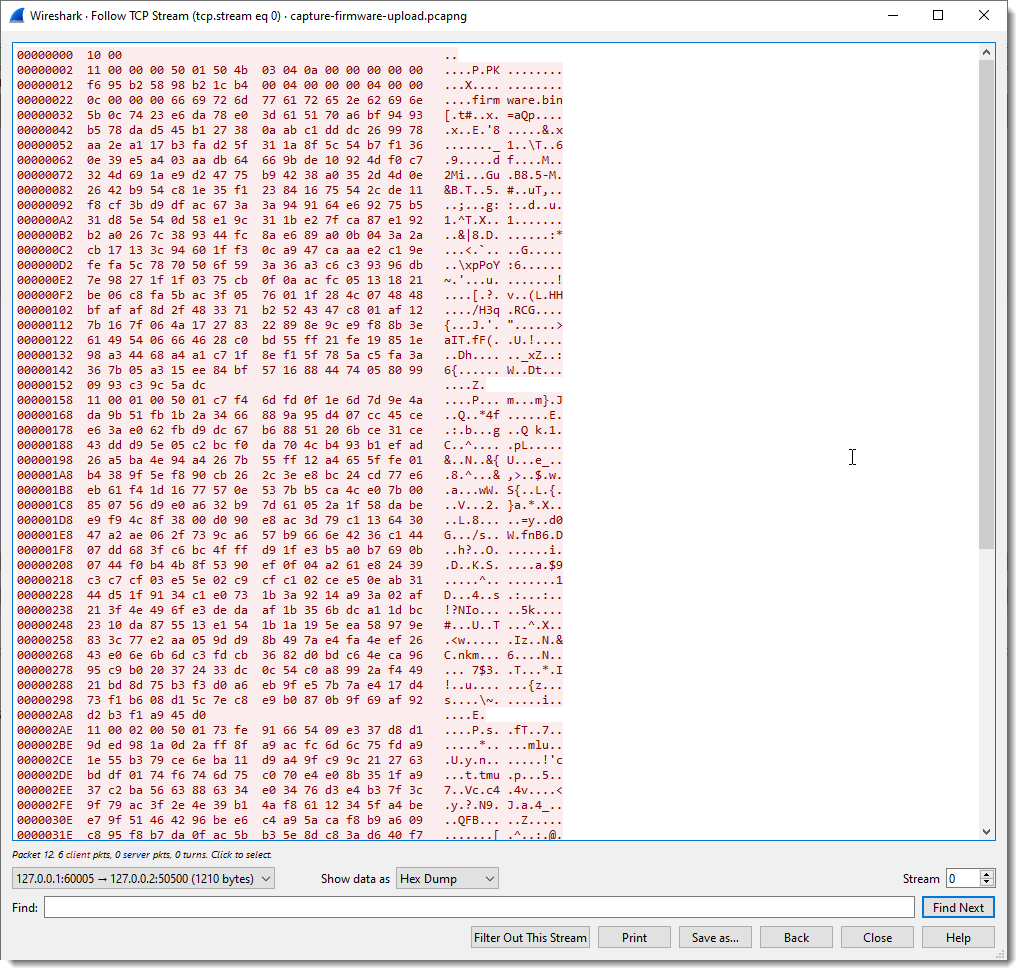
First I perform a TCP follow:
In pink you have the packets sent by the client; the server packets are blue.
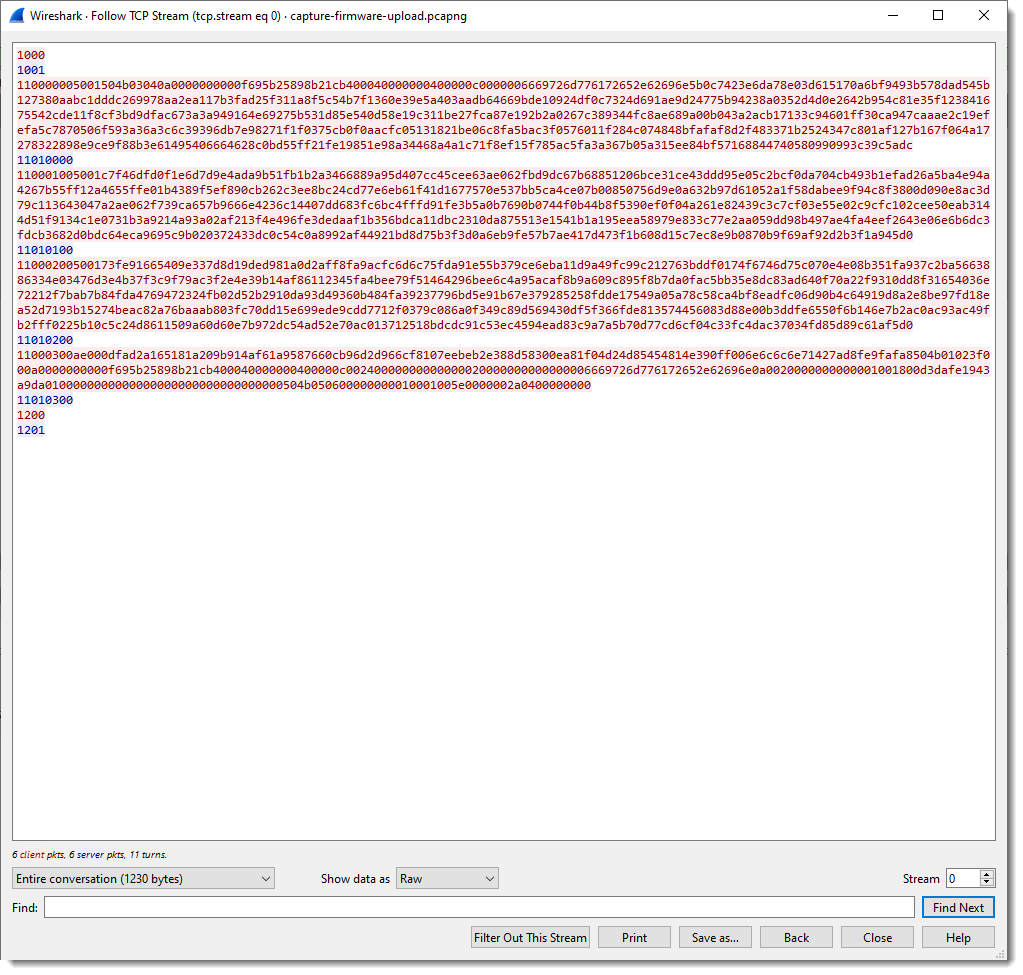
We can apply a filter to see these packets separately:
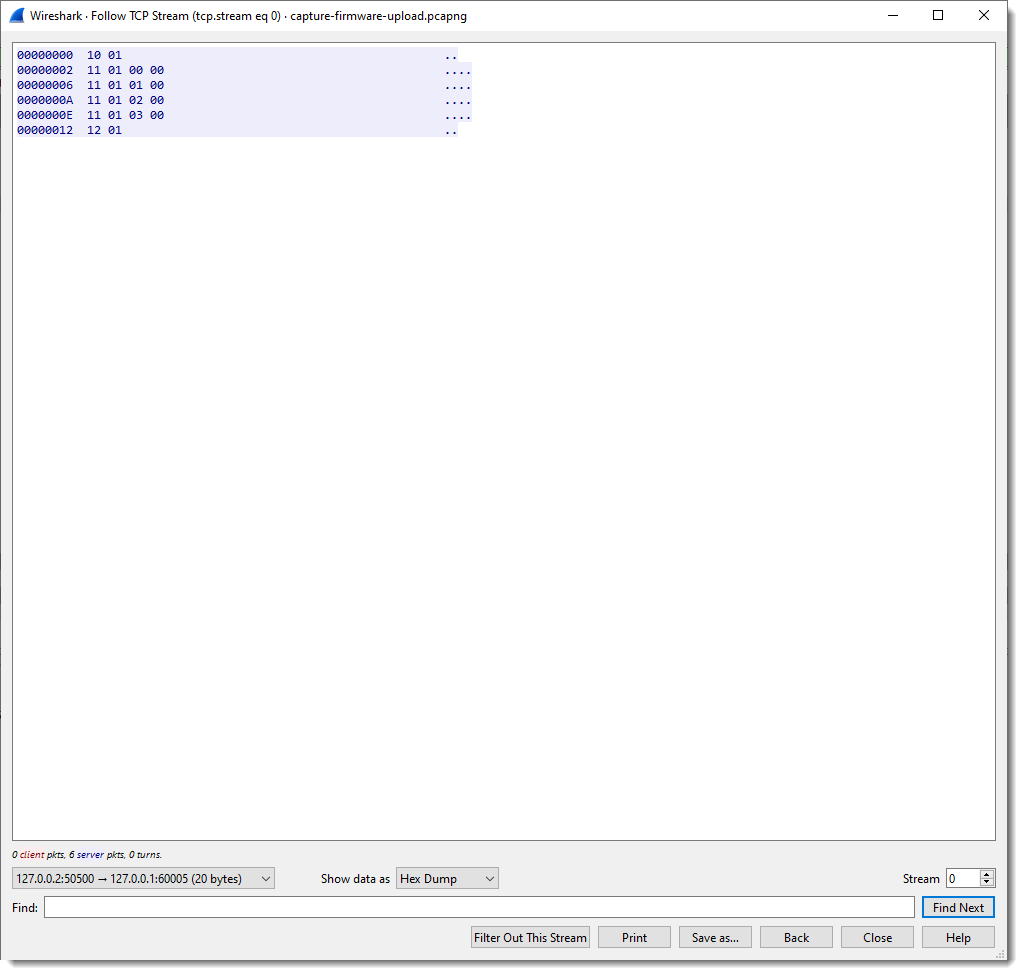
And here is the raw view:
We can see that the client (Windows machine) is sending a lot of data, and that the server (IOT device) sends back packets up to 4 bytes in size.
To facilitate the analysis, it would be useful to have a dissector that splits up the TCP traffic into fields. It’s not necessary to write a custom Wireshark dissector for this, I can use my fixed field length Lua dissector.
One way to load the dissector in Wireshark, is to start Wireshark from the command-line with options to load the dissector:
-X lua_script:fl-dissector.lua loads the dissector when Wireshark starts. The file fl-dissector.lua has to be in the current folder.
I also have to specify the port (50500) for this dissector:
lua_script1:port:50500
Wireshark will only invoke the dissector for TCP traffic coming from or going to the given port. If I don’t provide a port, the hard-coded port number (1234) will be used.
And finally, I provide the name of the capture file: capture-firmware-upload.pcapng
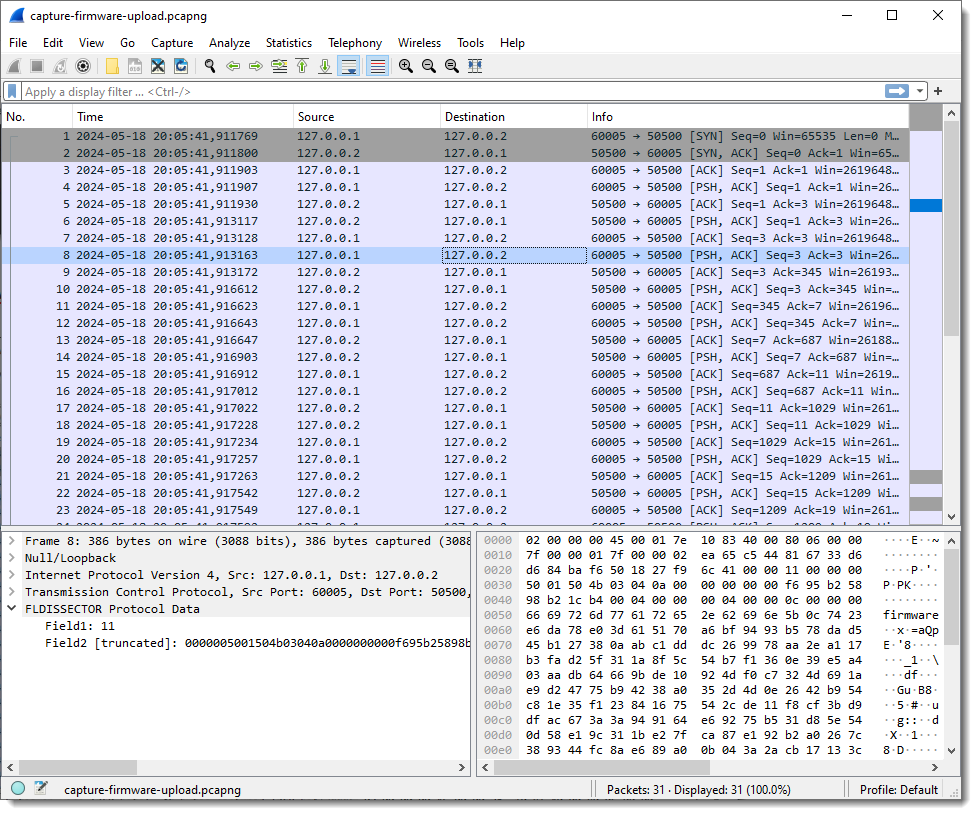
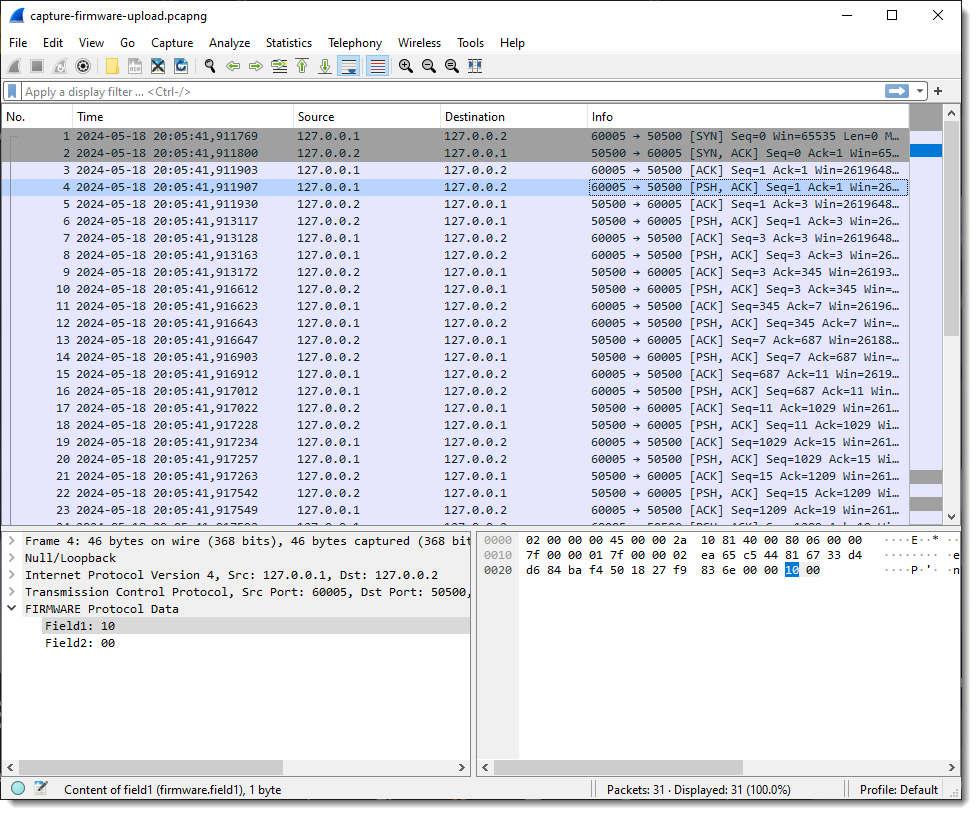
This starts Wireshark and loads the dissector:
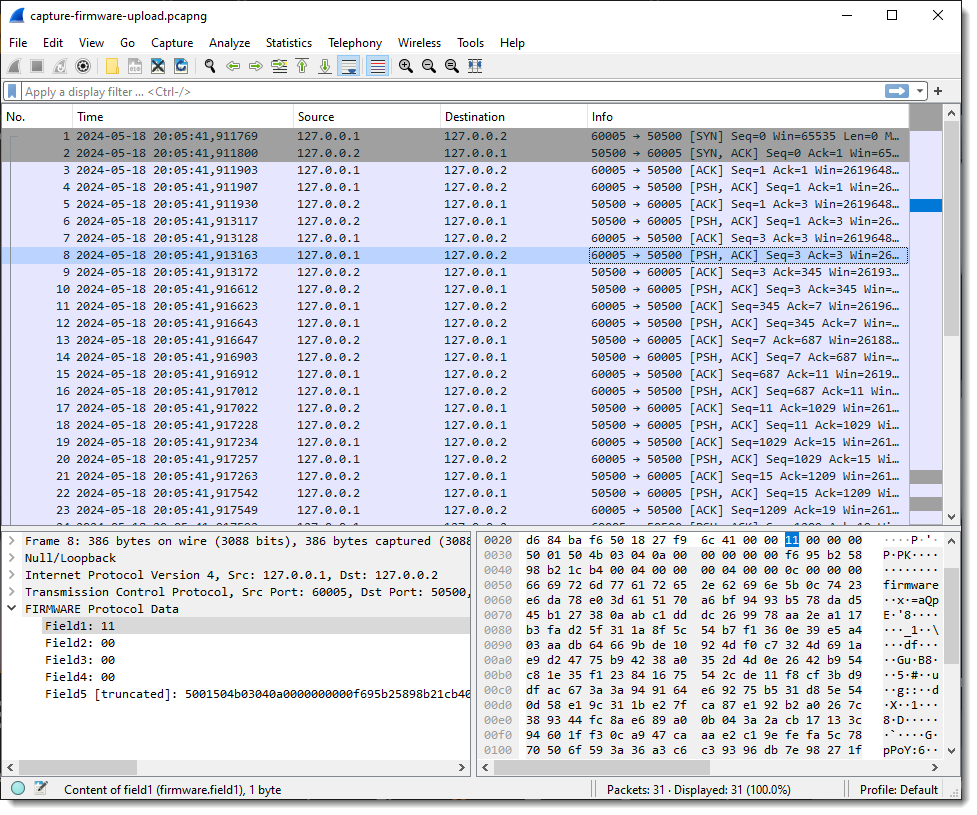
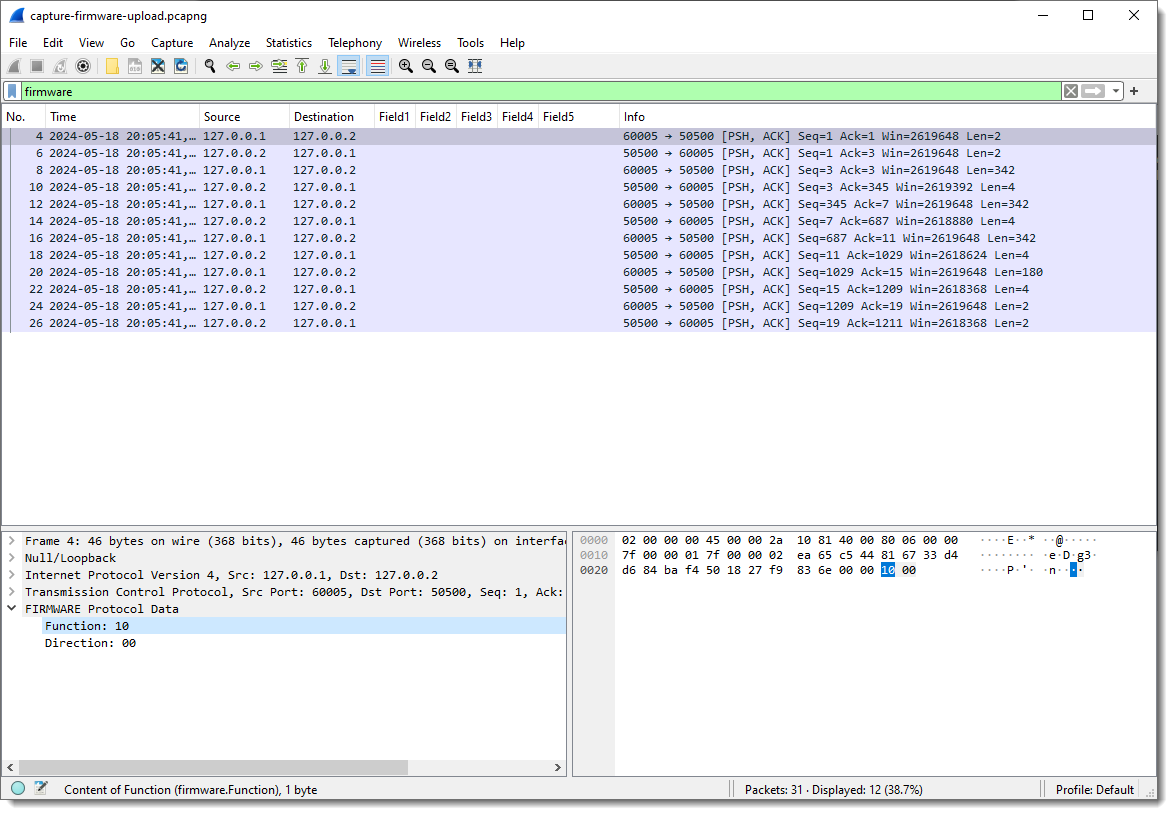
When I select a packet with some traffic of interest, the result of the dissector appears in the Packet Details pane at the bottom of the protocols. Protocol dissector FLDISSECTOR shows two fields: Field1 and Field2. That’s the default field length definition: one field (Field1) of length 1 (1 byte long) and a second field (Field2) with the remaining TCP payload data.
Since I want a more descriptive protocol name, I’m stopping Wireshark and loading it again with an extra argument:
-X lua_script1:protocolname:firmware
Argument protocolname allows me to specify the name of the dissector/protocol:
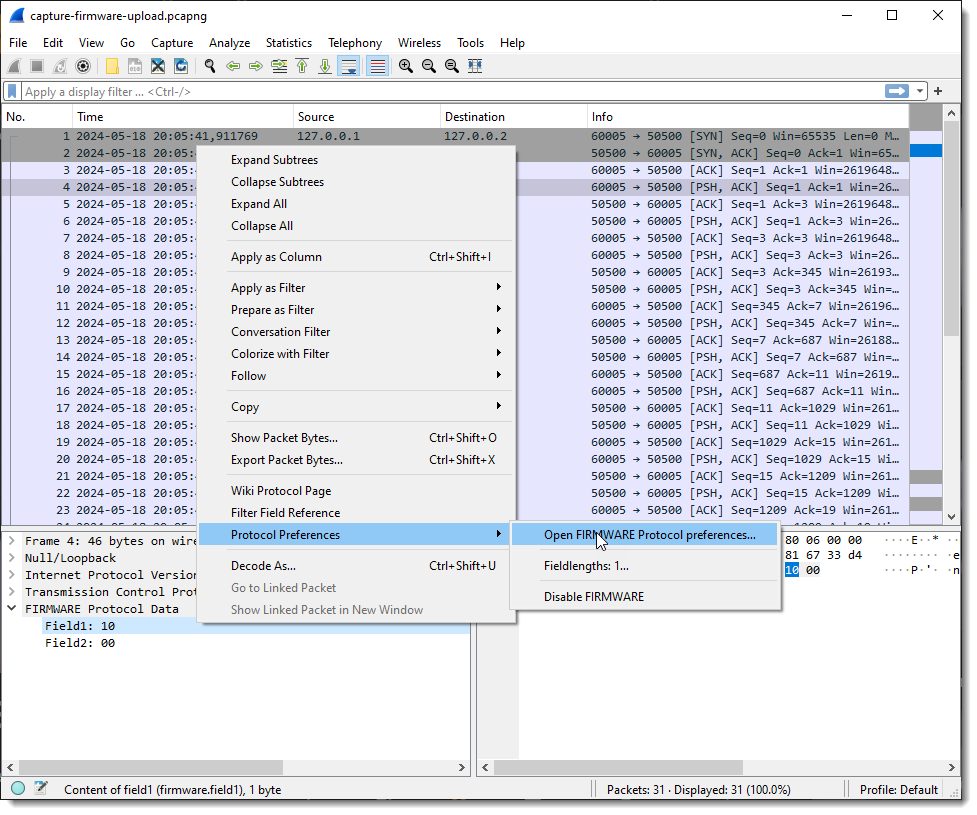
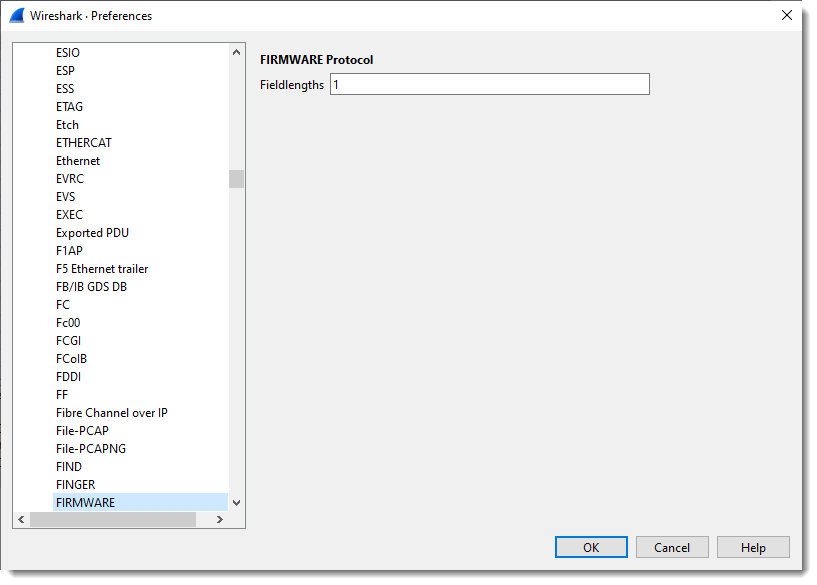
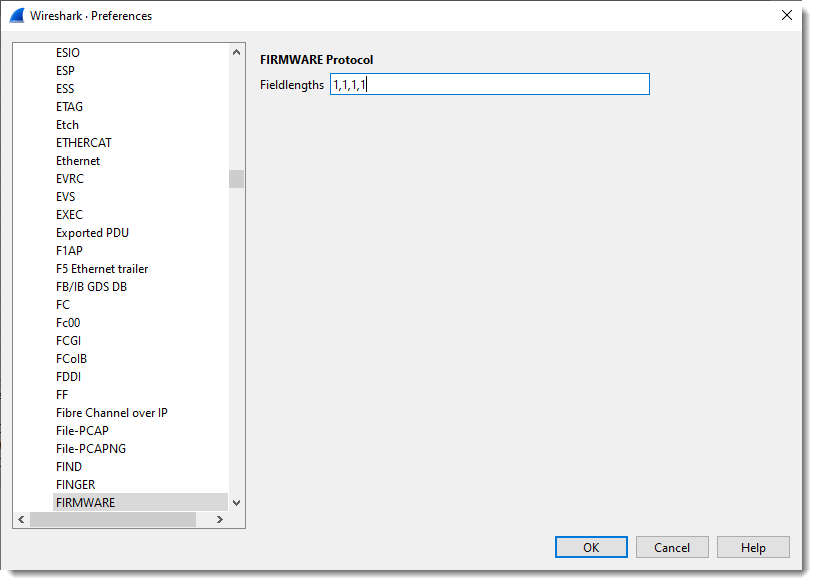
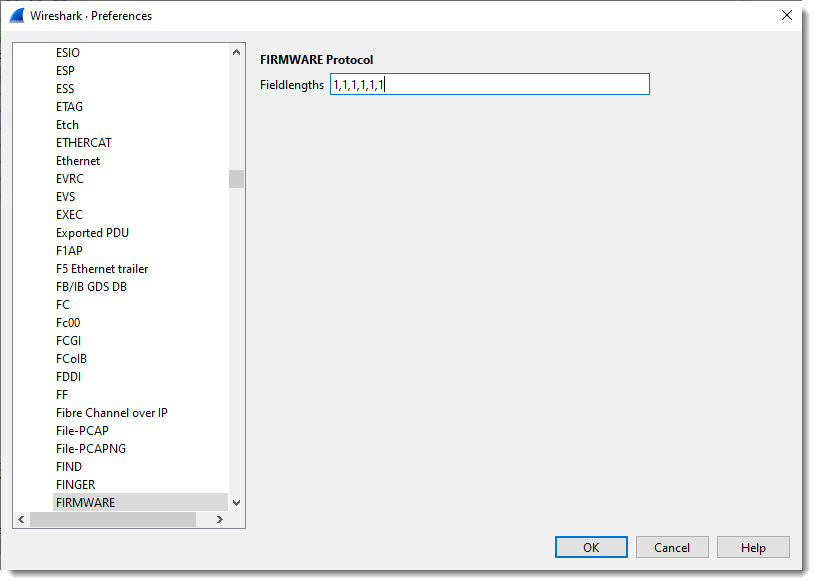
Next, I define the length of the fields with the protocol preferences dialog:
What you see here is “1”: one field with size 1 (1 byte long).
I define 4 fields, each on byte in size:
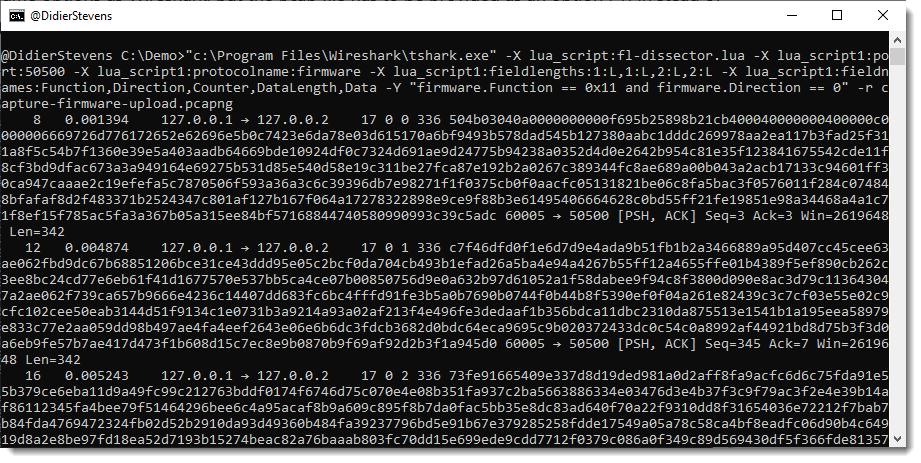
If I select a packet with just 2 bytes of TCP payload, I get 2 fields:
But when I select a packet with more than 4 bytes of TCP payload, I get 5 fields: 4 fields of 1 byte in size, and the last field with the remaining bytes of the TCP payload:
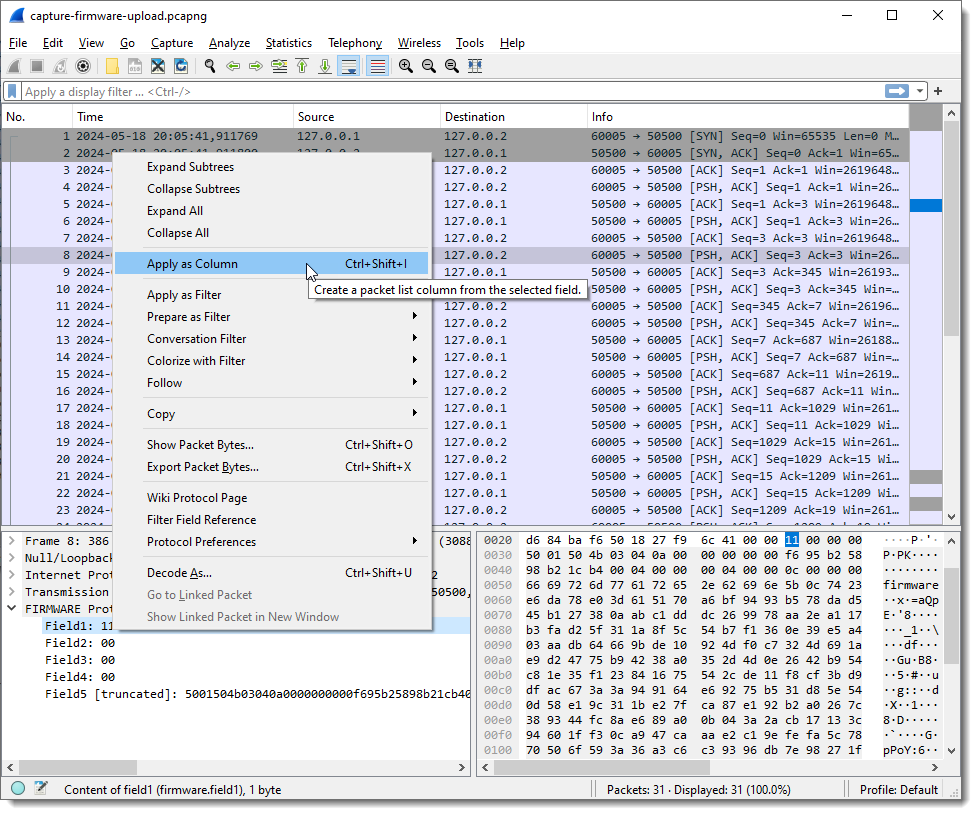
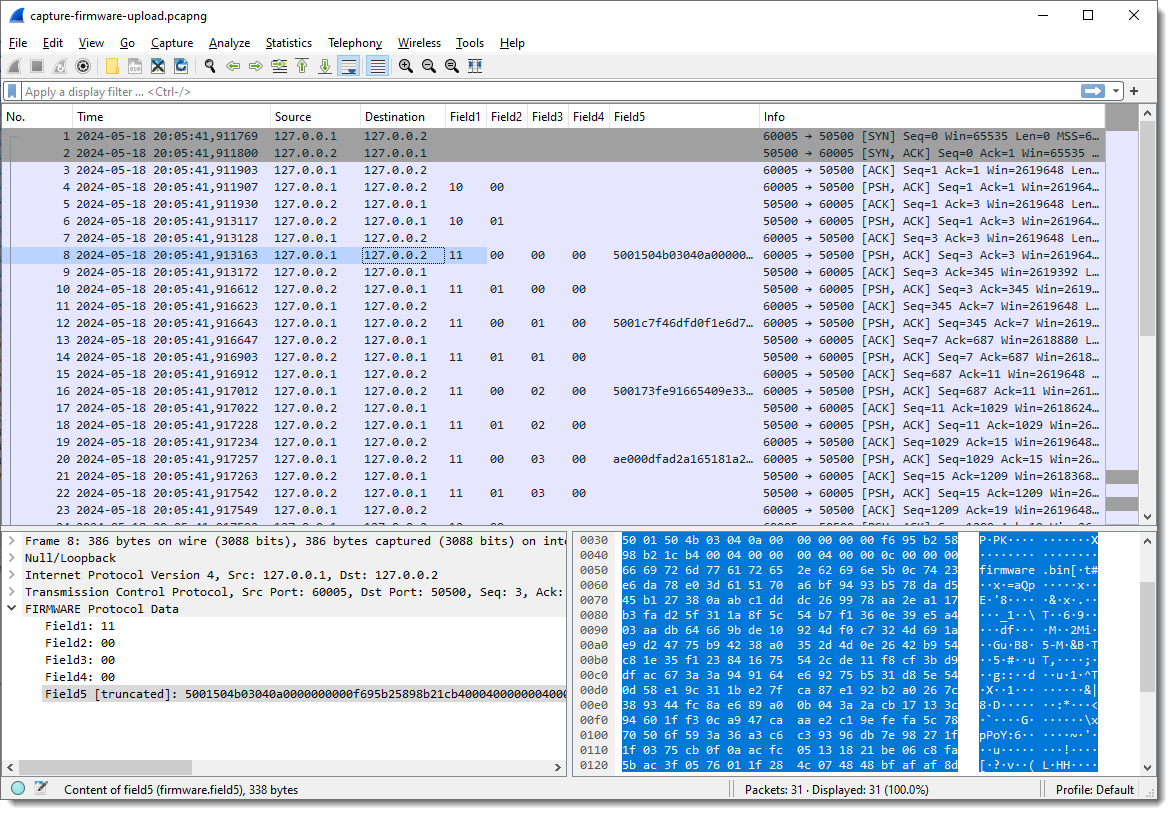
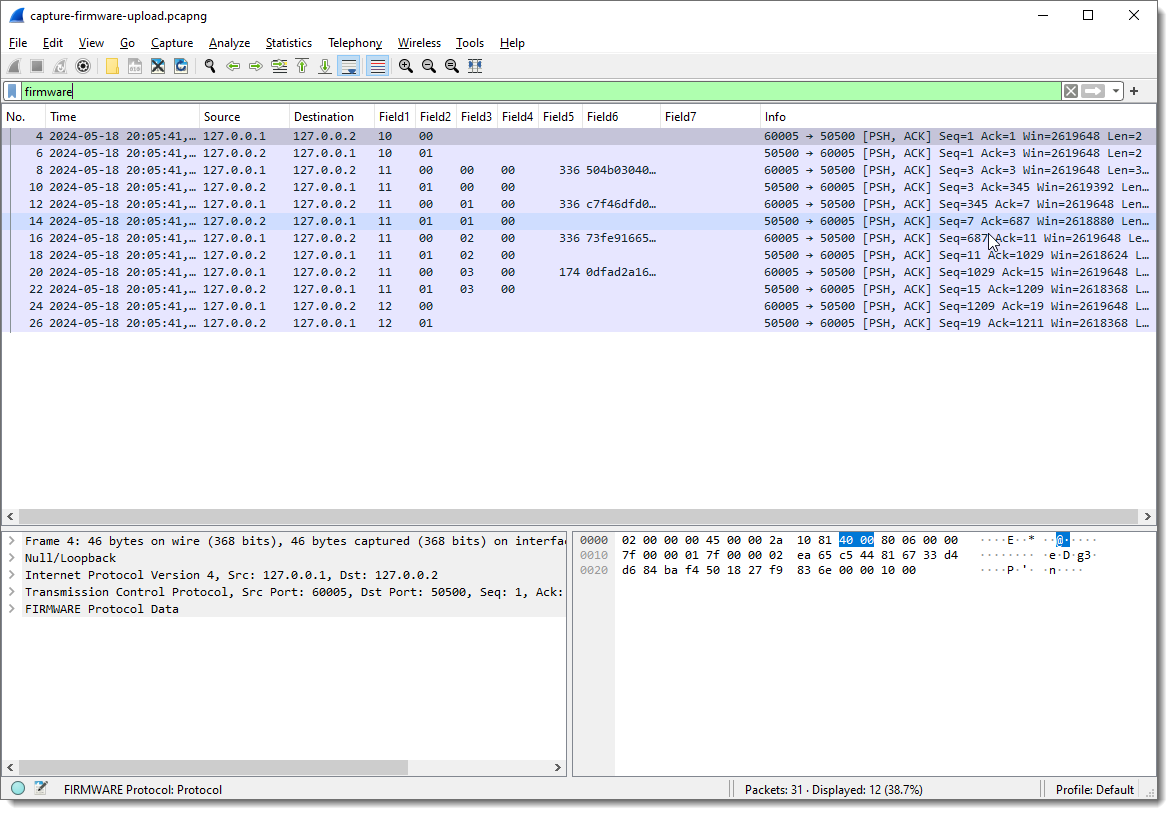
Next, I add each field as a column in the Packet List pane:
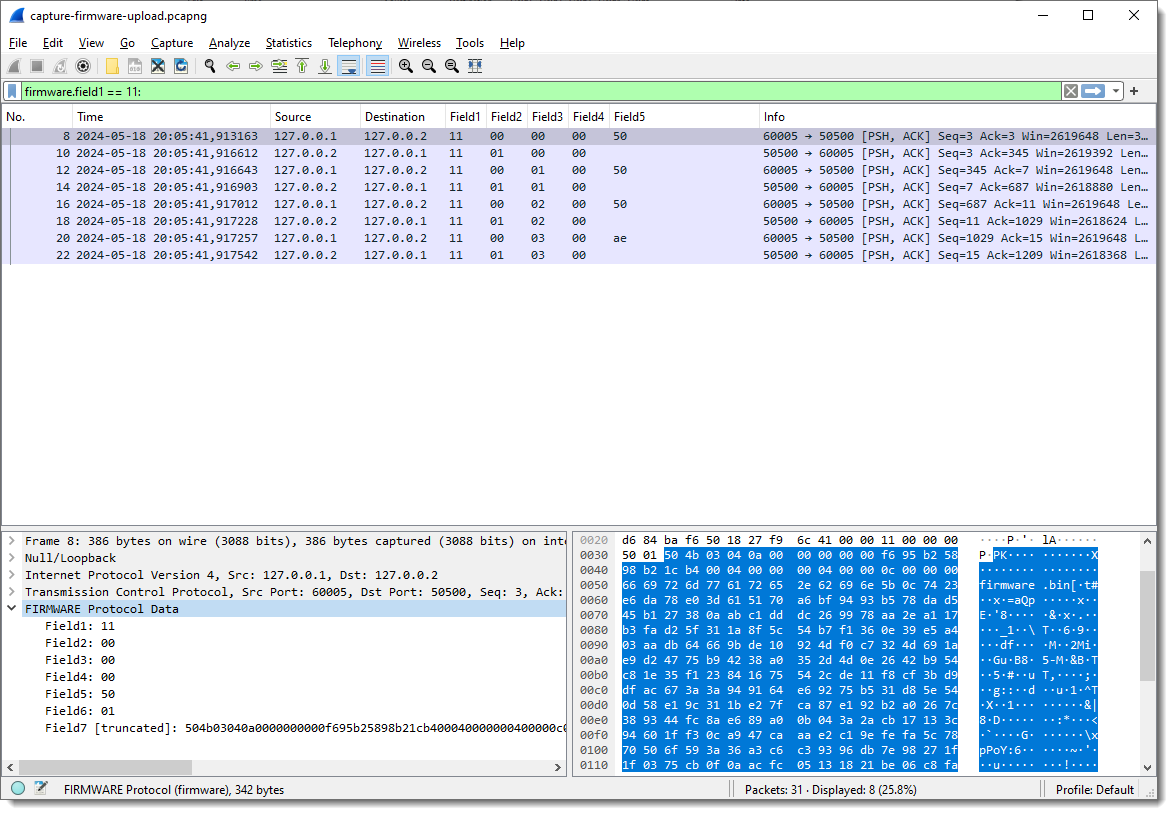
And I apply display filter “firmware” (the name I gave to the protocol I’m reversing) to see only packets with protocol data:
Now I can start to see some patterns.
Field1 has values 10, 11 and 12. Remark that each field’s type is “bytes”, so this is hexadecimal. These are not numbers/integers, but bytes (I can change that later).
Field2 is equal to 00 when the destination is 127.0.0.2 (the “server”), and equal to 01 when the destination is 127.0.0.1.
This can be verified with display filters (useful when there is a lot of data that doesn’t fit the screen like here).
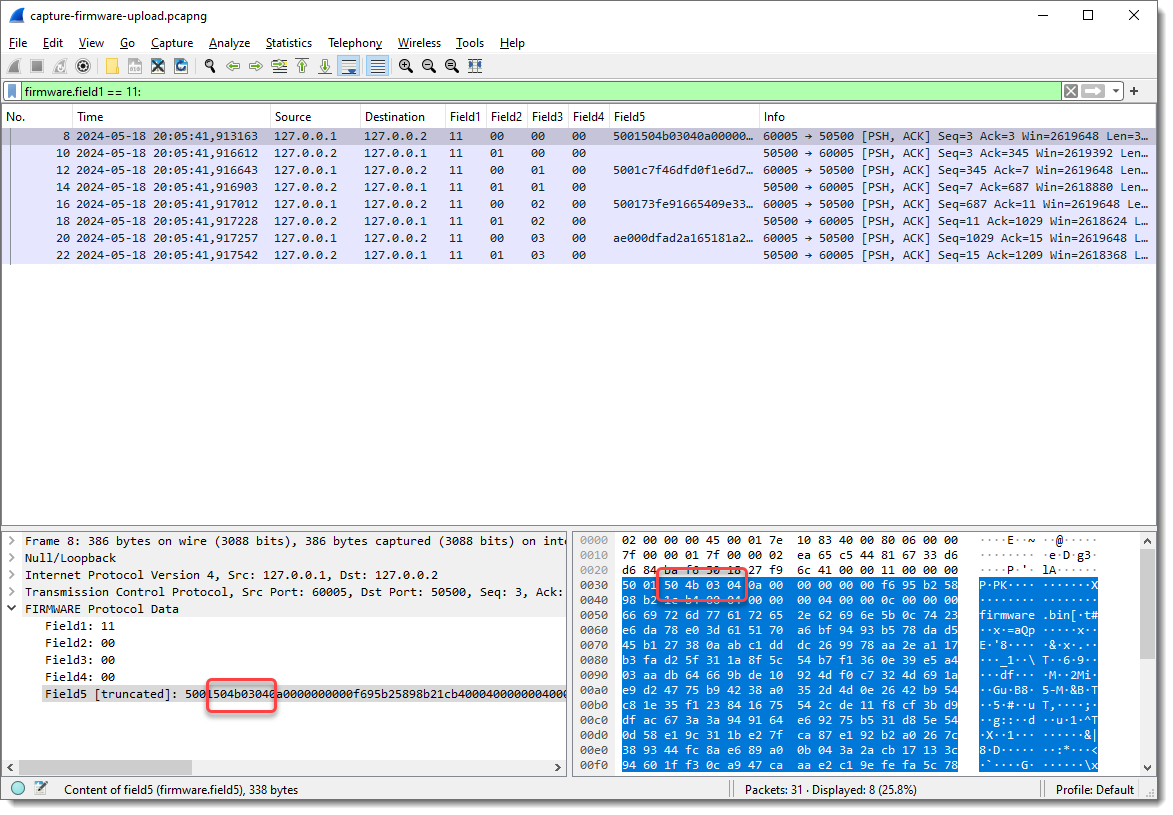
If my assumption is correct, there shouldn’t be any packets with Field1 equal to 00 and destination 127.0.0.1. I confirm this with display filter “firmware.field2 == 00: and ip.dst == 127.0.0.1”:
And there shouldn’t be any packets with Field2 equal to 01 and destination 127.0.0.2. I confirm this with display filter “firmware.field2 == 01: and ip.dst == 127.0.0.2”:
And when Field1 is 10 or 12, no data follows Field2 (Field3 and following are empty). Fields Field3 and following are only populated when Field1 is 11.
This too can be checked with display filters, should there be a lot of data that doesn’t fit on a single screen.
This is one advantage of a prototyping dissector like this one: it allows me to check my assumptions directly in Wireshark with display filters.
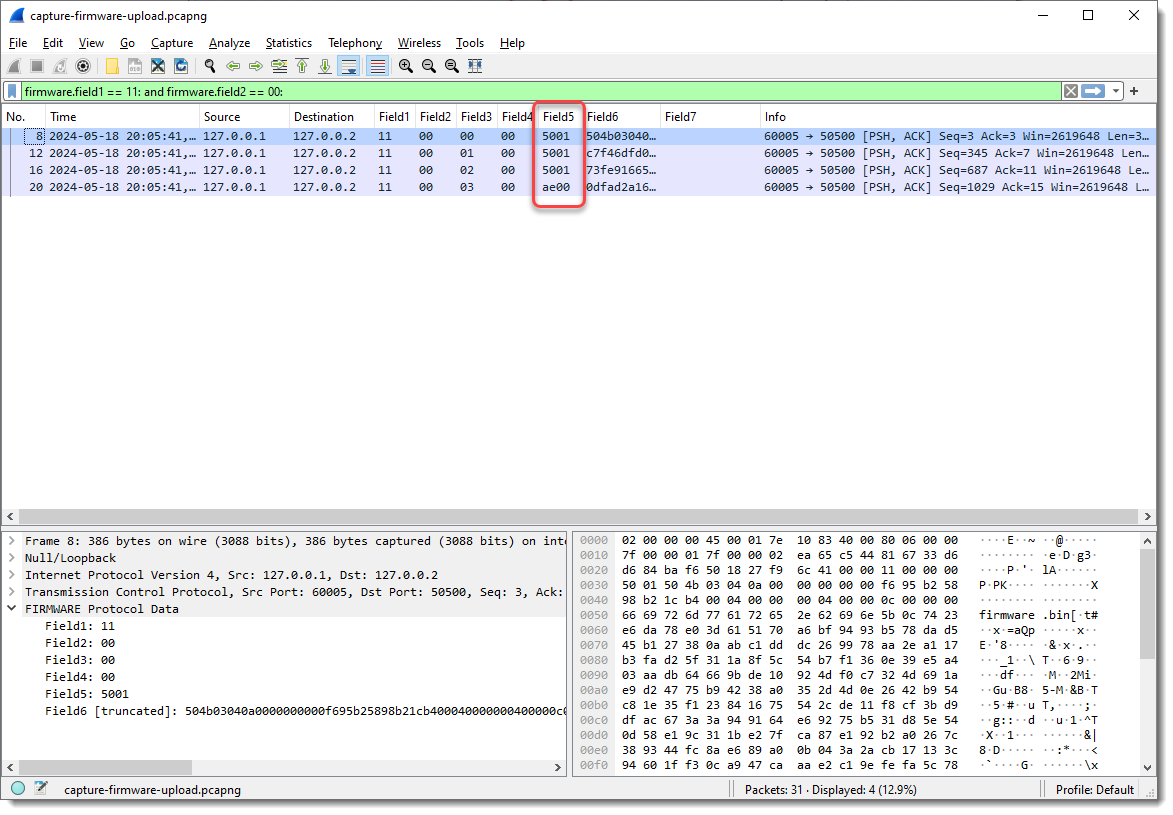
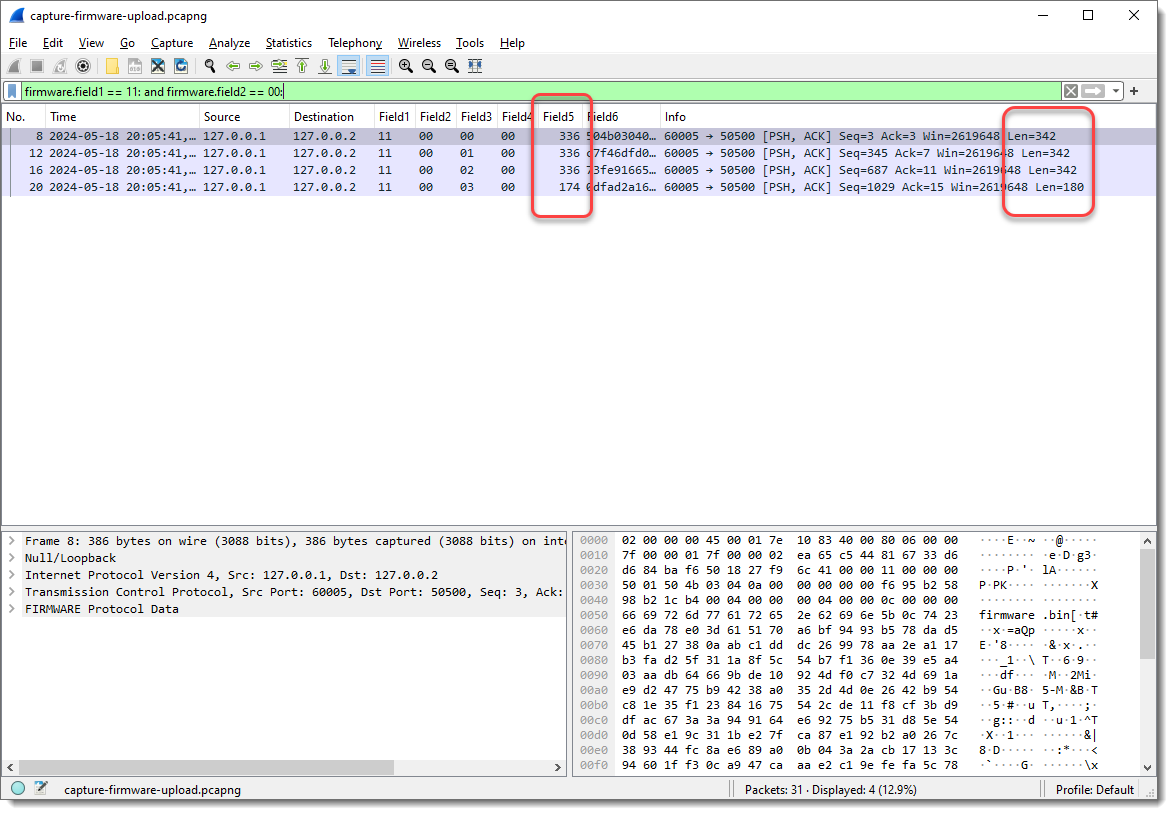
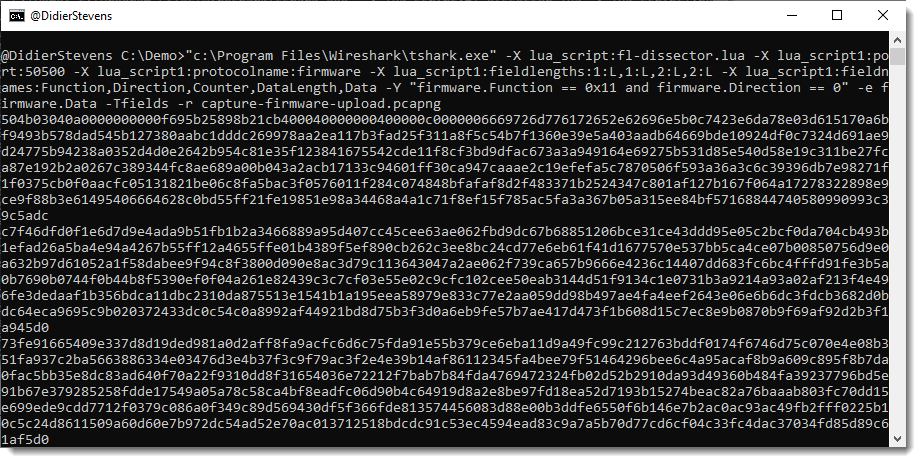
If there is any remaining data after all defined fields have been populated, this dissector will populate the next field with the remaining data. As I defined the length for 4 fields, Field5 contains that remaining data.
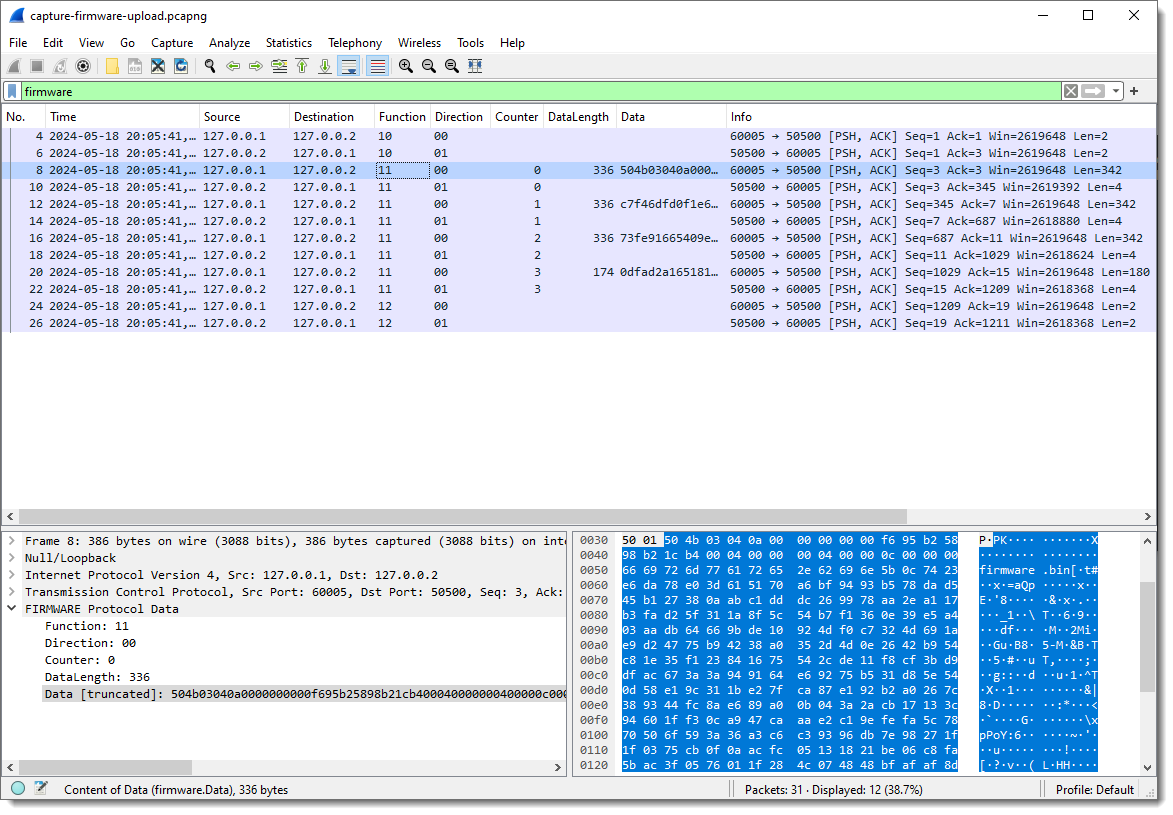
Taking a closer look at the data in field 5, I spot string PK: PK are the initials of Phil Katz, who invented the ZIP file format, and all ZIP records start with bytes 0x50 and 0x4B, e.g., PK:
Byte sequence 50 4b 03 04 is the header of a ZIP File entry record. And if I look at the ASCII dump, I see “firmware.bin” about 30 bytes after PK. So this is very likely a ZIP file, and it is possible that the update protocol uses the ZIP file format. As there are 2 bytes preceding this PK header, I’m going to add 2 extra fields to capture these bytes, to check if that reveals another pattern.
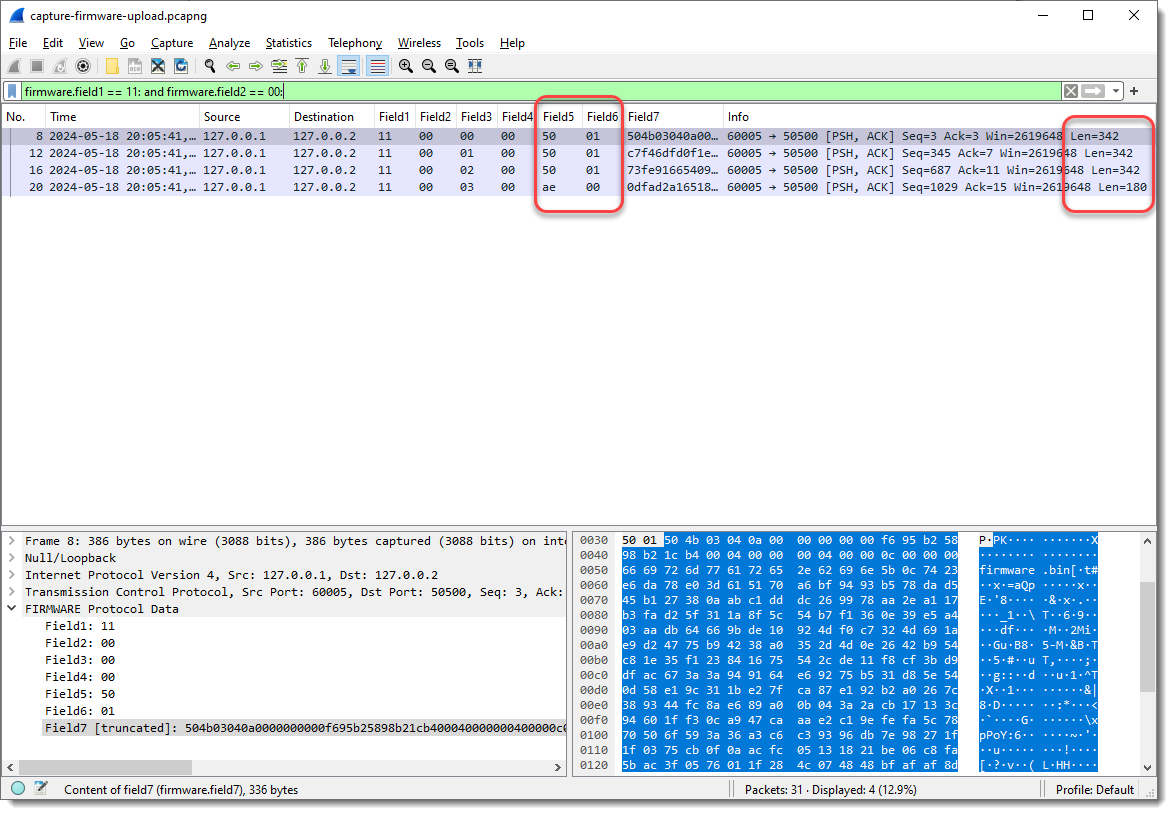
And now I need to add fields 6 and 7 as columns:
The first 3 combined values of Field5 and Field6 are the same (50 01), and the last is different (ae 00). When I take a look at the Len= value in the Info field, I see that it’s also the same for the first 3 packets, and different for the last. So Field5 and Field6 could represent the length of the data that follows. This is not uncommon in network protocols.
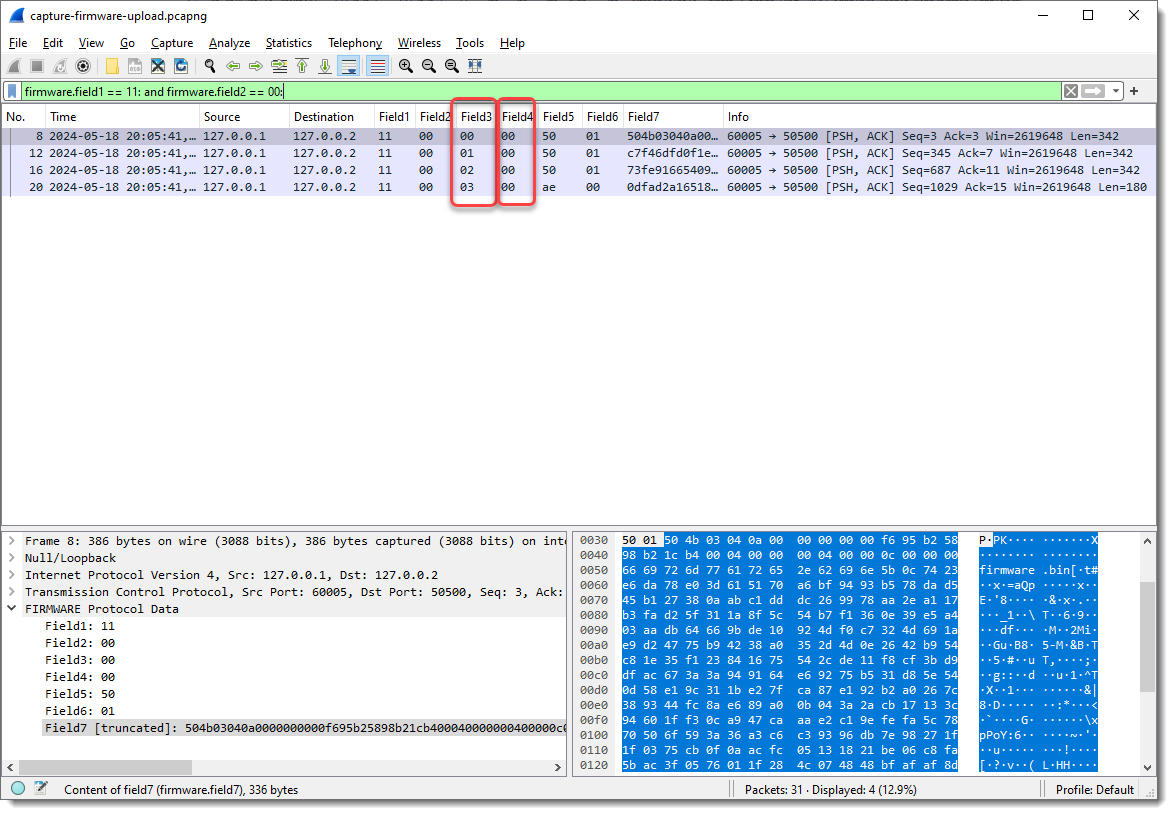
What I also notice, is that Field3 increases with 1 for each packet where Field1 is 11 and Field2 00:
So Field3 could be a packet index, or counter, …
Let’s make some changes. I’m going to define Field5 as 2 bytes long, as it requires 2 bytes to encode lengths greater than 255 (like Len=342):
A length of 0x5001, that’s too large to be 342 in decimal. So this could be a little-endian integer: where the least significant bytes appear first. In my experience, network protocols often use big-endian integers, but there are many exceptions.
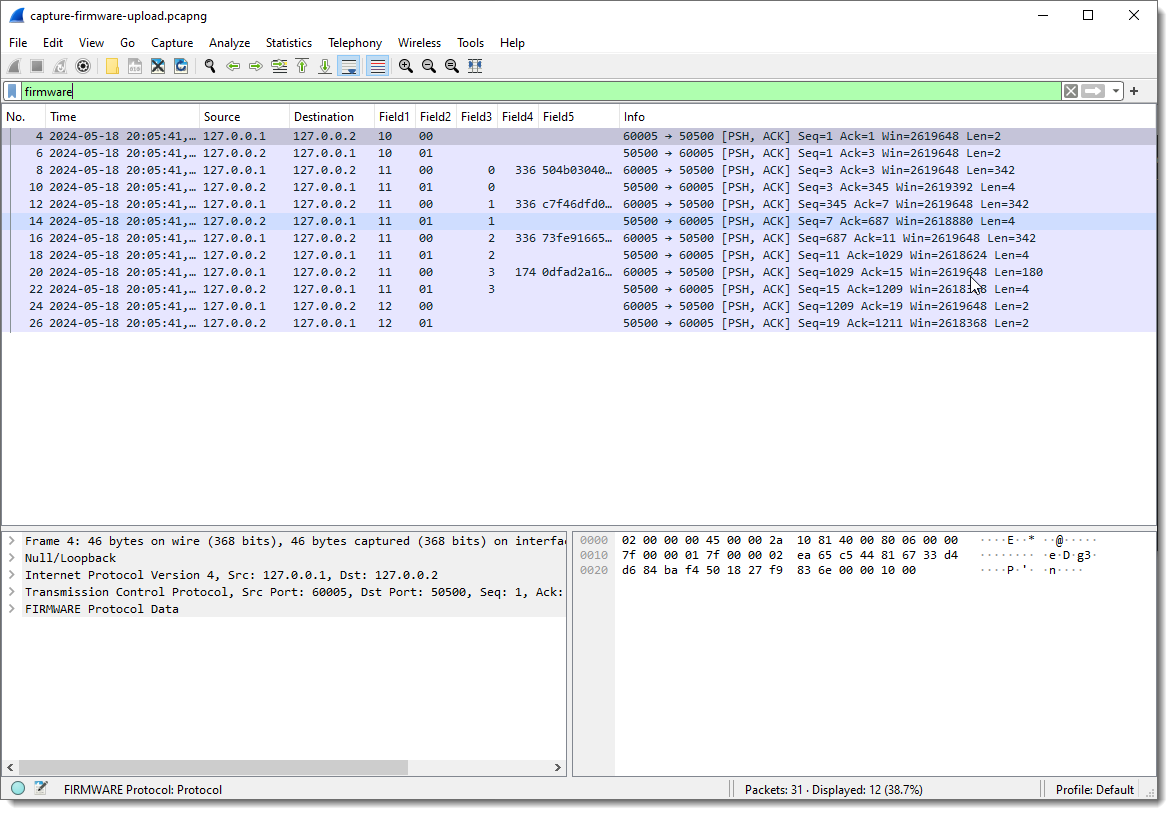
I can define Field5 to be interpreted as a little-endian integer (now it is just defined as a 2-byte sequence), by specifying the field size as follows: 2:L. (L stands for little-endian, and you can also use lowercase l). Unfortunately, specifying this via protocol preferences will have no effect, as field types have to be defined before the dissector is registered. So we need to specify this as a command-line argument, and once we specify the field lengths via the command-line, the field lengths defined via the protocol preferences are ignored.
I can do this with argument fieldlengths: -X lua_script1:fieldlengths:1,1,1,1,2:L
I remove Field7, as it is no longer populated (Field6 now contains the remainder of the data):
Field5 now has values 336 and 174. Compare this with the Len= info: 342 – 336 = 6 and 180 – 174 = 6. So Field5 is indeed a length field (little-endian 16-bit integer, probably unsigned), because 6 is the number of bytes that come before Field6: 1 + 1 + 1 + 1 + 2 = 6.
To summarize my assumptions:
Field1 indicates the type of data/command. 10 indicates the start of the upload, and 12 indicates the end of the upload, as these packets have no data (fields 3, 4, 5 and 6 are not populated)
Field2 indicates the direction, or is a request/response field
Field3 is a counter, specific for the upload packets, as it is only present with Field1 equal to 11 (upload command)
Field4 is always zero. It could have an unknown purpose, or it could be that the counter field is actually 2 bytes long, and also little-endian
Field5 is the length of the data for upload packets
I will now combine Field3 and Field4 into a little-endian integer, and remove Field5 as column (as the upload data will now become Field4), assuming the Field3 and Field4 are a counter (I would need more data, more than 256 upload packets, to be able to test this conclusively):
Talking about Field1, Field2, … is not descriptive, especially when we change sizes of fields and that the meaning of Field? changes. That’s one of the reason that I provide the ability to name Fields, but it also has to be done via a command-line argument: -X lua_script1:fieldnames:Function,Direction,Counter,DataLength,Data
In the Packet List view, you see that Field1, Field2, … are no longer populated, and in the Packet Details view, you see fields Function and Direction.
Since the field names have changed, I need to remove the columns of the old field names and add the new field names as columns:
Finally, fields Function and Direction are byte field, but I can also make them integer fields by specifying that they are little-endian or big-endian: for single byte fields, endianness makes no sense at the byte level. If there is only one byte, there is no byte order. So it doesn’t make a difference if I specify 1:L or 1:B, in both case, the field will be interpreted as an integer.
Notice that the values for Function and Direction are now displayed as decimal integers. It’s decimal because I hardcoded that in the dissector code. In later versions, I might also make this configurable.
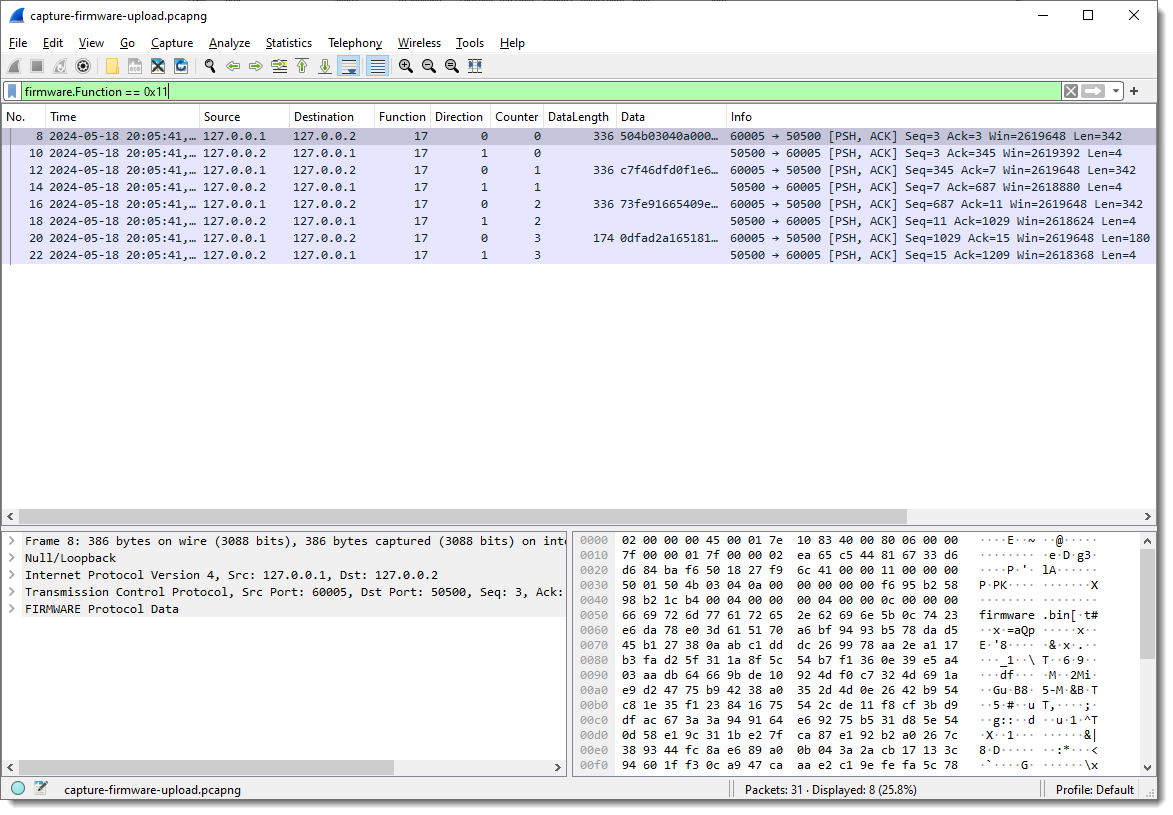
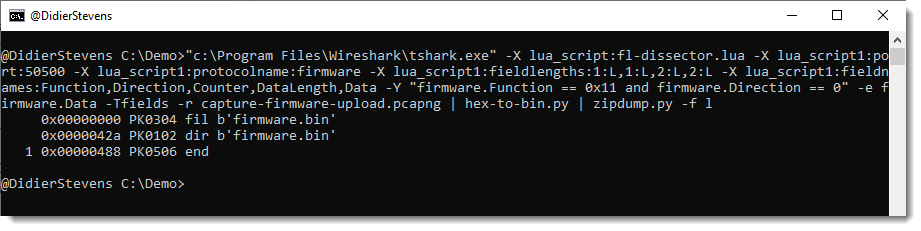
But you can still use hexadecimal values for display filters: firmware.Function == 0x11
How about extracting the data:
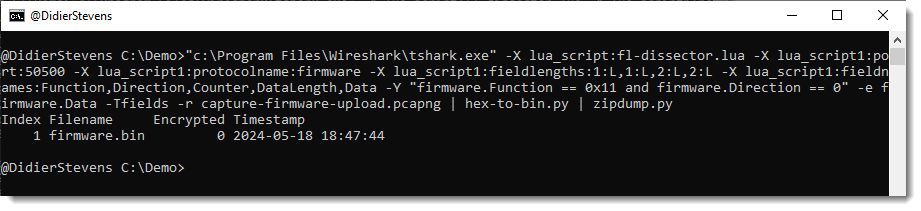
We just need to grab the Data fields. This is something I prefer to do from the command-line. Tshark is the command-line version of Wireshark. On Windows, it gets installed when you install Wireshark, while on Linux/Mac, it is a separate install.
It takes the same options as Wireshark, but the pcap file has to be provided as an option (-r) in stead of an argument:
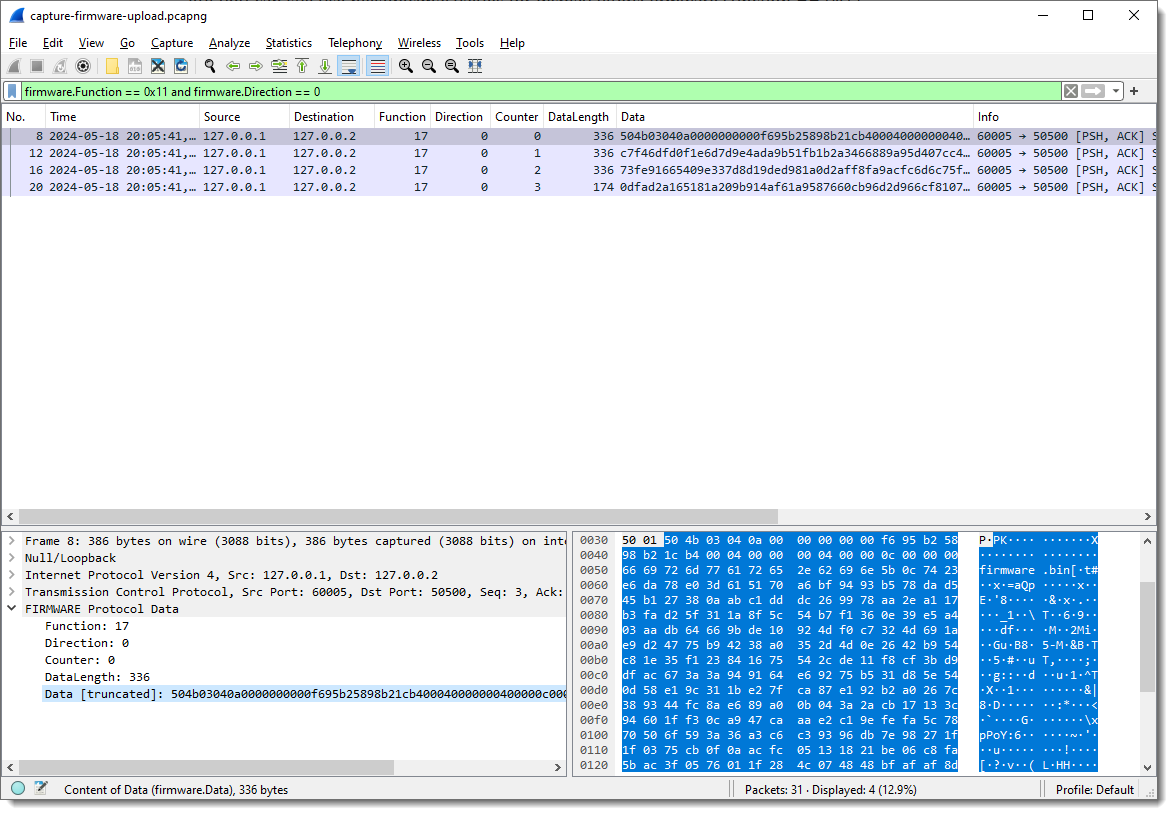
A display filter for tshark is provide via option -Y: -Y firmware.Function == 0x11 and firmware.Direction == 0
I just want the content of field firmware.Data as output, thus I use options -e and -F to select this field as output:
Now I can convert this hexadecimal data to binary with my tool hex-to-bin.py, and pipe that output into zipdump.py to check that it is indeed a ZIP file:
As there are no errors and zipdump.py displays a contained file, I can be quite sure that I managed to extract a valid ZIP file from this firmware upload.
A last check uses the find (-f) option to find and parse PK ZIP records, this would show if there is any extra data (there isn’t):
I developed a Wireshark dissector (fl-dissector) in Lua to dissect TCP protocols with fixed field lengths. The dissector is controlled through protocol preferences and Lua script arguments.
The port number is an essential argument, if you don’t provide it, default port number 1234 will be used.
Example for TCP port 50500: -X lua_script1:port:50500.
The protocol name (default fldissector) can be changed with argument protocolname: -X lua_script1:protocolname:firmware.
The length of the fields can be changed via the protocol preferences dialog:
Field lengths are separated by a comma.
Field lengths can also be defined by Lua script argument fieldlengths, like this: -X lua_script1:fieldlengths:1,1,2:L,2:L.
When field lengths are defined via a Lua script argument, this argument takes precedence over the settings in the protocol preferences dialog. fieldlengths can also specify the field type, but only via Lua script argument, not via protocol preferences (this is due to a Lua script dissector design limitation: protocol preferences can only be read after dissector initialization, and fields have to be defined before dissector initialization). Field types are defined like this: length:type. Type can be L (or l) and defines a little-endian integer, or B (or b) and defines a big-endian integer. The length of the integer (8, 16, 24 or 32 its) is inferred from the fieldlength. Fields without a defined type ate byte fields.
The length of the last field is not specified, it contains all the remaining bytes (if any).
Field names are specified with Lua script argument fieldnames: -X lua_script1:fieldnames:Function,Direction,Counter,DataLength,Data.
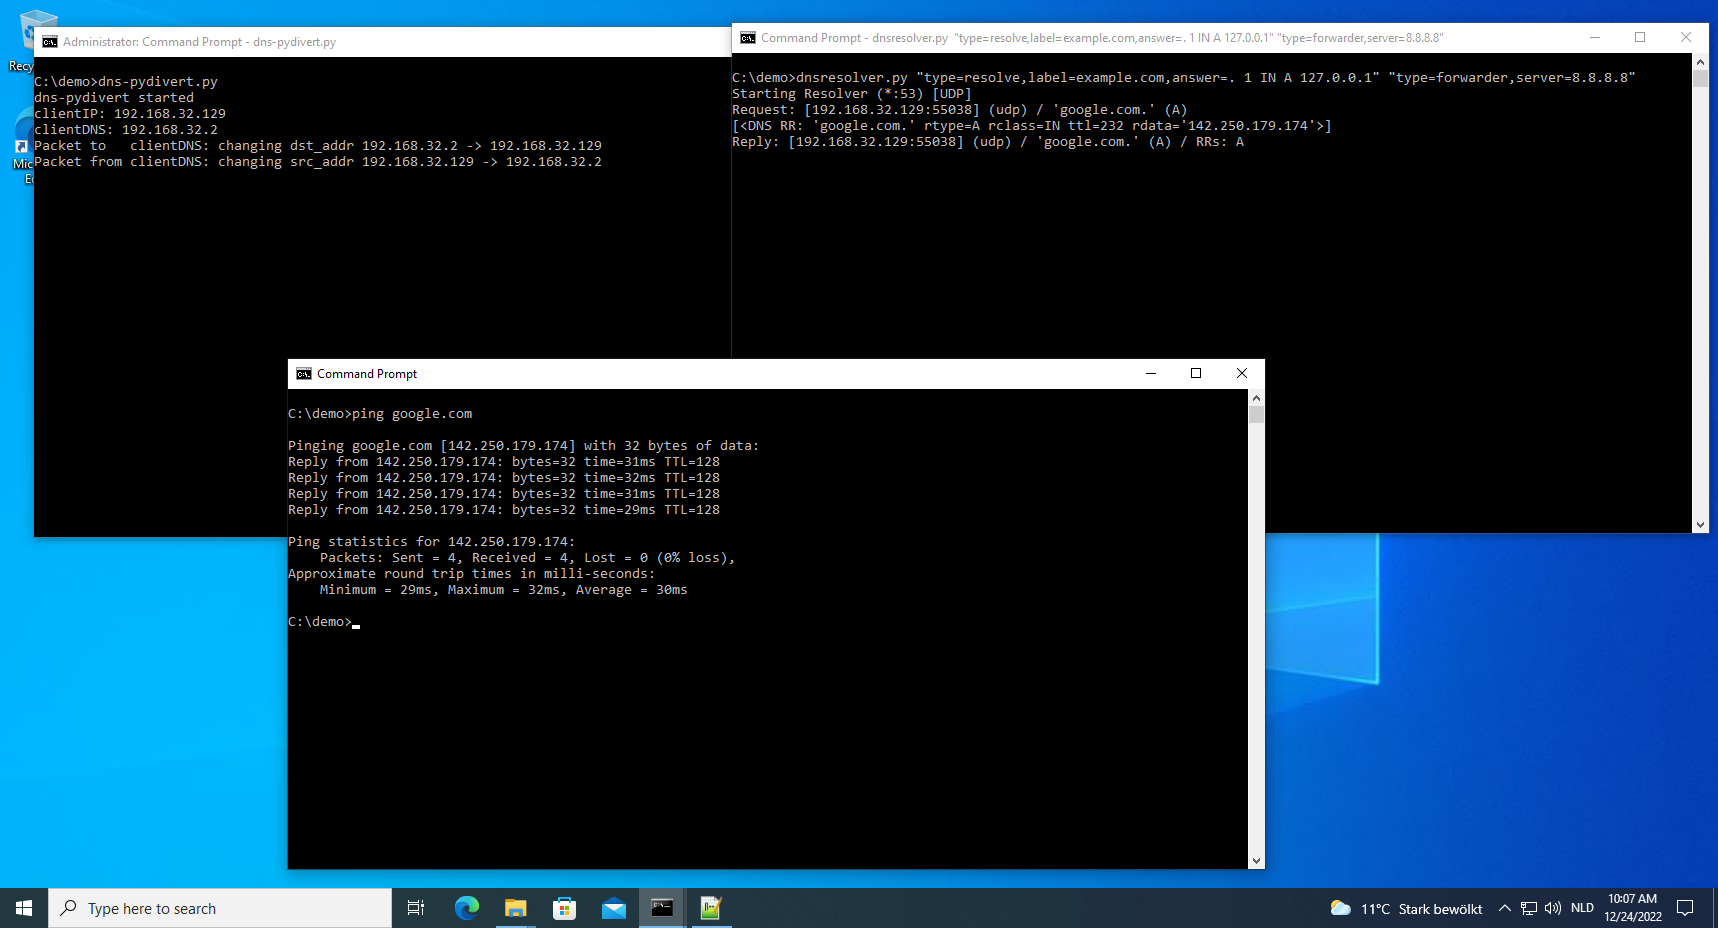
I use my tools dns-pydivert and dnsresolver.py for dynamic analysis of software (malware and benign software).
On the virtual machine where I’m doing dynamic analysis, I disable IPv6 support.
I install dnslib and run dnsresolver.py with a command like this, for example:
dnsresolver.py "type=resolve,label=example.com,answer=. 1 IN A 127.0.0.1" "type=forwarder,server=8.8.8.8"
The first command is a resolve command: DNS A queries for example.com will be resolved to IPv4 address 127.0.0.1 with TTL 1 minute.
The second command is a forwarder command: all DNS requests not handled by other commands, are forwarded to 8.8.8.8. Make sure that the IPv4 address of the DNS server you forward requests to, is different from the VM’s default DNS server, otherwise this forwarding will be redirected by dns-pydivert too.
I don’t use this second resolver command if the VM is isolated from the Internet, I only use it when I want to allow some interaction with the Internet.
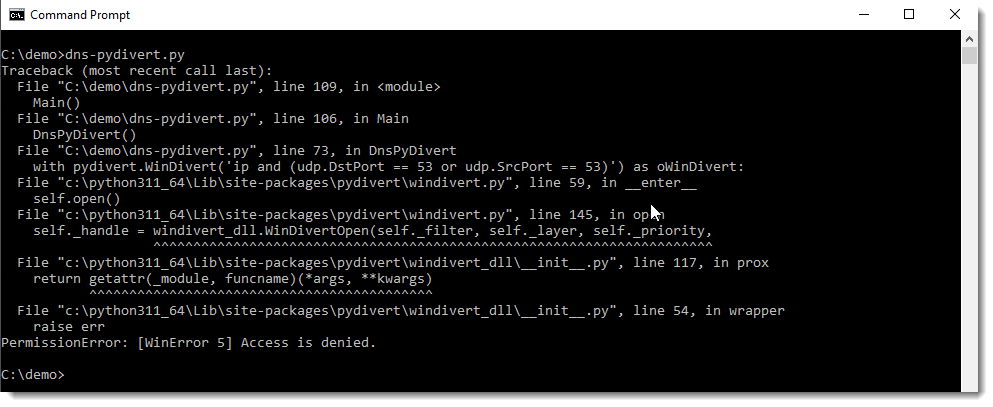
Then I install pydivert and run dns-pydivert.py as administrator.
You can’t run dns-pydivert.py properly without administrative permissions:
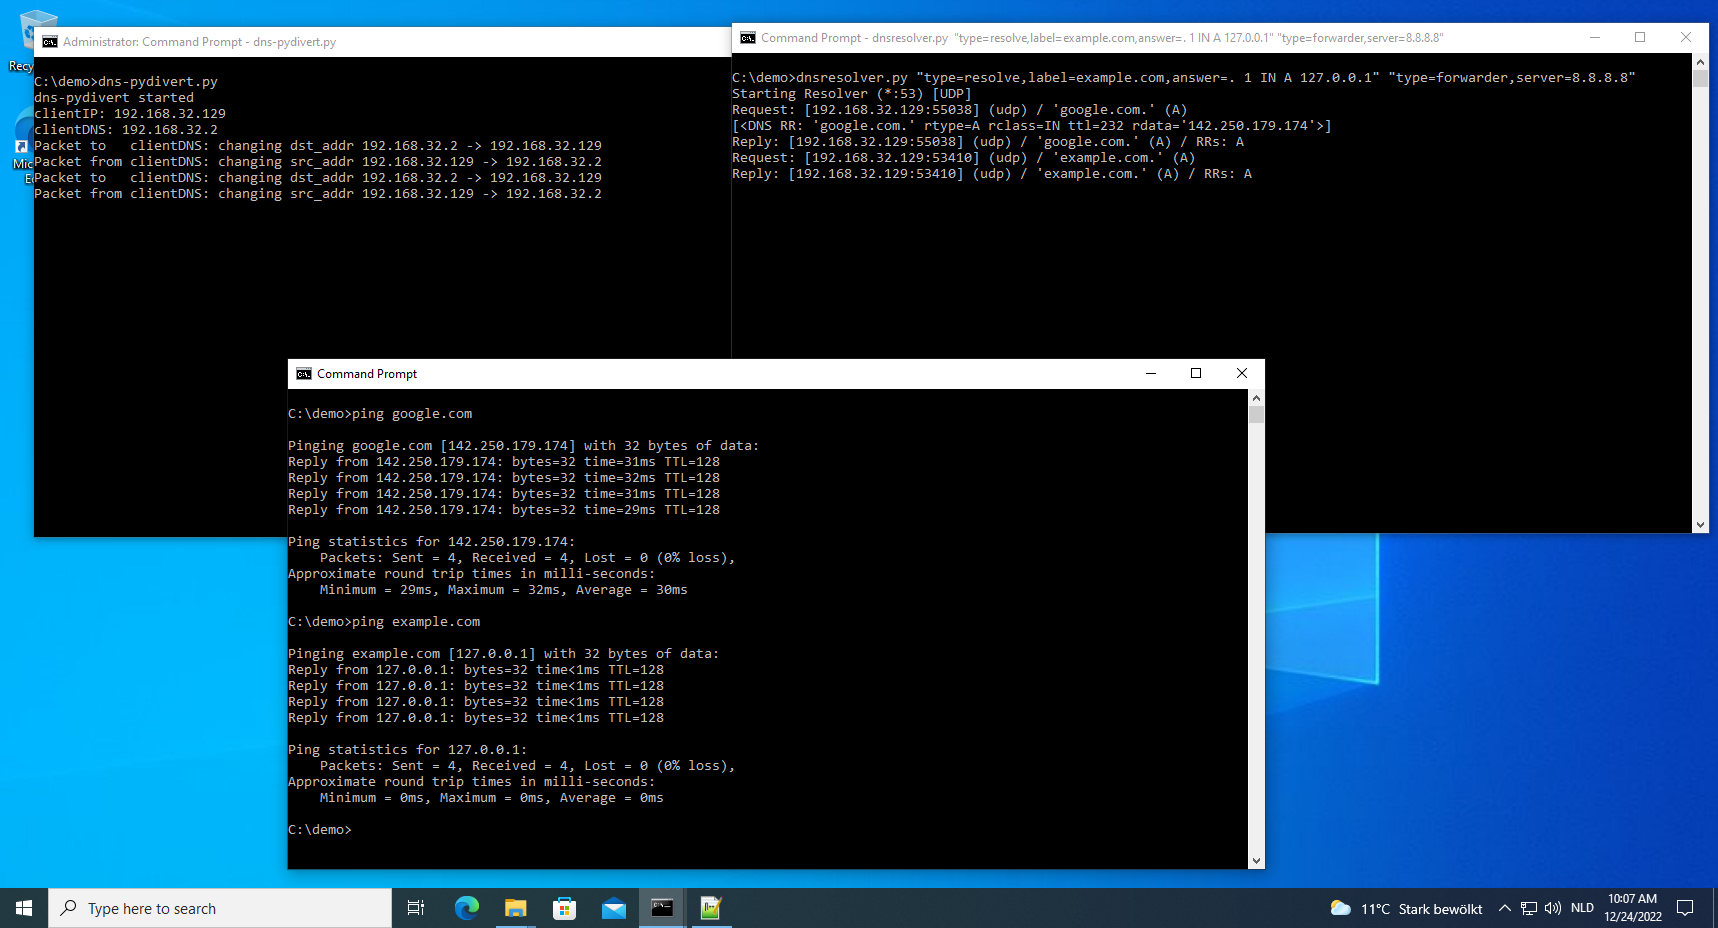
When dns-pydivert.py and dnsresolver.py are running, DNS traffic is altered according to our settings.
For example (picture above), when I issue a “ping google.com” command inside the VM, dns-pydivert sees this first DNS packet and configures itself with the addresses in this packet: 192.168.32.129 is the IPv4 address of the Windows VM and 192.168.32.2 is the IPv4 address of this Windows VM’s DNS server.
It alters this first request to be redirected to the VM itself (192.168.32.2 -> 192.168.32.129).
Then dnsresolver receives this packet, and forwards it to DNS server 8.8.8.8. It receives a reply from DNS server 8.8.8.8, and forwards it to the Windows VM (192.168.32.129).
Then dns-pydivert sees this reply, and changes its source from 192.168.32.129 to 192.168.32.2, so that it appears to come from the Windows VM’s default DNS server.
When I do the same (picture above) for example.com (ping example.com), the query is redirected to dnsresolver, which resolves this to 127.0.0.1 with a TTL of 1 minute (per resolve commands configuration).
Thus the ping command pings the localhost, instead of example.com’s web server.
And when I kill dns-pydivert (picture above) and issue a “ping example.com” again after waiting for 1 minute, the query is no longer redirected and example.com’s web server is pinged this time.
I used ping here to illustrate the process, but often it’s HTTP(S) traffic that I want to redirect, and then I also use my simple-listener.py tool to emulate simple web servers.
Remark that this will only redirect DNS traffic (per the configuration). This does not redirect traffic “directed” at IPv4 addresses (as opposed to hostnames).
This can be done too with pydivert, and I will probably release a tool for that too.
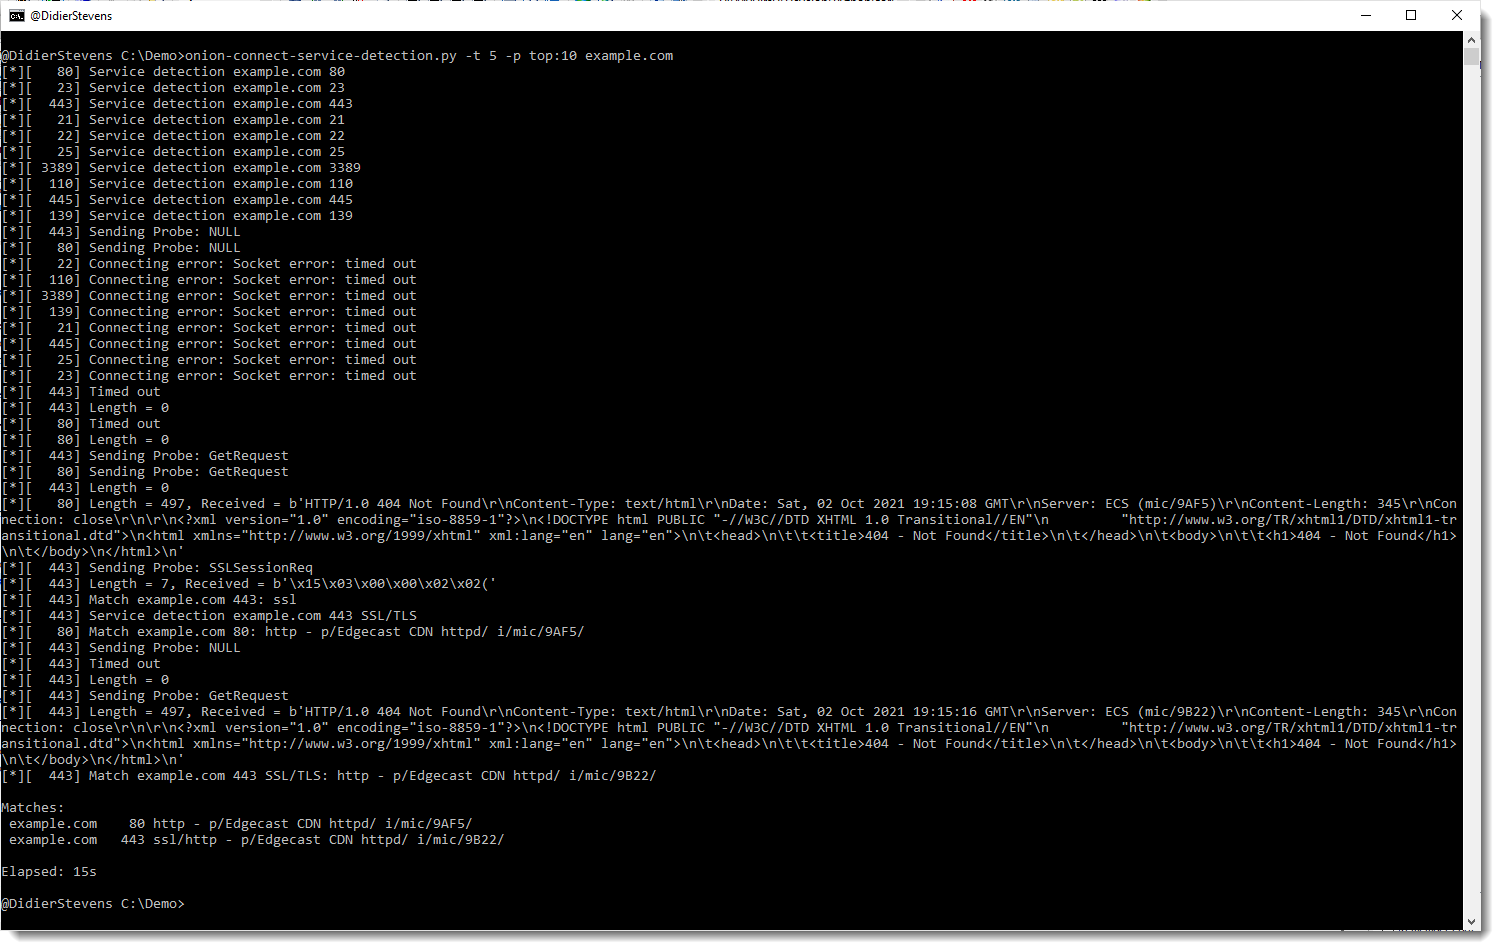
To better understand how nmap does service detection, I implemented a tool in Python that tries to do (more or less) the same. nmap detects what service is listening on a port, by sending it probes (particular byte sequences) and matching it with expected replies. These probes and replies can be found in file nmap-service-probes.
It allows me to experiment with service detection.
By default onion-connect-service-detection.py connects to service ports over the Tor network.
Here is an example where I use the tool to detect services on the 10 most popular ports (top:10) of example.com. With a time-out of 5 seconds.
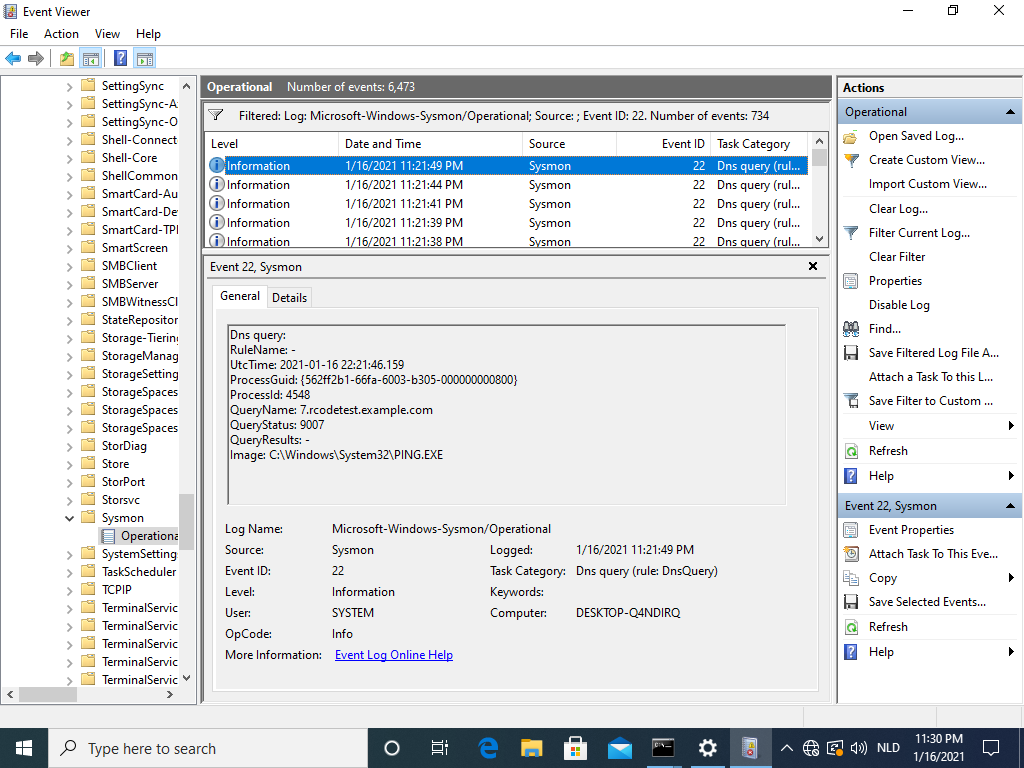
I added a feature to my dnsresolver.py script, that allows me to choose the rcode I want to receive. It works with this command-line:
dnsresolver.py “type=rcode,label=rcodetest”
And then I can just do DNS queries for a hostname like this:
4.rcodetest.example.com.
When my dnsresolver replies to such a query, it will send a reply without answer and with rcode equal to 4 (because the first label of the DNS query is 4). This allows me to quickly test different rcodes:
And this does indeed confirm that QueryStatus is equal to the rcode (greater than 0) plus 9000.
If the rcode is 0, the QueryStatus is 0, unless there is no answer in the DNS reply. Then the QueryStatus is 9501:
FYI: to test this, I configured a Windows VM with DNS server IP = 127.0.0.1, ran sysmon and dnsresolver.py inside that VM and did ping requests (I didn’t use nslookup, because that tool talks directly to the DNS server, it doesn’t use the Windows DNS client service).