FYI: This is nothing new, I’m just documenting how I configured and used my new Bash Bunny for “SNAGGING CREDS FROM LOCKED MACHINES” as Mubix explained.
After setting up my Bash Bunny, I used it on a locked Windows 10 machine to get netNTLMv2 hashes, here is the video:
After collecting the hashes, I can recover them from the Bash Bunny:
I put my Bash Bunny into arming mode: put the switch in position 3 (switch position closest to the USB connector). I insert my Bash Bunny in my Windows machine. The removable storage on the Bash Bunny gets assigned drive letter D: on my machine.
Inside folder D:\loot\quickcreds there are folders created each time I use this payload on a machine. Here is the content for the Windows 10 machine I collected hashes from (DESKTOP-DEMO):
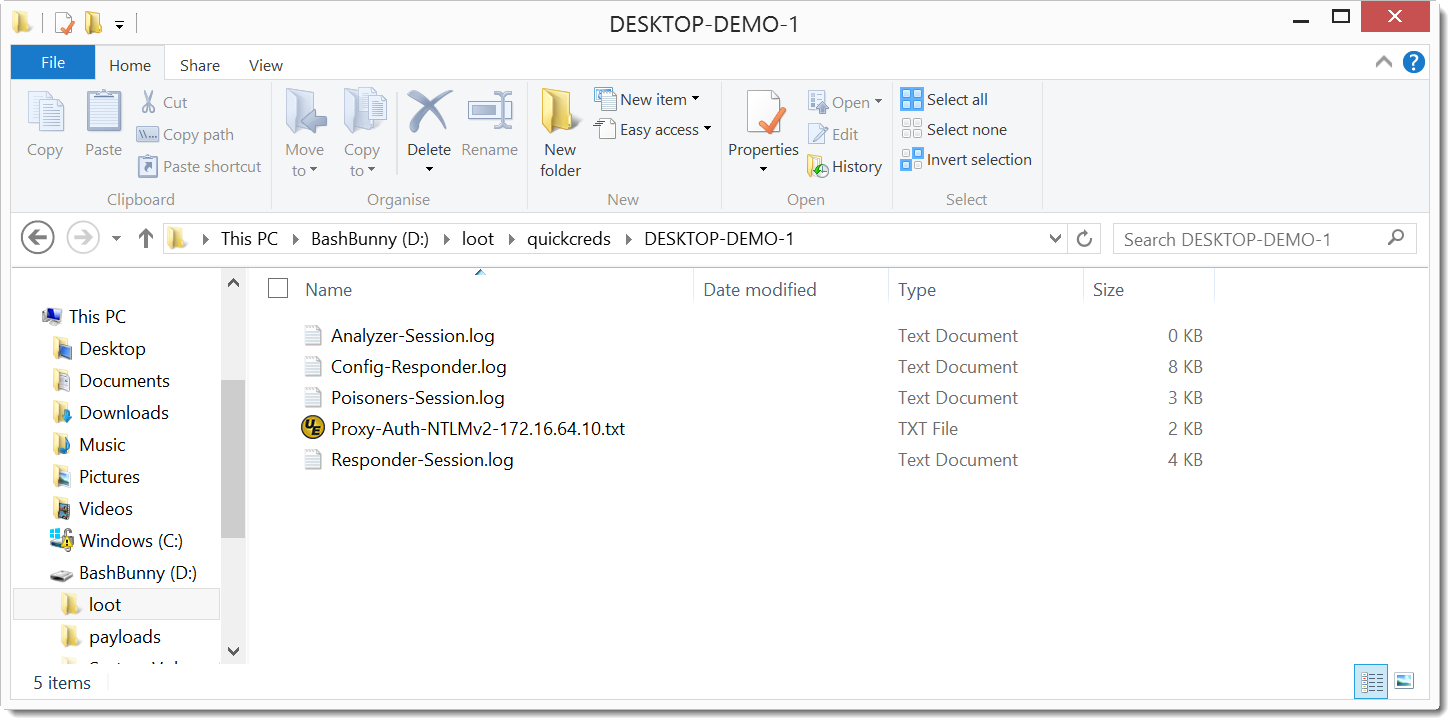
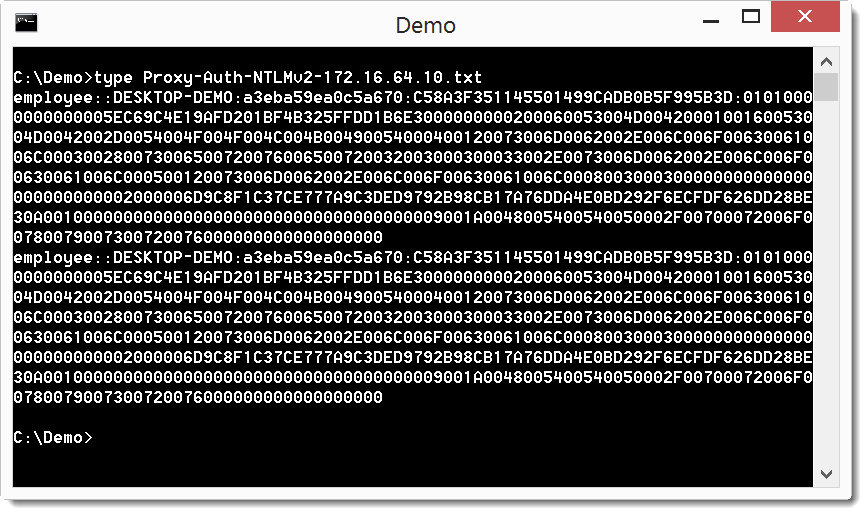
File Proxy-Auth-NTLMv2-172.16.64.10.txt contains the hashes:
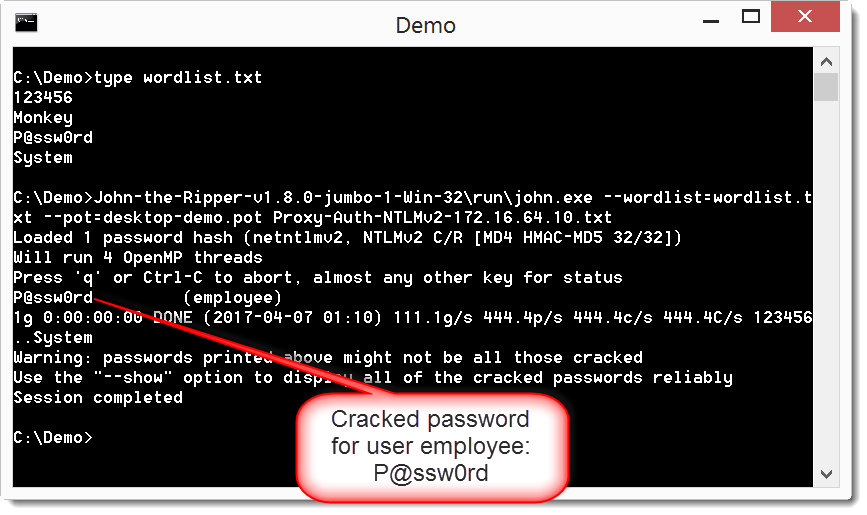
These can be cracked, for example with John The Ripper:
Here is what I did to setup my Bash Bunny after unboxing it:
First I updated the payloads on my Bash Bunny from the GitHub repository.
I put my Bash Bunny into arming mode: put the switch in position 3 (switch position closest to the USB connector). I insert my Bash Bunny in my Windows machine. The removable storage on the Bash Bunny gets assigned drive letter D: on my machine.
I copy the content of the GitHub repository payloads folder to the payloads folder on the Bash Bunny: d:\payloads\ (overwriting existing files).
To install the tools: I copy D:\payloads\library\tools_installer\ to D:\payloads\switch1\ (overwriting existing files).
I eject the Bash Bunny, put the switch in position 1 (payload 1, switch position closest to the LED). I insert the Bash Bunny in my Windows machine, and wait for a white solid LED: this takes about 10 seconds.
I eject the Bash Bunny, put the switch in position 3 and re-insert it into my Windows machine.
Then I set the QuickCreds payload (responder) as payload 2 on my Bash Bunny: copy D:\payloads\library\QuickCreds\ to D:\payloads\switch2\ (overwriting existing files).
I eject the Bash Bunny, put the switch in position 2 (payload 2, switch position in the middle) and insert it into my test Windows machine. After some time, the Bash Bunny displays a green LED, indicating that hashes were collected.

[…] Quickpost is for my Bash Bunny with the original firmware. Since my first Bash Bunny post a couple of days ago, firmware 1.1 was released, but I have not yet […]
Pingback by Quickpost: Bash Bunny & Keyboard Layouts | Didier Stevens — Sunday 9 April 2017 @ 12:51
[…] Blog post: Quickpost: Using My Bash Bunny To “Snag Creds From A Locked Machine” […]
Pingback by Didier Stevens Videos — Saturday 22 April 2017 @ 22:21
[…] can of course be cracked (if the password is not too complex), with John The Ripper for […]
Pingback by WebDAV, NTLM & Responder | Didier Stevens — Monday 20 May 2019 @ 0:00
Great write up! I cant seem to find the script i need to download for quick creds can you direct me to where that would be?
Comment by Travis — Saturday 9 November 2019 @ 19:44
Follow the github link.
Comment by Didier Stevens — Saturday 9 November 2019 @ 20:52
Mine grabbed the NTLM hash but the john command didn’t crack it. It was the same password as yours, any suggestions?
Comment by Anonymous — Tuesday 10 February 2026 @ 18:30
Have you checked with an online cracker?
Comment by Didier Stevens — Friday 13 February 2026 @ 9:26