Comments were disabled and the hires movie was missing in my previous post. I just fixed it.
Friday 29 September 2006
Tuesday 26 September 2006
PiXiE dust
Once more, I had to convince by example (movie included).
Our laptops are locked down, a normal user has only 2 boot options: from the hard disk or from the network. Removable media boot (Floppy, CD, …) is disabled. Network boot is allowed because the laptops are installed with Microsoft RIS (a network boot technology), and this feature is not disabled after installation.
This allows a user to boot from another image and access the hard disk without restrictions. Contrary to the arguments of the workstation installation team, this isn’t hard to do and you don’t need a specialized network environment with a Microsoft RIS server.
To pull this of, you need a DHCP and BOOT server, and a boot image. I didn’t find freeware to create the boot images, I had to use emBoot’s Network Boot Tools trial version.
The procedure in a nutshell:
- configure a Windows XP machine with a static IP address and connect it to a network hub
- install a DHCP & TFTP server on the Windows XP machine
- serve a Network Bootdisk image from the Windows XP machine
- connect the laptop to the hub and boot from network
- use the Network Bootdisk to transfer files from the laptop to the Windows XP machine
Making the boot disk
- the Network Bootdisk doesn’t work with PXE (a network boot technology), but this forum thread explains how to modify the Network Bootdisk to solve this problem
- add NTFSDOS from Sysinternals to the Network Boot disk to provide access to NTFS volumes
- start the Bootimage Editor from the Network Boot Tools
- create an image file from the Network Bootdisk image you just prepared, and call it netbootdisk.img
- create a PXE menu boot file: add netbootdisk.img and save it as netbootdisk.pxe
Preparing the workstation
The workstation will host the DHCP and TFTP server to provide the boot image to the laptop. I also share a folder on this workstation to transfer files.
- to avoid authentication problems with the Network Bootdisk, I use a Windows XP workstation in Workgroup mode with a blank Administrator password
- configure a static IP address: 10.10.10.10
- create a share on the workstation, configure it with write permissions
- disable the firewall
- install tftpd32 (DHCP & TFTP server), it’s just one executable and it’s freeware
- create a folder tftpboot and copy the images to it (netbootdisk.img and netbootdisk.pxe)
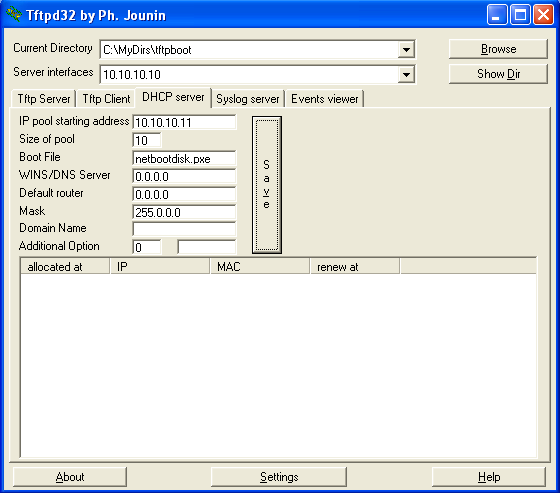
- start tftpd32
- point the “Current Directory” to the tftpboot folder
- set “IP pool starting address” to 10.10.10.11
- set “Size of pool” to 10
- set the “Boot File” to netbootdisk.pxe
- set the “Mask” to 255.0.0.0
- Save the configuration
The server is now ready.
Executing the attack
- connect the laptop to the network hub
- boot the laptop, go to the BIOS boot menu and select network boot
- follow the Network Bootdisk instructions until the command line prompt is displayed
- start the net command and connect to the share
- start ntfsdos
- now we can access and copy any file to the share (the free NTFSDOS version is readonly)
Conclusion
I agree that configuring the boot images is not a trivial task, but I’m sure that you can find ready-made bootdisks on the Internet.
However, setting up the boot server and booting the laptop is childs play, and the only software you need is a simple DHCP/TFTP daemon.
I didn’t find free software to replace the Network Boot Tools (except for the DHCP/TFTP daemon). The PXE specification defines an API you can use when you boot from the network (this API provides a TFTP client, amongst other things). The only open source example I found using the PXE API is PXELINUX. The source code of the boot image is assembler code that has to be assembled with NASM.
Here is a YouTube movie showing you the complete boot. A hires (XviD) version can be found here. This example is on VMware, not on the laptop. In this movie, I transfer the SAM and SYSTEM file to crack the administrator password with Cain & Abel. I use a simple password (test) to speed up the brute-force attack.
Monday 18 September 2006
A Windows Live CD plugin for my UserAssist utility
I’ve published a BartPE plugin for my UserAssist utility, you can download it here (https, MD5 D43E519B7BCE90F31EB54884E7AA75C1 DE9D576C0F5FF8D33E039A5064BD8AFF). And I’m posting another movie.
Windows Live CDs are a popular troubleshooting and forensic investigation tool, they allow you to boot a (Windows) PC from a CD. Bart Lagerweij developed BartPE, a tool to create a Windows Live CD (a Windows “pre-install” environment CD), and several people build their own tools based on his work. The Ultimate Boot CD for Windows is based on BartPE.
Bart’s PE has an open architecture, you can integrate your own tools by making a dedicated plugin. My UserAssist utility uses the Microsoft .NET Framework 2.0, which is not supported by BartPE. You need to add Colin Finck’s Microsoft .NET Framework 2.0 plugin to the Ultimate Boot CD for Windows plugins to use my plugin.
You add plugins to the Ultimate Boot CD for Windows with the Plugins dialog:
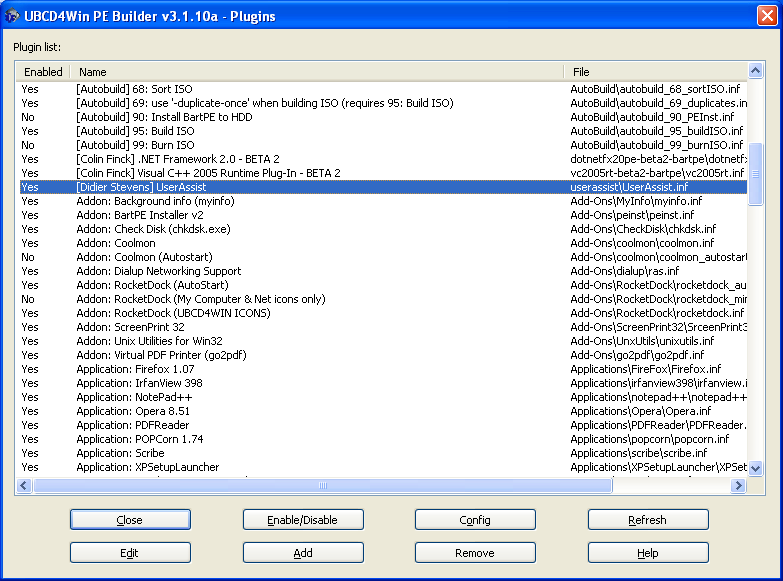
Afterwards you create your own Ultimate Boot CD for Windows (you have to provide your own licensed Windows XP SP2 CD).
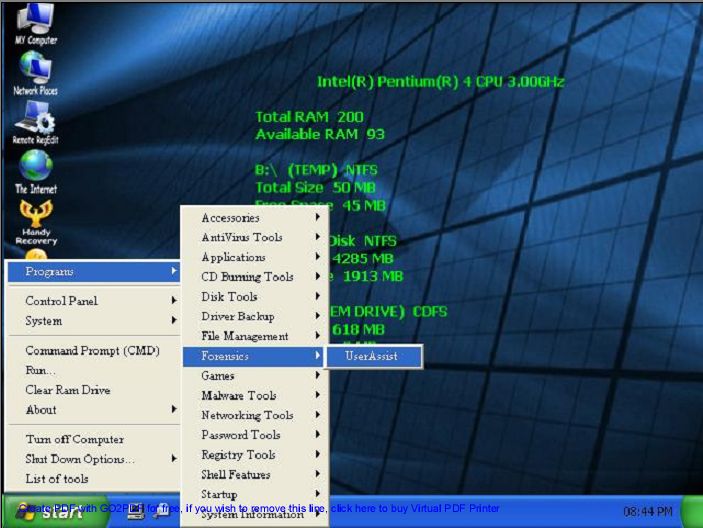
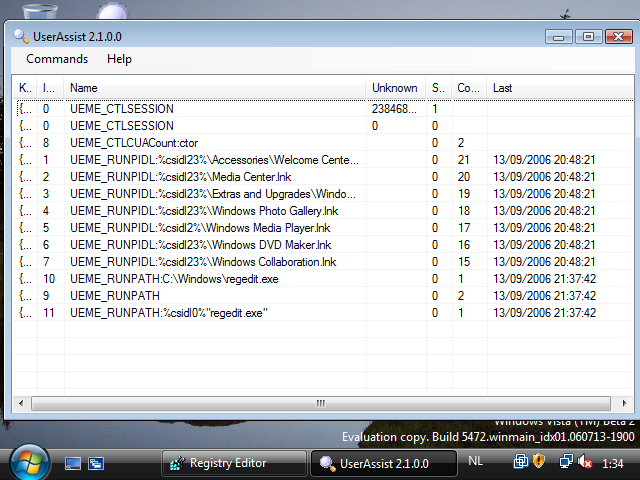
The UserAssist utility is located in the Programs/Forensics menu (when you boot from the CD):
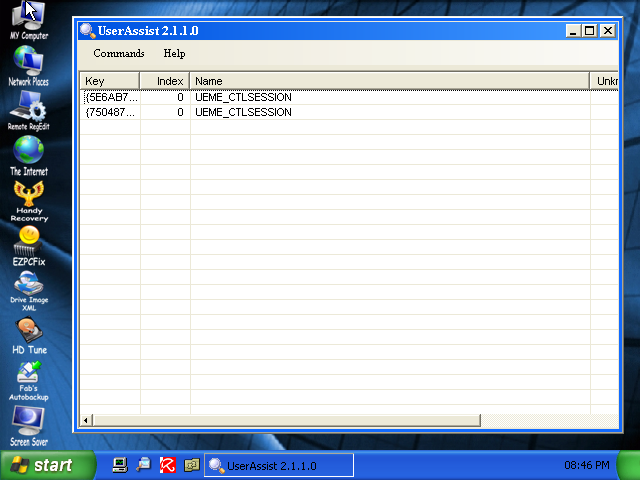
The UserAssist utility displays the activity of the current user at startup. This is of course not useful for a Live CD, because the profile of the current user of a Live CD is not persisted.
You will have to load the NTUSER.DAT registry hive of the user you want to investigate in RegEdit and export it to a reg file, before you can import it in UserAssist (I plan to add a feature to UserAssist to automate this task).
I’ve tested my plugin with the Ultimate Boot CD for Windows, not with BartPE.
There’s a movie here on YouTube, or hires (XviD) here showing you how to do this for user Employee.
Thursday 14 September 2006
UserAssist on Windows Vista
Microsoft mailed me Windows Vista Build 5472 (that’s the Black Hat Vista).
The VMware installation went smoothly once I figured out I had to add these lines to the VMX config file:
svga.maxWidth = "640"
svga.maxHeight = "480"
The UserAssist registry keys still exists and the format hasn’t changed, my UserAssist utility works without problem:
Only the icon will require some rework:

Monday 11 September 2006
Malicious Cryptography
Aditya Kapoor blogged on the McAfee Avert Labs Blog about a trojan using EFS to protect itself.
To understand more of this, I did some tests during the weekend.
I developed a service that runs under a dedicated account and writes the EICAR test virus file every 5 seconds to an encrypted file.
You can find the this service here (source code & EXE), you can compile it with Borland’s free C++ 5.5 compiler. Be warned, this service will write the EICAR test virus file to your c:\ folder and your anti-virus will detect this. EICAR is not a virus, it’s an anti-virus test file.
Procedure:
- logon as administrator to a test machine (preferably a virtual machine)
- create a user efsuser with password 123456 and make this user member of the administrator group
- give the efsuser user the right to logon as a service (local security policies)
- logoff & logon as efsuser
- copy MyEFSService.exe to a folder on the test machine
- install the service: MyEFSService.exe -i
- encrypt MyEFSService.exe (properties / advanced / encrypt contents to secure data)
- logoff & logon as administrator
- start the service
This service writes debug information, you can view this with Sysinternals‘s DebugView.
Your anti-virus should detect the encrypted c:\eicar.exe file that is written to the disk every 5 seconds.
This is normal, even for encrypted files, because a modern anti-virus installs a file system filter driver that analyzes all data read from & written to disk before encryption (screenshot of DeviceTree):

McAfee VirusScan 8.0i detected & deleted this EFS encrypted “virus” without problems.
But I also wanted to know if the service itself, if it was a virus, could avoid detection.
The problem was that I could not modify my service to get it detected as a virus by McAfee. Including the EICAR string is not a solution, because the EICAR anti-virus test file specifications states that the EICAR string must be detected only if it’s in a file that contains nothing more than the EICAR string. I ended-up replacing the DOS header in the PE-structure (the stuff that says “This program cannot be run in DOS mode.”) by a byte sequence of an old DOS virus. McAfee would not detect this “fake” virus, but AVG does (I tested this with VirusTotal, without distributing the file).
I replaced McAfee with AVG Anti-Virus Free on my test machine. At first AVG didn’t even detect the EICAR virus, I found this very strange, because AVG also uses a file system filter driver:

But then I activated the “on-close scanning” option:

and the EICAR anti-virus test file was detected:
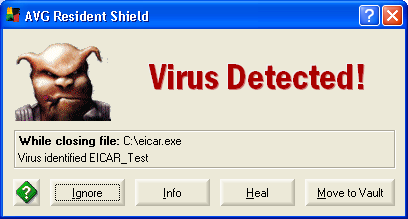
But AVG failed to detect the “infected” service, even when I instructed AVG to scan the file. Only when I stopped the service (making the file accessible) did AVG detect the “virus”.
However, AVG will detect the “virus” when booting, preventing the service from starting.
So it seems that this EFS trick can fool some anti-virus products some of the time. I will continue trying to make McAfee detect my service as a virus, to see how it behaves.
Malicious Cryptography, the inspiration for the title of my post, is a very interesting read for anti-virus specialists.
Tuesday 5 September 2006
Playing with utilman.exe, The Motion Picture
For a demo of My second playdate with utilman.exe, go here on YouTube.
