Didier Stevens

Monday 12 January 2009

A Hardware Tip for Fuzzing Embedded Devices

Filed under: Hardware,WiFi — Didier Stevens @ 21:22

Phidgets are hardware interfaces that let your computer interact with the environment. In this first blogpost of a new series, I explain how to automatically power-cycle a crashed embedded device.

I’ve been playing with Phidgets over the holiday season. Phidgets are inexpensive hardware interfaces for your computer. You connect them via USB, thus extending your machine with digital inputs/outputs and analogue inputs.

There are several aspects I like about the API-software:

  • it’s available for Windows, Linux and Mac
  • the Linux version is open-source (in a next post, I’ll show it running on my nslu2)
  • there’s support for many programming languages, even Python
  • input changes can trigger events (avoids polling loops)

One problem with automated fuzzing of embedded devices (for example a WiFi AP) is that you’ve to power-cycle a device when it crashed. And that’s a problem when you let it run unattended (i.e. overnight). So it would be handy to have your fuzzer power-cycle the device each time it detects the device became unresponsive.

This Phidget Interface Kit with 4 relays lets you do this. Connect the power supply of the embedded device to the NC (Normally Closed) connector of the relay. This way, the un-powered relay will let the current flow through the power-supply and feed the embedded device. To power-cycle the device, activate the relay for a second or two. This will open the circuit and shutdown the embedded device.

Activating a relay for a second is very easy with the Phidgets sofware, here is a Python example for an Interface Kit:

    oInterfaceKit = Phidgets.Devices.InterfaceKit.InterfaceKit()
    oInterfaceKit.openPhidget()
    oInterfaceKit.waitForAttach(10000)

    oInterfaceKit.setOutputState(0, True)
    time.sleep(1)
    oInterfaceKit.setOutputState(0, False)

    oInterfaceKit.closePhidget()

setOutputState is the actual command used to control the relay on output 0. The other statements are necessary to setup the interface.

Before OSes took full control over the input and output ports, a popular solution was to connect a relay to a Centronics printer port and control the output of the port directly from your program. But nowadays, OSes like Windows take full control over the Centronics port (if your machine still has one…), making it much harder to control from user software.

Phidgets were used (but not hurt) for my TweetXmasTree:

20090112-220040

Tuesday 6 January 2009

Quickpost: Running BackTrack 3 on a Eee PC

Filed under: Eee PC,Quickpost — Didier Stevens @ 20:44

I want to run the BackTrack 3 Live CD on my new Eee PC 901. Here is how I configured a SD card to boot the BackTrack 3 USB Version (not the same as installing the BackTrack 3 distro on a SSD or SD card).

  • start Windows XP on Eee PC
  • download the BackTrack 3 USB version
  • use unetbootin to install the BackTrack 3 iso file to the SD card
  • copy 901_net_gfx.lzm to the \BT3\optional directory on the SD card (details and download here)
  • edit file /boot/syslinux/syslinux.cfg on the SD card to add these lines after the LABEL… line:
LABEL EEE
MENU LABEL BT3 EEE Mode
KERNEL /boot/vmlinuz
APPEND vga=785 initrd=/boot/initrd.gz ramdisk_size=6666 root=/dev/ram0 rw load=901_net_gfx autoexec=startx

The following step is only needed if you want to change the keyboard. I use a Belgian keyboard, so I want the default KDE keyboard to be the BE keyboard, not the US keyboard. We will update the kxkbrc file in the root.lzm compressed directory. sda1 is the SD card I booted from, adapt according to your configuration.

  • Boot BackTrack 3 from the SD card and get a root shell
  • cp /mnt/sda1/BT3/base/root.lzm .
  • mv /mnt/sda1/BT3/base/root.lzm /mnt/sda1/BT3/base/root.lzm.original
  • mkdir newroot
  • lzm2dir root.lzm newroot
  • edit file newroot/root/.kde/share/config/kxkbrc
  • edit the LayoutList property and move the be value to the beginning of the comma-separated list, like this:
    • LayoutList=be,us,ch,br,cz,fr,de,it,pl,sk,gb,dk,de
  • save file kxkbrc
  • dir2lzm newroot root.lzm
  • mv root.lzm /mnt/sda1/BT3/base

You can use the same procedure to edit other (config) files, or add files like your favorite utilities.


Quickpost info


Monday 5 January 2009

Howto: Add a Digital Signature to an Office Document

Filed under: Encryption — Didier Stevens @ 21:19

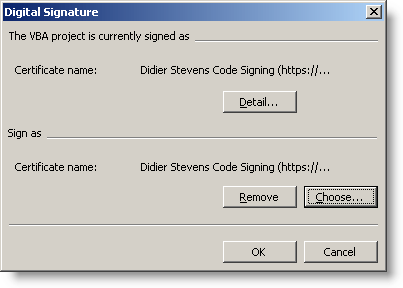
Starting with Microsoft Office 2003, digital signatures can be added to office documents (e.g. a spreadsheet). Macros can also be digitally signed. So if you’ve that special spreadsheet macro to execute, but your Excel configuration requires macros to be signed, this howto is what you’re looking for 😉 .

First step is to import our PKCS12 file.

First we’ll take a look ad signing the document (an Excel spreadsheet).

20090105-131422

Adding a digital sigature is done with Tools / Options…

20090105-132822

20090105-131444

20090105-1314592

20090105-131510

20090105-131531

These actions added our digital signature:

20090105-131548

Of course, when we change the spreadsheet, we have to sign it again:

20090105-131729

The title bar warns us when we opened a signed spreadsheet:

20090105-1321011

The “unverified” word in the title is a reminder that we have to check the signature (via Tools / Options…) to make sure the spreadsheet wasn’t tampered with:

20090105-132151

Now let’s sign a macro:

20090105-132615

20090105-132709

20090105-1327221

20090105-132733

20090105-132744

A default Office 2003 install requires macros to be signed:

20090105-133013

Sunday 4 January 2009

Howto: Add a Digital Signature to a PDF File

Filed under: Encryption,PDF — Didier Stevens @ 21:47

After signing an executable and a Mozilla add-on, let’s sign a PDF document with our certificate.

I didn’t manage to use a free tool to sign a PDF document with a certificate, so we’ll use a trial version of Adobe Acrobat Professional.

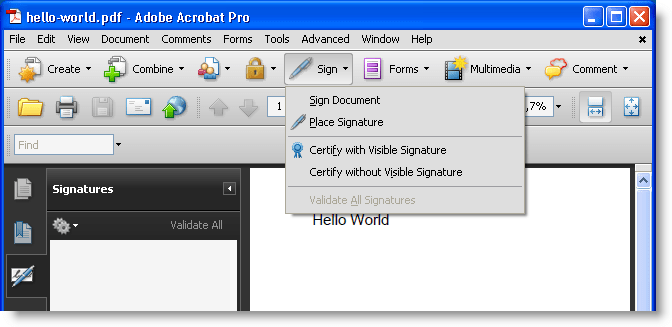
Our PKCS12 file (with keys and signatures) is imported in our certificate store, so let’s open a PDF document and sign it:
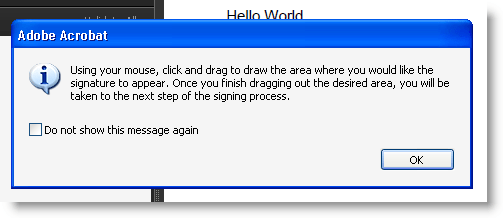
20090104-214956

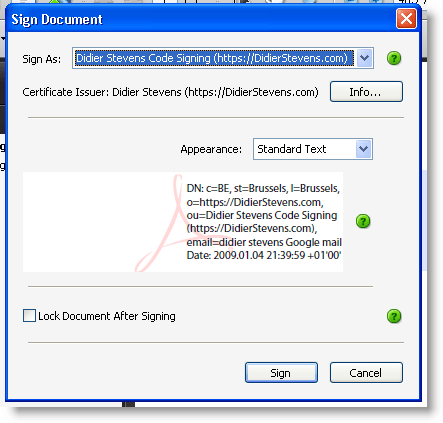
20090104-215128

20090104-215340

After signing, we notice there’s one issue, our identity is not yet trusted:

20090104-215702

Let’s trust ourself:

20090104-215955

20090104-220023

20090104-220103

20090104-220243

After validation, Adobe Acrobat tells us our signature is valid:

20090104-220644

Thursday 1 January 2009

Howto: Add a Digital Signature to a Firefox Add-on

Filed under: Encryption — Didier Stevens @ 22:02

After signing a Windows executable with our own certificate, let’s sign an XPI file.

There is a nice Firefox add-on we’ll use to achieve this: Key Manager. But the subordinate CA certificate we create is not suited to sign XPI files, because it doesn’t state explicitly that it can be used for code signing. We have to create another one with an extendedKeyUsage property for code signing.

First we need to create a config file with the extended key usage, eku.cnf:

[eku_codesigning]
extendedKeyUsage=codeSigning

Then we issue the next OpenSSL commands to create a new certificate and PKCS12 file:

openssl x509 -req -days 730 -in ia.csr -CA ca.crt -CAkey ca.key -set_serial 02 -out ia2.crt -extfile eku.cnf -extensions eku_codesigning

openssl pkcs12 -export -out ia2.p12 -inkey ia.key -in ia2.crt -chain -CAfile ca.crt

Now we use the Key Manager add-on to import the PKCS12 file (this can also be done with the Firefox options manager):

20090101-220132

20090101-220237

20090101-220326

20090101-2203431

20090101-2203561

20090101-2204091

After importing the certificates and keys, we need to enable the root CA certificate for code signing:

20090101-220428

20090101-220454

Now this is done, we’re ready to sign an XPI file. As an example, I’m taking my WhoAmI Firefox add-on:

20090101-220543

20090101-220724

20090101-220735

When installing this signed Firefox add-on, we get to see the identity of the signer:

20090101-220802

For an unsigned add-on, it says “Author not verified”:

20090101-220010

If we don’t trust the root CA for code signing (or the root CA certificate is missing), we can’t install the add-on!

20090101-221028

So it doesn’t make sense to sign a Firefox add-on with your own self-signed certificate if you plan to make it public (e.g. publish it on the Mozilla add-on site). Users will not be able to install your add-on if they don’t have imported and approved your root CA certificate.

Wednesday 31 December 2008

Howto: Add a Digital Signature to Executables

Filed under: Encryption — Didier Stevens @ 10:56

Signtool.exe is the default Windows development tool to add a digital signature (Authenticode) to Windows executables (PE files). This howto shows you how to use signtool. You’ll need to create your own certificate and key (or buy one) to sign code.

To obtain signtool, download the platform SDK or the .NET SDK.

I use signtool in my makefile with command line options to automatically sign compiled code, but in this howto, I’ll show the interactive use.

First we will install the certificate with key we’ll use to sign code. Double-click the file and let the wizard do its work with the default option:

20081231-094329

20081231-094445

Because the wizard will also install the root CA certificate found in the PKCS12 file, it will ask you if you trust it.

20081231-094615

It is not necessary to install this root CA certificate for code signing purposes, but if you don’t, signtool will not include the root CA certificate in the certificate chain. And you also need to install this root CA certificate if you want to automatically trust all certificates issued by this root CA (or its subordinate CAs).

Now start signtool from a command-line like this: signtool signwizard.

20081231-094839

For the purposes of this howto, we’ll sign notepad.exe. When you sign an executable that is already signed, the existing signature is overwritten. Actually, notepad is not signed by Microsoft with an embedded signature, but using a security catalog.

20081231-095047

We’ll use the default options presented by the wizard (except for the timestamp):

20081231-095559

20081231-095812

Select the certificate with key we installed: use Select from Store…

20081231-095856

20081231-095950

20081231-100027

By default, the signature doesn’t include a timestamp signed by an external authority (a counter-signature). It’s easy to add one, for example using Verisign’s timestamp service: http://timestamp.verisign.com/scripts/timstamp.dll (of course, using this option requires Internet access).

20081231-100318

Finally, click finish for the wizard to do its work:

20081231-100432

20081231-100504

From now on, notepad.exe’s properties displays a Digital Signatures tab:

20081231-100619

20081231-100920

20081231-101005

This certificate is OK because we installed the root CA certificate in our certificate store. But if you check this signature on another machine or with another account (which doesn’t trust our root CA), we’ll get a warning that although the signature is valid, we don’t trust the root CA:

20081231-101604

20081231-102020

If you didn’t make a backup of notepad.exe and want to remove the signature, use my digital signature tool disitool.

Tuesday 30 December 2008

Howto: Make Your Own Cert With OpenSSL

Filed under: Encryption — Didier Stevens @ 21:18

Update: if you don’t have access to a machine with OpenSSL, I created a website to generate certs using the procedure described here. Read through the procedure, and then use the website listed at the end. And if you don’t want your private key generated on a server you don’t own, download my tool I created for Windows that doesn’t require installation: CreateCertGUI.

I also made a video showing the full procedure.

Ever wanted to make your own public key certificate for digital signatures? There are many recipes and tools on the net, like this one. My howto uses OpenSSL, and gives you a cert with a nice chain to your root CA.

First we generate a 4096-bit long RSA key for our root CA and store it in file ca.key:

openssl genrsa -out ca.key 4096

Generating RSA private key, 4096 bit long modulus
...................................................................................++
........................................................................++
e is 65537 (0x10001)

If you want to password-protect this key, add option -des3.

Next, we create our self-signed root CA certificate ca.crt; you’ll need to provide an identity for your root CA:

openssl req -new -x509 -days 1826 -key ca.key -out ca.crt

You are about to be asked to enter information that will be incorporated
into your certificate request.
What you are about to enter is what is called a Distinguished Name or a DN.
There are quite a few fields but you can leave some blank
For some fields there will be a default value,
If you enter '.', the field will be left blank.
-----
Country Name (2 letter code) [GB]:BE
State or Province Name (full name) [Berkshire]:Brussels
Locality Name (eg, city) [Newbury]:Brussels
Organization Name (eg, company) [My Company Ltd]:https://DidierStevens.com
Organizational Unit Name (eg, section) []:
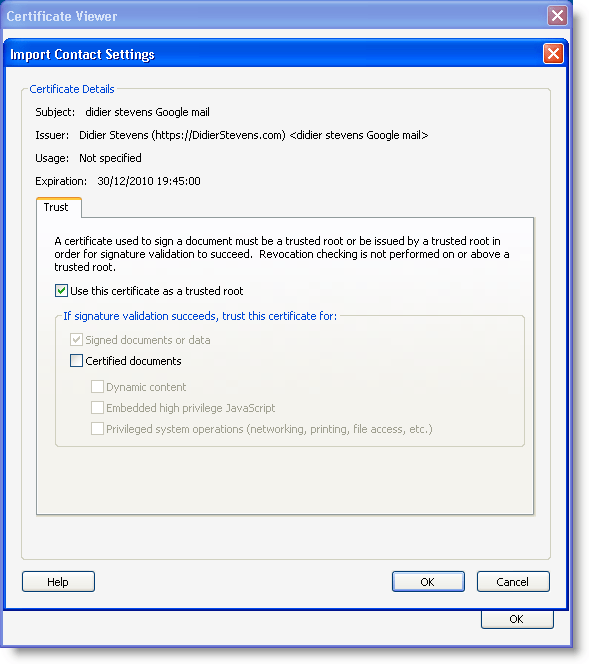
Common Name (eg, your name or your server's hostname) []:Didier Stevens (https://DidierStevens.com)
Email Address []:didier stevens Google mail

The -x509 option is used for a self-signed certificate. 1826 days gives us a cert valid for 5 years.

20081230-220030

Next step: create our subordinate CA that will be used for the actual signing. First, generate the key:

openssl genrsa -out ia.key 4096

Generating RSA private key, 4096 bit long modulus
.....++
.............................................................................++
e is 65537 (0x10001)

Then, request a certificate for this subordinate CA:

openssl req -new -key ia.key -out ia.csr

You are about to be asked to enter information that will be incorporated
into your certificate request.
What you are about to enter is what is called a Distinguished Name or a DN.
There are quite a few fields but you can leave some blank
For some fields there will be a default value,
If you enter '.', the field will be left blank.
-----
Country Name (2 letter code) [GB]:BE
State or Province Name (full name) [Berkshire]:Brussels
Locality Name (eg, city) [Newbury]:Brussels
Organization Name (eg, company) [My Company Ltd]:https://DidierStevens.com
Organizational Unit Name (eg, section) []:Didier Stevens Code Signing (https://DidierStevens.com)
Common Name (eg, your name or your server's hostname) []:
Email Address []:didier stevens Google mail

Please enter the following 'extra' attributes
to be sent with your certificate request
A challenge password []:
An optional company name []:

Next step: process the request for the subordinate CA certificate and get it signed by the root CA.

openssl x509 -req -days 730 -in ia.csr -CA ca.crt -CAkey ca.key -set_serial 01 -out ia.crt

Signature ok
subject=/C=BE/ST=Brussels/L=Brussels/O=https://DidierStevens.com/OU=Didier Stevens Code Signing (https://DidierStevens.com)/emailAddress=didier stevens Google mail
Getting CA Private Key

The cert will be valid for 2 years (730 days) and I decided to choose my own serial number 01 for this cert (-set_serial 01). For the root CA, I let OpenSSL generate a random serial number.

That’s all there is to it! Of course, there are many options I didn’t use. Consult the OpenSSL documentation for more info. For example, I didn’t restrict my subordinate CA key usage to digital signatures. It can be used for anything, even making another subordinate CA. When you buy a code signing certificate, the CA company will limit its use to code signing.

20081230-220418

To use this subordinate CA key for Authenticode signatures with Microsoft’s signtool, you’ll have to package the keys and certs in a PKCS12 file:

openssl pkcs12 -export -out ia.p12 -inkey ia.key -in ia.crt -chain -CAfile ca.crt

Enter Export Password:
Verifying - Enter Export Password:

To sign executables in Windows with the signtool: install file ia.p12 in your certificate store (e.g. double click it), and then use signtool /wizard to sign your PE file.

I’ve used this process to generate certs for my own code signing, and for my Authenticode Challenge.

Update: don’t have OpenSSL? Use my website https://toolbokz.com/gencert.psp

Saturday 13 December 2008

Identifying Garbage Men

Filed under: Entertainment — Didier Stevens @ 15:23

My guest post over at Pauldotcom:

“Tis the season for tipping garbage men. Here in Brussels, at the end of the year, garbage men would ring your doorbell during their round, presenting you their best wishes for the new year.

This tradition came to an end several years ago. Nowadays, they present you their best wishes when they’re off-duty. And in came a new ID problem…

Tuesday 9 December 2008

Updates: bpmtk and Hakin9; PDF and Metasploit

Filed under: Announcement,Hacking,Malware,My Software,PDF,Update — Didier Stevens @ 21:23

Hakin9 has published my bpmtk article. The article mentions bpmtk version 0.1.4.0; however, this new version has no new features. But it comes with extra PoC code, like a LUA-mode keylogger and “rootkit”. New blogposts will explain this new PoC code.

bpmtk12

And upcoming bpmtk version 0.1.5.0 contains a new feature to inject shellcode. Just have to update the documentation.

On the PDF front: I’ve produced my first Ruby code ;-). I worked together with MC from Metasploit to optimize the PDF generation code in this util.printf exploit module. It uses some obfuscation techniques I described 8 months ago.

Monday 8 December 2008

@TweetXmasTree

Filed under: Announcement,Entertainment,Hardware — Didier Stevens @ 20:07

I won’t produce an anti-virus related Season’s Greetings movie, like I did in 2006 and 2007.

But this time, I’ve made you an Xmas Tree you can control via Twitter. However, you’ll have to find out yourself how to control it. 😉

Happy New Year!

20081208-204318

« Previous PageNext Page »

Blog at WordPress.com.