Didier Stevens

Wednesday 8 May 2013

Howto: Make Your Own Cert And Revocation List With OpenSSL

Filed under: Encryption — Didier Stevens @ 10:34

Here is a variant to my “Howto: Make Your Own Cert With OpenSSL” method. This time, I needed a signing cert with a Certificate Revocation List (CRL) extension and an (empty) CRL. I used instructions from this post.

Adding a CRL extension to a certificate is not difficult, you just need to include a configuration file with one line. But creating a CRL file requires more steps, that’s why I needed this howto. The start of this howto is the same as my previous howto.

First we generate a 4096-bit long RSA key for our root CA and store it in file ca.key:

openssl genrsa -out ca.key 4096

Generating RSA private key, 4096 bit long modulus
...................................................................................++
........................................................................++
e is 65537 (0x10001)

If you want to password-protect this key, add option -des3.

Next, we create our self-signed root CA certificate ca.crt; you’ll need to provide an identity for your root CA:

openssl req -new -x509 -days 1826 -key ca.key -out ca.crt

You are about to be asked to enter information that will be incorporated
into your certificate request.
What you are about to enter is what is called a Distinguished Name or a DN.
There are quite a few fields but you can leave some blank
For some fields there will be a default value,
If you enter '.', the field will be left blank.
-----
Country Name (2 letter code) [XX]:BE
State or Province Name (full name) []:Brussels
Locality Name (eg, city) [Default City]:Brussels
Organization Name (eg, company) [Default Company Ltd]:Didier Stevens
Organizational Unit Name (eg, section) []:
Common Name (eg, your name or your server's hostname) []:Didier Stevens CA
Email Address []:

The -x509 option is used for a self-signed certificate. 1826 days gives us a cert valid for 5 years.

Next step: create our subordinate CA that will be used for the actual signing. First, generate the key:

openssl genrsa -out ia.key 4096

Generating RSA private key, 4096 bit long modulus
.....++
.............................................................................++
e is 65537 (0x10001)

Then, request a certificate for this subordinate CA:

openssl req -new -key ia.key -out ia.csr

You are about to be asked to enter information that will be incorporated
into your certificate request.
What you are about to enter is what is called a Distinguished Name or a DN.
There are quite a few fields but you can leave some blank
For some fields there will be a default value,
If you enter '.', the field will be left blank.
-----
Country Name (2 letter code) [XX]:BE
State or Province Name (full name) []:Brussels
Locality Name (eg, city) [Default City]:Brussels
Organization Name (eg, company) [Default Company Ltd]:Didier Stevens
Organizational Unit Name (eg, section) []:
Common Name (eg, your name or your server's hostname) []:Didier Stevens IA
Email Address []:

Please enter the following 'extra' attributes
to be sent with your certificate request
A challenge password []:
An optional company name []:

Make sure the Common Name is different for both certs, otherwise you’ll get an error. Now, before we process the request for the subordinate CA certificate and get it signed by the root CA, we need to create a couple of files (this step is done with Linux; to create empty file certindex on Windows, you could use Notepad in stead of touch).

touch certindex
echo 01 > certserial
echo 01 > crlnumber

And also create this configuration file (ca.conf):

# Mainly copied from:
# http://swearingscience.com/2009/01/18/openssl-self-signed-ca/

[ ca ]
default_ca = myca

[ crl_ext ]
# issuerAltName=issuer:copy  #this would copy the issuer name to altname
authorityKeyIdentifier=keyid:always

 [ myca ]
 dir = ./
 new_certs_dir = $dir
 unique_subject = no
 certificate = $dir/ca.crt
 database = $dir/certindex
 private_key = $dir/ca.key
 serial = $dir/certserial
 default_days = 730
 default_md = sha1
 policy = myca_policy
 x509_extensions = myca_extensions
 crlnumber = $dir/crlnumber
 default_crl_days = 730

 [ myca_policy ]
 commonName = supplied
 stateOrProvinceName = supplied
 countryName = optional
 emailAddress = optional
 organizationName = supplied
 organizationalUnitName = optional

 [ myca_extensions ]
 basicConstraints = CA:false
 subjectKeyIdentifier = hash
 authorityKeyIdentifier = keyid:always
 keyUsage = digitalSignature,keyEncipherment
 extendedKeyUsage = serverAuth
 crlDistributionPoints = URI:http://example.com/root.crl
 subjectAltName  = @alt_names

 [alt_names]
 DNS.1 = example.com
 DNS.2 = *.example.com

Notice the crlDistributionPoints and DNS. entries pointing to domain example.com. You should change them to your domain.

Now you can sign the request:

openssl ca -batch -config ca.conf -notext -in ia.csr -out ia.crt

Using configuration from ca.conf
Check that the request matches the signature
Signature ok
The Subject's Distinguished Name is as follows
countryName          : PRINTABLE:'BE'
stateOrProvinceName   :ASN.1 12:'Brussels'
localityName          :ASN.1 12:'Brussels'
organizationName      :ASN.1 12:'Didier Stevens'
commonName            :ASN.1 12:'Didier Stevens IA'
Certificate is to be certified until May  3 21:13:02 2015 GMT (730 days)

Write out database with 1 new entries
Data Base Updated

To use this subordinate CA key for Authenticode signatures with Microsoft’s signtool, you’ll have to package the keys and certs in a PKCS12 file:

openssl pkcs12 -export -out ia.p12 -inkey ia.key -in ia.crt -chain -CAfile ca.crt

Enter Export Password:
Verifying - Enter Export Password:

Finally, you can generate the empty CRL file:
openssl ca -config ca.conf -gencrl -keyfile ca.key -cert ca.crt -out root.crl.pem
openssl crl -inform PEM -in root.crl.pem -outform DER -out root.crl
rm root.crl.pem

rm is a Linux command, use del on a Windows machine.

The last step is to host this root.crl file on the webserver pointed to in the CRL extension (http://example.com/root.crl in this example).

If you need to revoke the intermediate certificate, use this command:

openssl ca -config ca.conf -revoke ia.crt -keyfile ca.key -cert ca.crt

And then regenerate the CRL file like explained above.
Friday 3 May 2013

VirusTotal: Searching And Submitting

Filed under: Malware,My Software,Update — Didier Stevens @ 8:47

This is an update for virustotal-search.py and a release of a new tool: virustotal-submit.py. I created this new tool because I needed to submit a sample stored in a password protected ZIP-file (not the ZIP-file), without extracting the sample to disk.

To submit a file to VirusTotal, you just run virustotal-submit.py sample.exe.

If you submit a ZIP file, virustotal-submit.py will extract the first file to memory and submit that to VirusTotal. The ZIP file can be password protected with password “infected”. To submit the ZIP file itself, use option -z.

To submit a batch of samples, create a textfile with the name of the files to submit and use option -f.

virustotal-submit.py supports proxies too (Python variables HTTP_PROXY and HTTPS_PROXY or environment variables http_proxy and https_proxy).

Python module poster is required for this tool.

virustotal-submit_V0_0_1.zip (https)
MD5: 8793C3276822DDE36BA0804D3390AD4D
SHA256: F17B9EEC408833039AE63FCED9F6114F99AADFBE9D547AE88B2C3A6E54AE91B4

Updates to virustotal-search.py:

  • uses json or simplejson module
  • proxies are supported (Python variables HTTP_PROXY and HTTPS_PROXY or environment variables http_proxy and https_proxy)
  • option -g forces virustotal-search.py to use the local database in the same directory as the program

virustotal-search_V0_0_8.zip (https)
MD5: 011C88A9C9026A32DA473187A64E880C
SHA256: 30711202BB0CD01A17AFA7BB8BBFE1545B6A840BDB91D83C7753300EF7E71A8F

Friday 26 April 2013

Howto: Add a Digital Signature to a PDF File – Free Software

Filed under: Encryption,PDF — Didier Stevens @ 12:58

This is an update to my post Howto: Add a Digital Signature to a PDF File, but this time I found free software.

Again we use our certificate which we install (open the .p12 file). Install the free JSignPdf software.

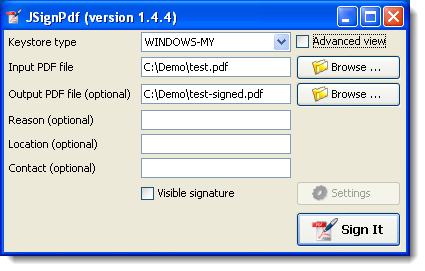
Select the PDF file to sign and select an output file (if you don’t want to overwrite your original):

20130426-140107

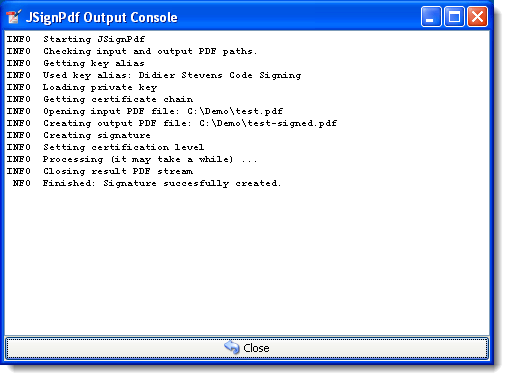
Push Sign It:

20130426-141230

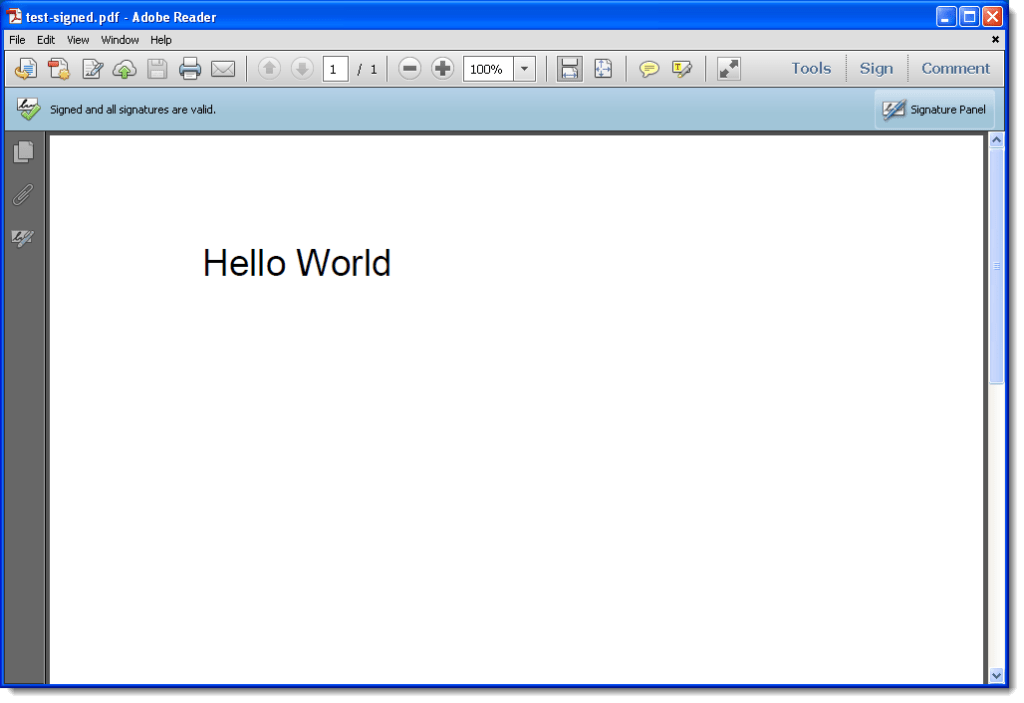
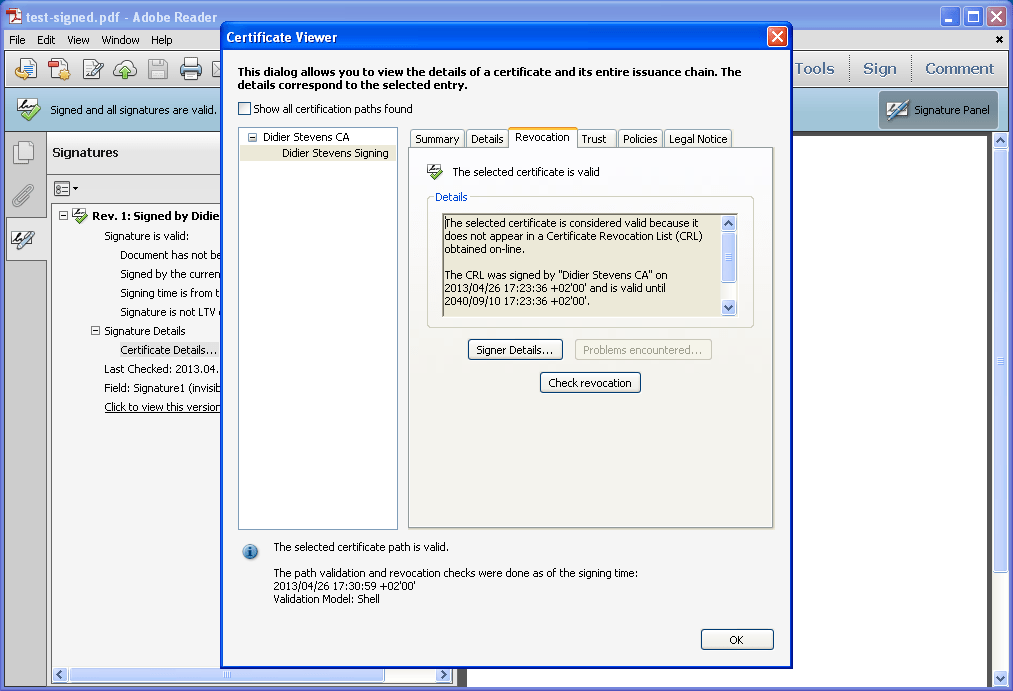
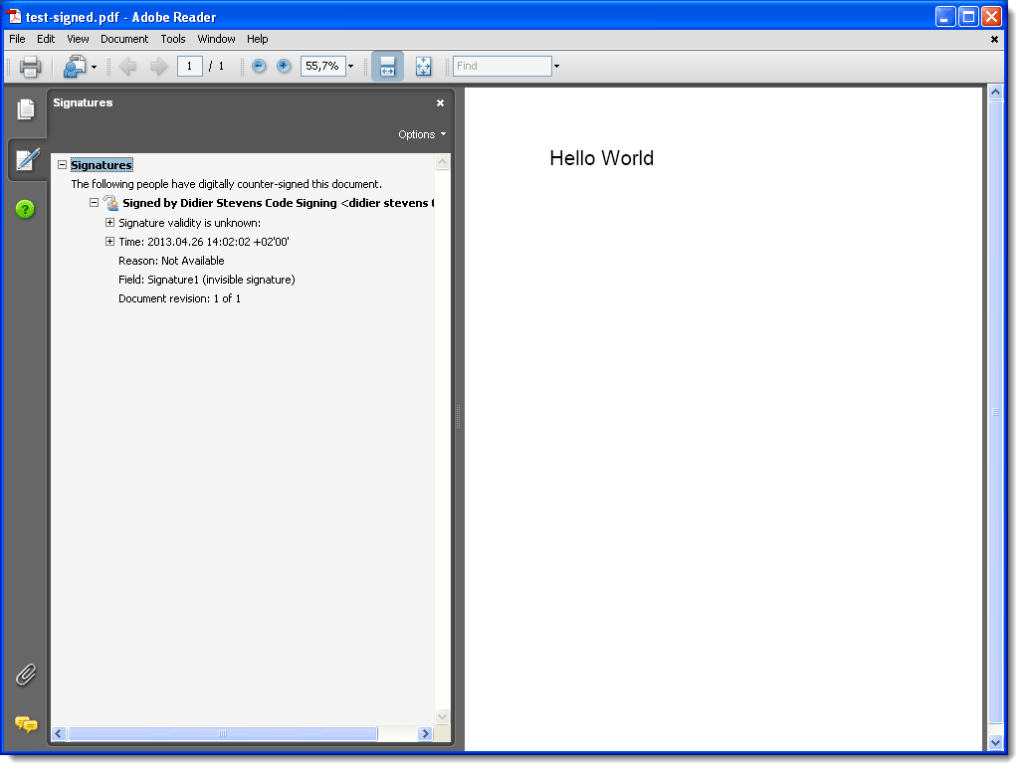
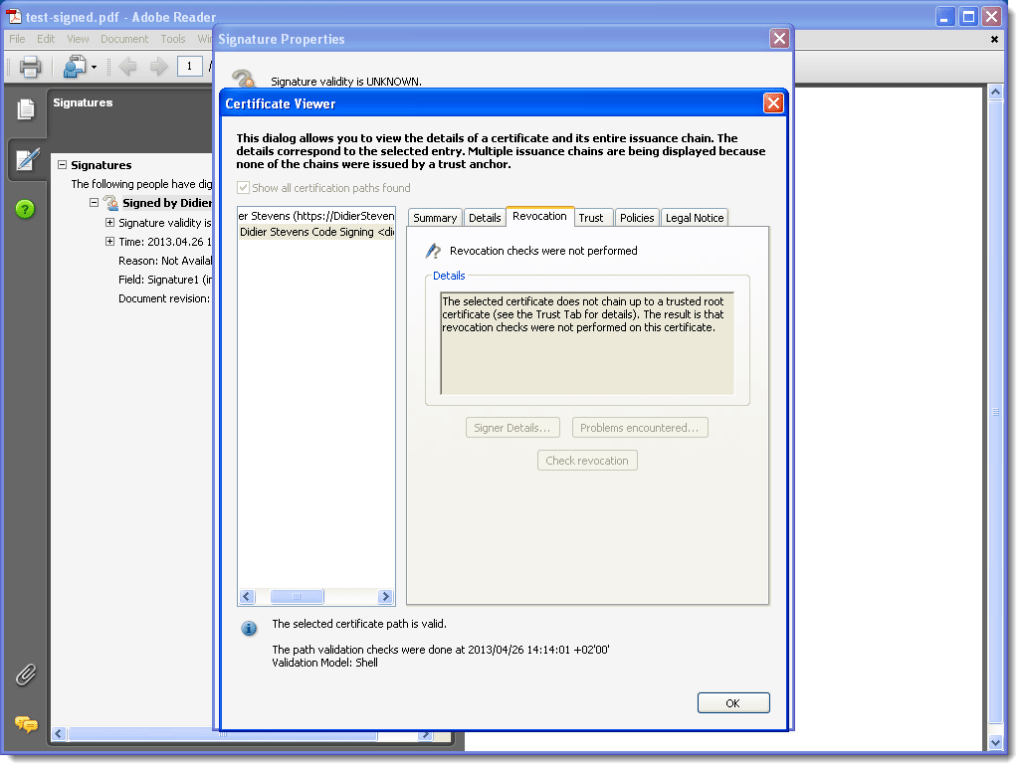
And then you can check the signature with Adobe Reader:

20130426-141337

If you get the following error, make sure you change your PDF version from %PDF-1.1 to %PDF-1.4:

Choosen configuration requires PDF version update, but it’s not possible in the “append” signature mode.

Sunday 21 April 2013

js-unicode-unescape.1sc

Filed under: 010 Editor,My Software — Didier Stevens @ 0:00

As a thank you to those who nominated me for the European Security Bloggers Awards, I’m going to release some new scripts this week. Here’s the sixth one.

This script does the opposite of js-unicode-escape.1sc: a Unicode escape encode string is decode to bytes.

js-unicode-unescape_v0_0_1.zip (https)
MD5: E4FF29FB631142AC995636EED4CFB2AB
SHA256: C5659BCED1C6A7F92C2F7F9058DAA5807D2907283041E4F9DD1E4B6F318F2BBD

Saturday 20 April 2013

js-unicode-escape.1sc

Filed under: 010 Editor,My Software — Didier Stevens @ 0:00

As a thank you to those who nominated me for the European Security Bloggers Awards, I’m going to release some new scripts this week. Here’s the fifth one.

010 Editor has a different functions to copy bytes from a file. As raw bytes, as hex, as base64, …

This script copies the selected bytes to the clipboard as a Unicode escape encoded string for JavaScript: %u3421%u9a0d…

js-unicode-escape_v0_0_3.zip (https)
MD5: B86B7E73D93C5A4C086384C2FF89303C
SHA256: 81F26C328FD67FB7512CD60485481D7FFD8B7FE5ACE95455D45F4F635EADF81C

Friday 19 April 2013

pecheck.py

Filed under: My Software,Reverse Engineering — Didier Stevens @ 0:00

As a thank you to those who nominated me for the European Security Bloggers Awards, I’m going to release some new scripts this week. Here’s the fourth one.

pecheck.py is a wrapper for pefile, but this version has a new feature: check a PE file stored in a (password protected) ZIP file (password infected).

pecheck_v0_3_0.zip (https)
MD5: C2AC9FED3C7F1787854C8D0E651B2591
SHA256: 3CDEBADA4C594DD3622E234747C6AABD41573C94087C0554CBA65D0472F6B413

Thursday 18 April 2013

search-and-replace-with-wildcards.1sc

Filed under: 010 Editor,My Software — Didier Stevens @ 0:00

As a thank you to those who nominated me for the European Security Bloggers Awards, I’m going to release some new scripts this week. Here’s the third one.

010 Editor has a search feature with wildcards (like FC 01 * 10 CF), but no search and replace with wildcards (like FC 01 * 10 CF -> FD 02 * 20 DF). This scripts implements such a feature.

search-and-replace-with-wildcards_v0_0_1.zip (https)
MD5: 7D620E8BEFFD4ED5563D9944C9B0B859
SHA256: B7F074304660A8DBF7AB2261D8619FFFFD461EFB5EE4C6E42880C87A3C1A4AB7

Wednesday 17 April 2013

fuzzer.1sc

Filed under: 010 Editor,My Software — Didier Stevens @ 0:00

As a thank you to those who nominated me for the European Security Bloggers Awards, I’m going to release some new scripts this week. Here’s the second one.

fuzzer.1sc is a 010 Editor script that implements a simple fuzzer. It overwrites bytes in a file or selection. A selection is particularly useful combined with a template. For example, with a couple of clicks you can fuzz the control structures of a JPEG image.

4 parameters (number of fuzz sequences to overwrite, minimum length and maximum length of a sequence, and the fuzz character) allow you to control the random overwriting process.

fuzzer_v0_0_1.zip (https)
MD5: E9B7114952E81A504C7CF3B06B99B5CF
SHA256: CF399EE2D86B6039236608F4FE882E579D7DCFED1DA980B4124ED06FD0C5807A

Tuesday 16 April 2013

shift.1sc

Filed under: 010 Editor,My Software — Didier Stevens @ 0:00

As a thank you to those who nominated me for the European Security Bloggers Awards, I’m going to release some new scripts this week. Here’s the first one.

shift.1sc is a 010 Editor script that allows you to shift bytes in a file or selection.

shift_v0_0_1.zip (https)
MD5: 0E98DD182D12839FD86A30E696414E0A
SHA256: 07D849E9E898AFA705E57474FADFF001C9CAF9DB1D51AD8C9EB7E9A2A765D714

Monday 15 April 2013

New Tool: XORStrings

Filed under: Forensics,My Software,Reverse Engineering — Didier Stevens @ 0:00

XORStrings is best described as the combination of my XORSearch tool and the well-known strings command.

XORStrings will search for strings in the (binary) file you provide it, using the same encodings as XORSearch (XOR, ROL, ROT and SHIFT). For every encoding/key, XORStrings will search for strings and report the number of strings found, the average string length and the maximum string length. The report is sorted by the number of strings found, but can also be sorted by the maximum string length (use option -m). By default, the string terminator is 0x00, but you can provide your own with option -t, like the space character (0x20) in this example:

20130308-213053

I’ve used XORStrings to identify the encoding used in TeamViewer traffic.

There are more options than the ones I mentioned here. I’ll create a dedicated page for this tool, but for now, I invite you to discover the options yourself.

XORStrings_V0_0_1.zip (https)
MD5: 27DA0B3BC5296179CB58181BDFF99F8D
SHA256: 5EA7E063A41E38E9E6277F1CD73FCEA2AEF50C33C44D75C226900314FF84A1B5

« Previous PageNext Page »

Blog at WordPress.com.