Didier Stevens

Friday 6 November 2015

Analysis Of An Office Maldoc With Encrypted Payload (Slow And Clean)

Filed under: maldoc,Malware,My Software,Reverse Engineering — Didier Stevens @ 0:00

In my previous post we used VBA and Excel to decode the URL and the PE file.

In thisĀ  post we will use Python. I translated the VBA decoding function IpkfHKQ2Sd to Python:

20151105-223017

Now we can decode the URL using Python:

20151105-223901

And also decode the downloaded file with my translate program and the IpkfHKQ2Sd function:

20151105-224328

20151105-224636


Thursday 5 November 2015

Analysis Of An Office Maldoc With Encrypted Payload (Quick And Dirty)

Filed under: maldoc,Malware,My Software,Reverse Engineering — Didier Stevens @ 0:00

The malicious office document we’re analyzing is a downloader: 0e73d64fbdf6c87935c0cff9e65fa3be

oledump reveals VBA macros in the document, but the plugins are not able to extract a URL:

20151104-194727

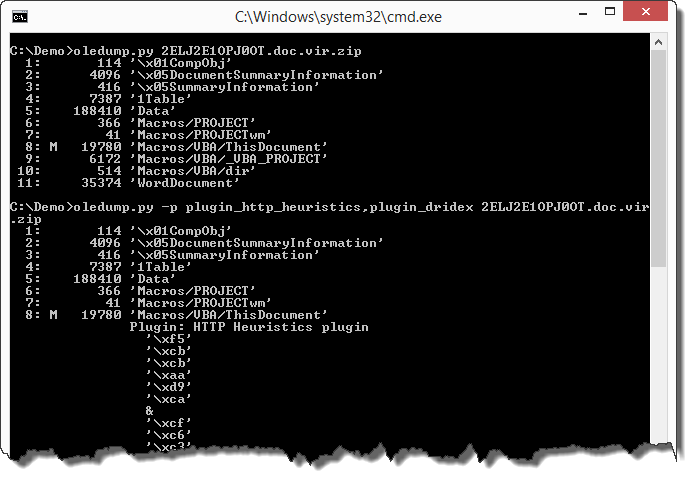
Let’s use a new plugin that I wrote: plugin_vba_dco. This plugin searches for Declare statements and CreateObject calls:

20151104-194827

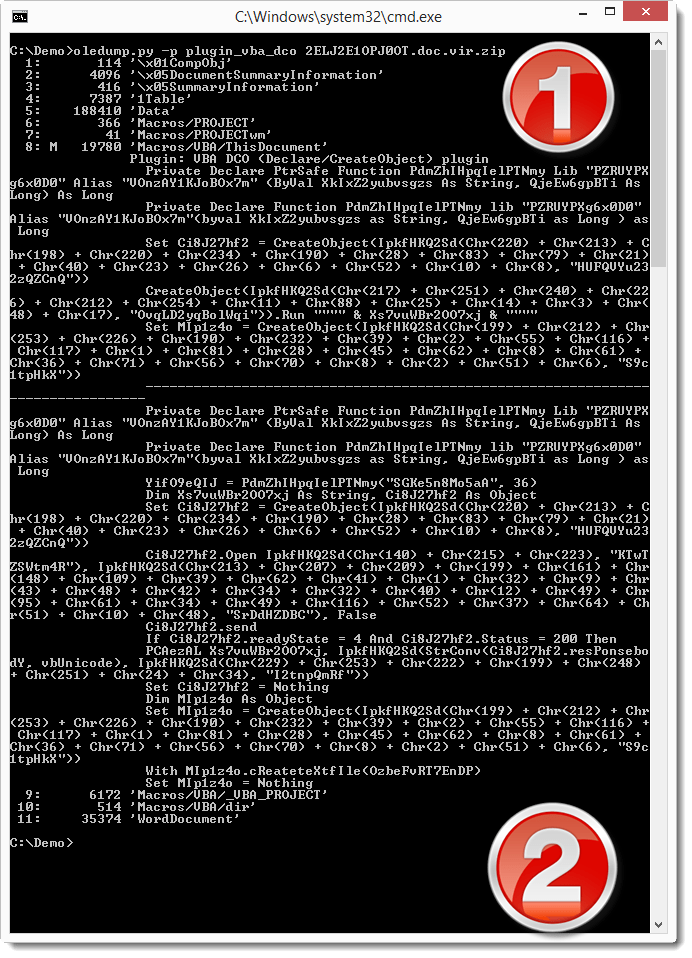
In the first half of the output (1) we see all lines containing the Declare or CreateObject keyword. In the second half of the output (2) we see all lines containing calls to declared functions or created objects.

Although the code is obfuscated (obfuscation of strings and variable names), the output of this plugin allows us to guess that Ci8J27hf2 is probably a XMLHTTP object, because of the .Open, .send, .Status, … methods and properties.

The Open method of the XMLHTTP object takes 3 parameters: the HTTP method, the URL and a boolean (asynchronous or synchronous call):

20151104-195006

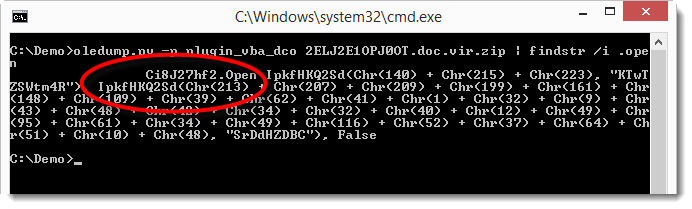
As we can see, the third parameter is False and the first 2 parameters are the return value of a function called IpkfHKQ2Sd. This function takes 2 parameters: 2 strings. The first string is the result of concatenated Chr functions, and the second string is a literal string. Since the Open method requires the HTTP method and URL as strings, is very likely that function IpkfHKQ2Sd is a decoding function that takes 2 strings as input (meaningless to us) and returns a meaningful string.

Here is the original IpkfHKQ2Sd function. It’s heavily obfuscated:

20151104-195102

Here is the same function that I deobfuscated. I didn’t change the function name, but I removed all useless code, renamed variables and added indentation:

20151104-195144

We can now see that this function uses a key (sKey) and XOR operations to decode a secret string (sSecret). And now we can also see that this is just a string manipulation function. It does not contain malicious or dangerous statements or function calls. So it is safe to use in a VBA interpreter, we don’t need to translate it into another language like Python.

We are going to use this deobfuscated function in a new spreadsheet to decode the URL parameter:

20151104-195359

In the VBA editor of this new spreadsheet, we have the deobfuscated IpkfHKQ2Sd function and a test subroutine that calls the IpkfHKQ2Sd function with strings that we found in the .Open method for the URL argument. The decoded string returned by function IpkfHKQ2Sd is displayed via MsgBox. Executing this test subroutine reveals the URL:

20151104-195410

Downloading this file, we see it’s not a JPEG file, but contrary to what we could expect, it’s neither an EXE file:

20151104-195912

Searching for .responseBody in the VBA code, we see that the downloaded file (present in .responseBody) is passed as an argument to function IpkfHKQ2Sd:

20151104-195823

This means that the downloaded file is also encoded. It needs to be decoded with the same function as we used for the URL: function IpkfHKQ2Sd (but with another key).

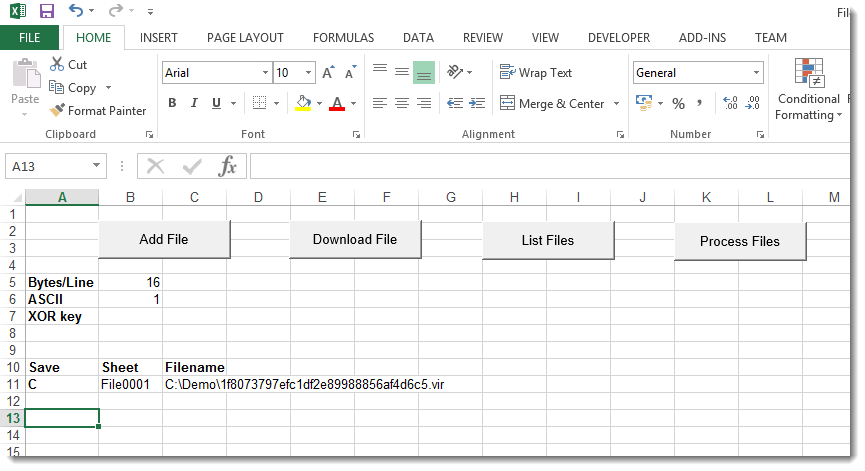
To convert this file with the deobfuscated function in our spreadsheet, we need to load the file in the spreadsheet, decode it, and save the decoded file to disk. This can be done with my FileContainer.xls tool (to be released). First we load the encoded file in the FileContainer:

20151104-200044

20151104-200105

FileContainer supports file conversion: we have to use command C and push the Process Files button:

20151104-200125

Here is the default conversion function Convert. This default function doesn’t change the file: the output is equal to the input:

20151104-200214

To decode the file, we need to update the Convert function to call the decoding function IpkfHKQ2Sd with the right key. Like this:

20151104-200424

And then, when we convert the file, we obtain an EXE file:

20151104-200952

This EXE turns out to be Dridex malware: 50E3407557500FCD0D81BB6E3B026404

Remark: reusing code from malware is dangerous unless we know exactly what the code does. To decode the downloaded file quickly, we reused the decoding VBA function IpkfHKQ2Sd (I did not translate it into another language like Python). But to be sure it was not malicious, I deobfuscated it first. The deobfuscation process gave me the opportunity to look at each individual statement, thereby giving me insight into the code and come to the conclusion that this function is not dangerous. We could also have used the obfuscated function, but then we ran the risk that malware would execute because we did not fully understand what the obfuscated function did.

Translating the obfuscating function to another language doesn’t make it less dangerous, but it allows us to execute it in a non-Windows environment (like Linux), thereby preventing Windows malware from executing.

Wednesday 14 October 2015

cut-bytes.py

Filed under: My Software — Didier Stevens @ 0:00

cut-bytes.py is a stand-alone program that implements the –cut option found in my dump programs.

cut-bytes_V0_0_1.zip (https)
MD5: 48CEBD6748E152CBF619EF10B58E8DFF
SHA256: E99BC09DA0F1310085ED1520D52FB188D06456D030BD05A941FCE2B5FE21A661

Tuesday 13 October 2015

Release: emldump.py Version 0.0.3

Filed under: My Software — Didier Stevens @ 0:00

This new version of emldump comes with the new –cut option. And with support for YARA. Take a look at the man page (emldump.py –man):

Usage: emldump.py [options] [mimefile]
EML dump utility

Options:
  --version             show program's version number and exit
  -h, --help            show this help message and exit
  -m, --man             Print manual
  -d, --dump            perform dump
  -x, --hexdump         perform hex dump
  -a, --asciidump       perform ascii dump
  -H, --header          skip first line
  -s SELECT, --select=SELECT
                        select item nr or MIME type for dumping
  -y YARA, --yara=YARA  YARA rule file (or directory or @file) to check
                        streams (YARA search doesn't work with -s option)
  --yarastrings         Print YARA strings
  -D DECODERS, --decoders=DECODERS
                        decoders to load (separate decoders with a comma , ;
                        @file supported)
  --decoderoptions=DECODEROPTIONS
                        options for the decoder
  -v, --verbose         verbose output with decoder errors
  -c CUT, --cut=CUT     cut data

Manual:

emldump is a tool to analyze MIME files.
The MIME file can be provided as an argument, via stdin (piping) and it may
also be contained in a (password protected) ZIP file.
When emldump runs on a MIME file without any options, it reports the different
parts in the MIME file. Like in this example:

emldump.py sample.vir
1: M         multipart/alternative
2:       610 text/plain
3: M         multipart/related
4:      1684 text/html
5:    133896 application/octet-stream

The first number is an index added by emldump (this index does not come from
the MIME file). This index can be used to select a part.
If a part has an M indicator, then it is a multipart and can not be selected.
Next is the number of bytes in the part, and the MIME type of the part.

Some MIME files start with an info line that has to be skipped. For example
e-mails saved with Lotus Notes. Skipping this first line can be done with
option -H.

A particular part of the MIME file can be selected for further analysis with
option -s. Here is an example where we use the index 2 to select the second
part:

emldump.py sample.vir -s 2
00000000: 20 20 20 0D 0A 20 20 20 41 20 63 6F 70 79 20 6F     ..   A copy o
00000010: 66 20 79 6F 75 72 20 41 44 50 20 54 6F 74 61 6C  f your ADP Total
00000020: 53 6F 75 72 63 65 20 50 61 79 72 6F 6C 6C 20 49  Source Payroll I
00000030: 6E 76 6F 69 63 65 20 66 6F 72 20 74 68 65 20 66  nvoice for the f
00000040: 6F 6C 6C 6F 77 69 6E 67 20 70 61 79 72 6F 6C 6C  ollowing payroll
...

When a part is selected, by default the content of the part is dumped in
HEX/ASCII format (option -a). An hexdump can be obtained with option -x, like
in this example:

emldump.py sample.vir -s 2 -x
20 20 20 0D 0A 20 20 20 41 20 63 6F 70 79 20 6F
66 20 79 6F 75 72 20 41 44 50 20 54 6F 74 61 6C
53 6F 75 72 63 65 20 50 61 79 72 6F 6C 6C 20 49
6E 76 6F 69 63 65 20 66 6F 72 20 74 68 65 20 66
6F 6C 6C 6F 77 69 6E 67 20 70 61 79 72 6F 6C 6C
20 69 73 09 20 20 20 69 73 20 61 74 74 61 63 68

The raw content of the part can be dumped too with option -d. This can be used
to redirect to a file or piped into another analysis program.

Option -s (select) takes an index number, but can also take a MIME type, like
in this example:
emldump.py sample.vir -s text/plain

emldump can scan the content of the parts with YARA rules (the YARA Python
module must be installed). You provide the YARA rules with option -y. You can
provide one file with YARA rules, an at-file (@file containing the filenames
of the YARA files) or a directory. In case of a directory, all files inside
the directory are read as YARA files. All parts are scanned with the provided
YARA rules, you can not use option -s to select an individual part.

Content of example.eml:
emldump.py example.eml
1: M         multipart/mixed
2:        32 text/plain
3:    114704 application/octet-stream

YARA example:
emldump.py -y contains_pe_file.yara example.eml
3:    114704 application/octet-stream contains_pe_file.yara Contains_PE_File

In this example, you use YARA rule contains_pe_file.yara to find PE files
(executables) inside MIME files. The rule triggered for part 3, because it
contains an EXE file encoded in BASE64.

If you want more information about what was detected by the YARA rule, use
option --yarastrings like in this example:
emldump.py -y contains_pe_file.yara --yarastrings example.eml
3:    114704 application/octet-stream contains_pe_file.yara Contains_PE_File
 000010 $a 4d5a 'MZ'
 0004e4 $a 4d5a 'MZ'
 01189f $a 4d5a 'MZ'

YARA rule contains_pe_file detects PE files by finding string MZ followed by
string PE at the correct offset (AddressOfNewExeHeader).
The rule looks like this:
rule Contains_PE_File
{
    meta:
        author = "Didier Stevens (https://DidierStevens.com)"
        description = "Detect a PE file inside a byte sequence"
        method = "Find string MZ followed by string PE at the correct offset
(AddressOfNewExeHeader)"
    strings:
        $a = "MZ"
    condition:
        for any i in (1..#a): (uint32(@a[i] + uint32(@a[i] + 0x3C)) ==
0x00004550)
}

maldoc.yara are YARA rules to detect shellcode, based on Frank Boldewin's
shellcode detector used in OfficeMalScanner.

When looking for traces of Windows executable code (PE files, shellcode, ...)
with YARA rules, one must take into account the fact that the executable code
might have been encoded (for example via XOR and a key) to evade detection.
To deal with this possibility, emldump supports decoders. A decoder is another
type of plugin, that will bruteforce a type of encoding on each part. For
example, decoder_xor1 will encode each part via XOR and a key of 1 byte. So
effectively, 256 different encodings of the part will be scanned by the YARA
rules. 256 encodings because: XOR key 0x00, XOR key 0x01, XOR key 0x02, ...,
XOR key 0xFF
Here is an example:
emldump.py -y contains_pe_file.yara -D decoder_xor1 example-xor.eml
3:    114704 application/octet-stream contains_pe_file.yara Contains_PE_File
(XOR 1 byte key 0x14)

The YARA rule triggers on part 3. It contains a PE file encoded via XORing
each byte with 0x14.

You can specify more than one decoder separated by a comma ,.
emldump.py -y contains_pe_file.yara -D decoder_xor1,decoder_rol1,decoder_add1
example-xor.eml
3:    114704 application/octet-stream contains_pe_file.yara Contains_PE_File
(XOR 1 byte key 0x14)

Some decoders take options, to be provided with option --decoderoptions.

Option -c (--cut) allows for the partial selection of a stream. Use this
option to "cut out" part of the stream.
The --cut option takes an argument to specify which section of bytes to select
from the stream. This argument is composed of 2 terms separated by a colon
(:), like this:
termA:termB
termA and termB can be:
- nothing (an empty string)
- a positive number; example: 10
- an hexadecimal number (to be preceded by 0x); example: 0x10
- a case sensitive string to search for (surrounded by square brackets and
single quotes); example: ['MZ']
- an hexadecimal string to search for (surrounded by square brackets);
example: [d0cf11e0]
If termA is nothing, then the cut section of bytes starts with the byte at
position 0.
If termA is a number, then the cut section of bytes starts with the byte at
the position given by the number (first byte has index 0).
If termA is a string to search for, then the cut section of bytes starts with
the byte at the position where the string is first found. If the string is not
found, the cut is empty (0 bytes).
If termB is nothing, then the cut section of bytes ends with the last byte.
If termB is a number, then the cut section of bytes ends with the byte at the
position given by the number (first byte has index 0).
When termB is a number, it can have suffix letter l. This indicates that the
number is a length (number of bytes), and not a position.
If termB is a string to search for, then the cut section of bytes ends with
the last byte at the position where the string is first found. If the string
is not found, the cut is empty (0 bytes).
No checks are made to assure that the position specified by termA is lower
than the position specified by termB. This is left up to the user.
Examples:
This argument can be used to dump the first 256 bytes of a PE file located
inside the stream: ['MZ']:0x100l
This argument can be used to dump the OLE file located inside the stream:
[d0cf11e0]:
When this option is not used, the complete stream is selected.

emldump_V0_0_3.zip (https)
MD5: FB080006C2653F3A2AD6E889FC957D5F
SHA256: 0D55DE704BDE558B6E8E5F823C513F19F8A5FD5B2A97BB8BD5EBB5FAD18FA658

Monday 12 October 2015

Update: base64dump.py Version 0.0.3

Filed under: My Software,Update — Didier Stevens @ 0:00

This new version of base64dump comes with the new –cut option.

base64dump_V0_0_3.zip (https)
MD5: CF214FDFE9B83E39DC8484C137050569
SHA256: 4F1B2764CCD40E0276FFC3F81E3C0B55E4C844D469C4E313A99FB13F0B5621C0

Tuesday 29 September 2015

Dump Tools: Cut Cut Cut …

Filed under: My Software,Update — Didier Stevens @ 0:00

I added a new option to my different dump tools (oledump, emldump, base64dump, zipdump and the new rtfdump): the cut option. And I will also release a standalone cut tool.

This option allows you to cut out a part of a data stream. For example to extract a PE file hidden in a byte stream.

The first updated tool to get published is oledump:

oledump_V0_0_18.zip (https)
MD5: 88C9999726C0157267E2FF31E137D66C
SHA256: 1FC9EE7A0BB5A016339C73CBE5DE2F2C0A9C006BC924A5F9346F9F4EDE060939

Here I demo the –cut option in a new video:

Tuesday 1 September 2015

nsrl.py: Using the Reference Data Set of the National Software Reference Library

Filed under: Forensics,My Software — Didier Stevens @ 0:00

When I scan executables on a Windows machine looking for malware or suspicious files, I often use the Reference Data Set of the National Software Reference Library to filter out known benign files.

nsrl.py is the program I wrote to do this. nsrl.py can read the Reference Data Set directly from the ZIP file provided by the NSRL, no need to unzip it.

20150831-230251

Usage: nsrl.py [options] filemd5 [NSRL-file]
NSRL tool

Options:
–versionĀ Ā Ā Ā Ā Ā Ā Ā Ā Ā Ā Ā  show program’s version number and exit
-h, –helpĀ Ā Ā Ā Ā Ā Ā Ā Ā Ā Ā  show this help message and exit
-s SEPARATOR, –separator=SEPARATOR
separator to use (default is ; )
-H HASH, –hash=HASHĀ  NSRL hash to use, options: SHA-1, MD5, CRC32 (default
MD5)
-f, –foundonlyĀ Ā Ā Ā Ā Ā  only report found hashes
-n, –notfoundonlyĀ Ā Ā  only report missing hashes
-a, –allfindsĀ Ā Ā Ā Ā Ā Ā  report all matching hashes, not just first one
-q, –quietĀ Ā Ā Ā Ā Ā Ā Ā Ā Ā  do not produce console output
-o OUTPUT, –output=OUTPUT
output to file
-m, –manĀ Ā Ā Ā Ā Ā Ā Ā Ā Ā Ā Ā  Print manual

Manual:

nsrl.py looks up a list of hashes in the NSRL database and reports the
results as a CSV file.

The program takes as input a list of hashes (a text file). By default,
the hash used for lookup in the NSRL database is MD5. You can use
option -H to select hash algorithm sha-1 or crc32. The list of hashes
is read into memory, and then the NSRL database is read and compared
with the list of hashes. If there is a match, a line is added to the
CSV report for this hash. The list of hashes is deduplicated before
matching occurs. So if a hash appears more than once in the list of
hashes, it is only matched once. If a hash has more than one entry in
the NSRL database, then only the first occurrence will be reported.
Unless option -a is used to report all matching entries of the same
hash. The first part of the CSV report contains all matching hashes,
and the second part all non-matching hashes (hashes that were not
found in the NSRL database). Use option -f to report only matching
hashes, and option -n to report only non-matching hashes.

The CSV file is outputted to console and written to a CSV file with
the same name has the list of hashes, but with a timestamp appended.
To prevent output to the console, use option -q. T choose the output
filename, use option -o. The separator used in the CSV file is ;. This
can be changed with option -s.

The second argument given to nsrl.py is the NSRL database. This can be
the NSRL database text file (NSRLFile.txt), the gzip compressed NSRL
database text file or the ZIP file containing the NSRL database text
file. I use the “reduced set” or minimal hashset (each hash appears
only once) found on http://www.nsrl.nist.gov/Downloads.htm. The second
argument can be omitted if a gzip compressed NSRL database text file
NSRLFile.txt.gz is stored in the same directory as nsrl.py.

nsrl_V0_0_1.zip (https)
MD5: 5063EEEF7345C65D012F65463754A97C
SHA256: ADD3E82EDABA7F956CDEBE93135096963B0B11BB48473EEC2C45FC21CFB32BAA

Friday 21 August 2015

Update: base64dump.py Version 0.0.2

Filed under: My Software,Update — Didier Stevens @ 9:35

A small update to my base64dump.py program: with option -n, you can specify the minimum length of the decoded base64 stream.

I use this when I have too many short strings detected as base64.

base64dump_V0_0_2.zip (https)
MD5: EE032FAB256D44B2907EAA716AD812C5
SHA256: 1E5801DD71C0FFA9CA90D2803B46275662E222D874E409FF31F83B21E6DEC080

Thursday 13 August 2015

Update: pdf-parser Version 0.6.4

Filed under: Malware,My Software,PDF,Update — Didier Stevens @ 0:00

In this new version of pdf-parser, option -H will now also calculate the MD5 hashes of the unfiltered and filtered stream of selected objects, and also dump the first 16 bytes. I needed this to analyze a malicious PDF that embeds a .docm file.

20150812-215754

As you can see in this screenshot, the embedded file is a ZIP file (PK). .docm files are actually ZIP files.

pdf-parser_V0_6_4.zip (https)
MD5: 47A4C70AA281E1E80A816371249DCBD6
SHA256: EC8E64E3A74FCCDB7828B8ECC07A2C33B701052D52C43C549115DDCD6F0F02FE

Monday 3 August 2015

Jump List Forensics

Filed under: Forensics,My Software — Didier Stevens @ 0:00

Jump List files are actually OLE files. These files (introduced with Windows 7) give access to recently accessed applications and files. They have forensic value. You can find them in C:\Users\%USERNAME%\AppData\Roaming\Microsoft\Windows\Recent\AutomaticDestinations and C:\Users\%USERNAME%\AppData\Roaming\Microsoft\Windows\Recent\CustomDestinations.

The AutomaticDestinations files are the OLE files, so you can analyze them with oledump. There are a couple of tools that can extract information from these files.

Here you can see oledump analyzing an automatic Jump List file:

20150712-190918

The stream DestList contains the Jump List data:

20150712-191030

There are several sites on the Internet explaining the format of this data, like this one. I used this information to code a plugin for Jump List files:

20150712-191130

The plugin takes an option (-f) to condense the information to just filenames:

20150712-191215

« Previous PageNext Page »

Blog at WordPress.com.