There are powerstrips with a switch that lights up when the switch is turned on. Like this one:
These switches (certainly older models) often use a neon lamp as light source.
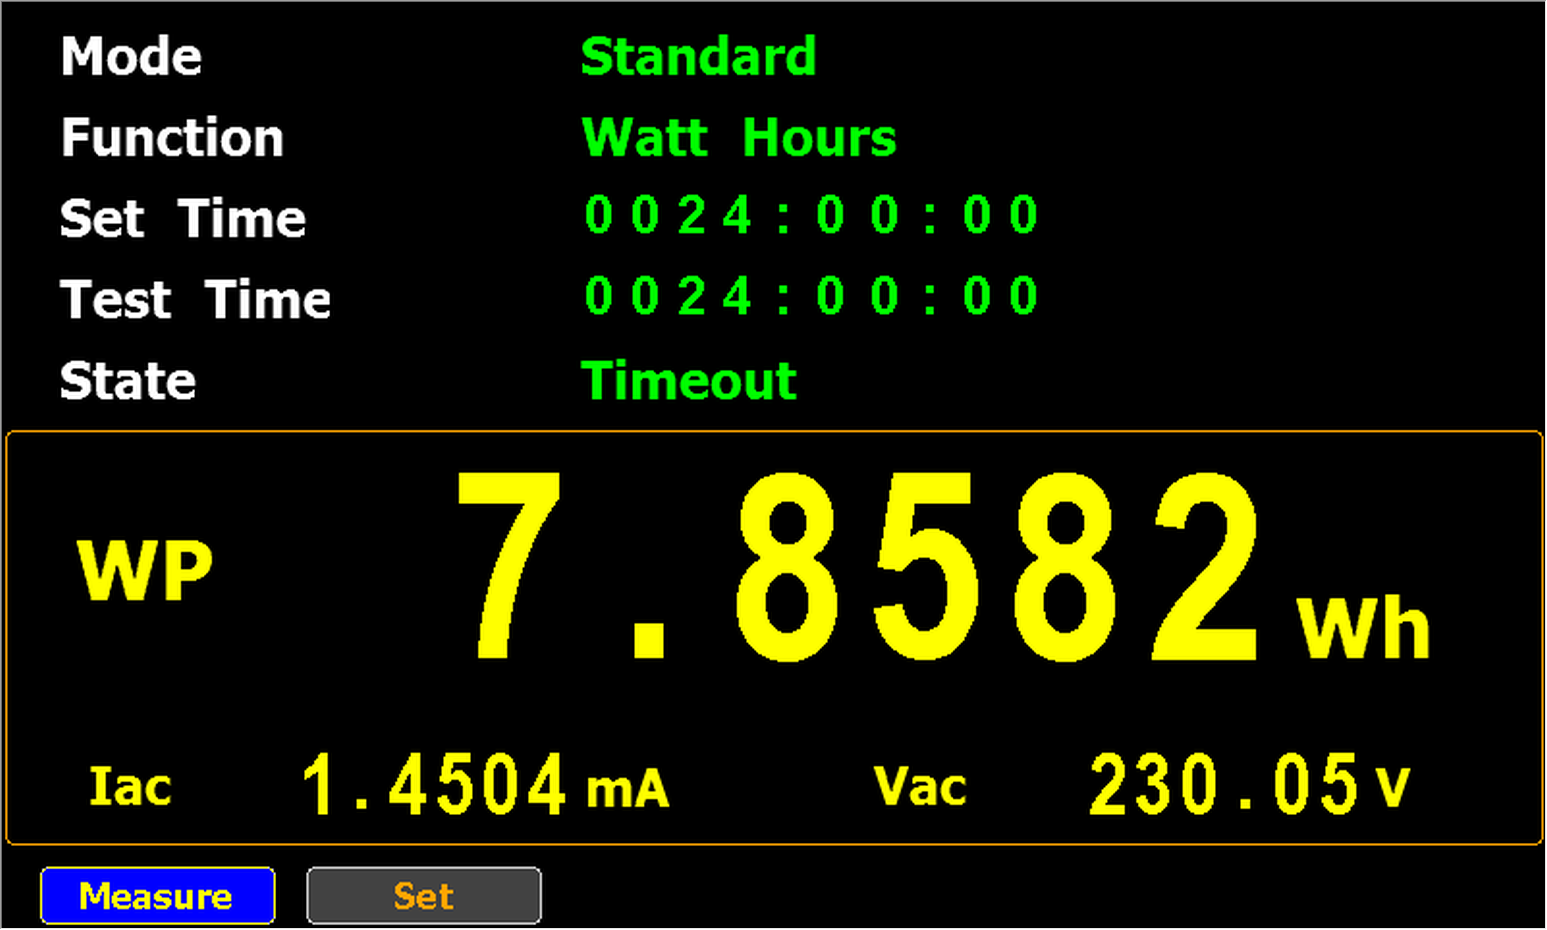
I measured the electric energy consumption of a powerstrip with switch on and neon lamp burning (without anything plugged into the powerstrip’s outlets).
It consumed 7,8582 Wh over 24 hours, thus it drew on average 0,327 W.
FYI: although the switch is turned on in the above picture, you don’t see the neon lamp burning.
That’s because of the AC power here in Belgium is 230V and 50Hz.
50Hz means that the current is 0 A 100 times per second, and thus the neon lamp does not light up around these 0 A current values.
So the picture above was taken at a moment that the lamp wasn’t lighting up because the current was (almost) 0 A.
I will go into more details in an upcoming blog post.
I did not conduct tests with powerstrips that use LEDs in stead of neon lamps yet, because all the powerstrips with LEDs I have, also have a builtin USB charger, and that draws power too.
I use my tools dns-pydivert and dnsresolver.py for dynamic analysis of software (malware and benign software).
On the virtual machine where I’m doing dynamic analysis, I disable IPv6 support.
I install dnslib and run dnsresolver.py with a command like this, for example:
dnsresolver.py "type=resolve,label=example.com,answer=. 1 IN A 127.0.0.1" "type=forwarder,server=8.8.8.8"
The first command is a resolve command: DNS A queries for example.com will be resolved to IPv4 address 127.0.0.1 with TTL 1 minute.
The second command is a forwarder command: all DNS requests not handled by other commands, are forwarded to 8.8.8.8. Make sure that the IPv4 address of the DNS server you forward requests to, is different from the VM’s default DNS server, otherwise this forwarding will be redirected by dns-pydivert too.
I don’t use this second resolver command if the VM is isolated from the Internet, I only use it when I want to allow some interaction with the Internet.
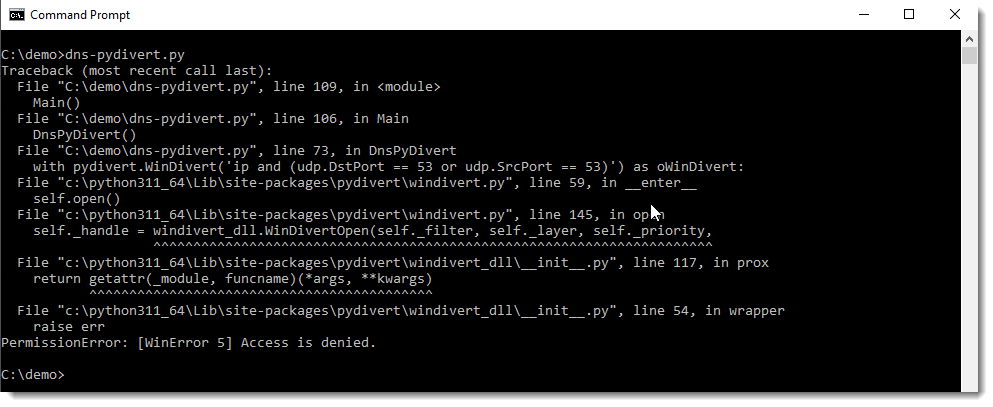
Then I install pydivert and run dns-pydivert.py as administrator.
You can’t run dns-pydivert.py properly without administrative permissions:
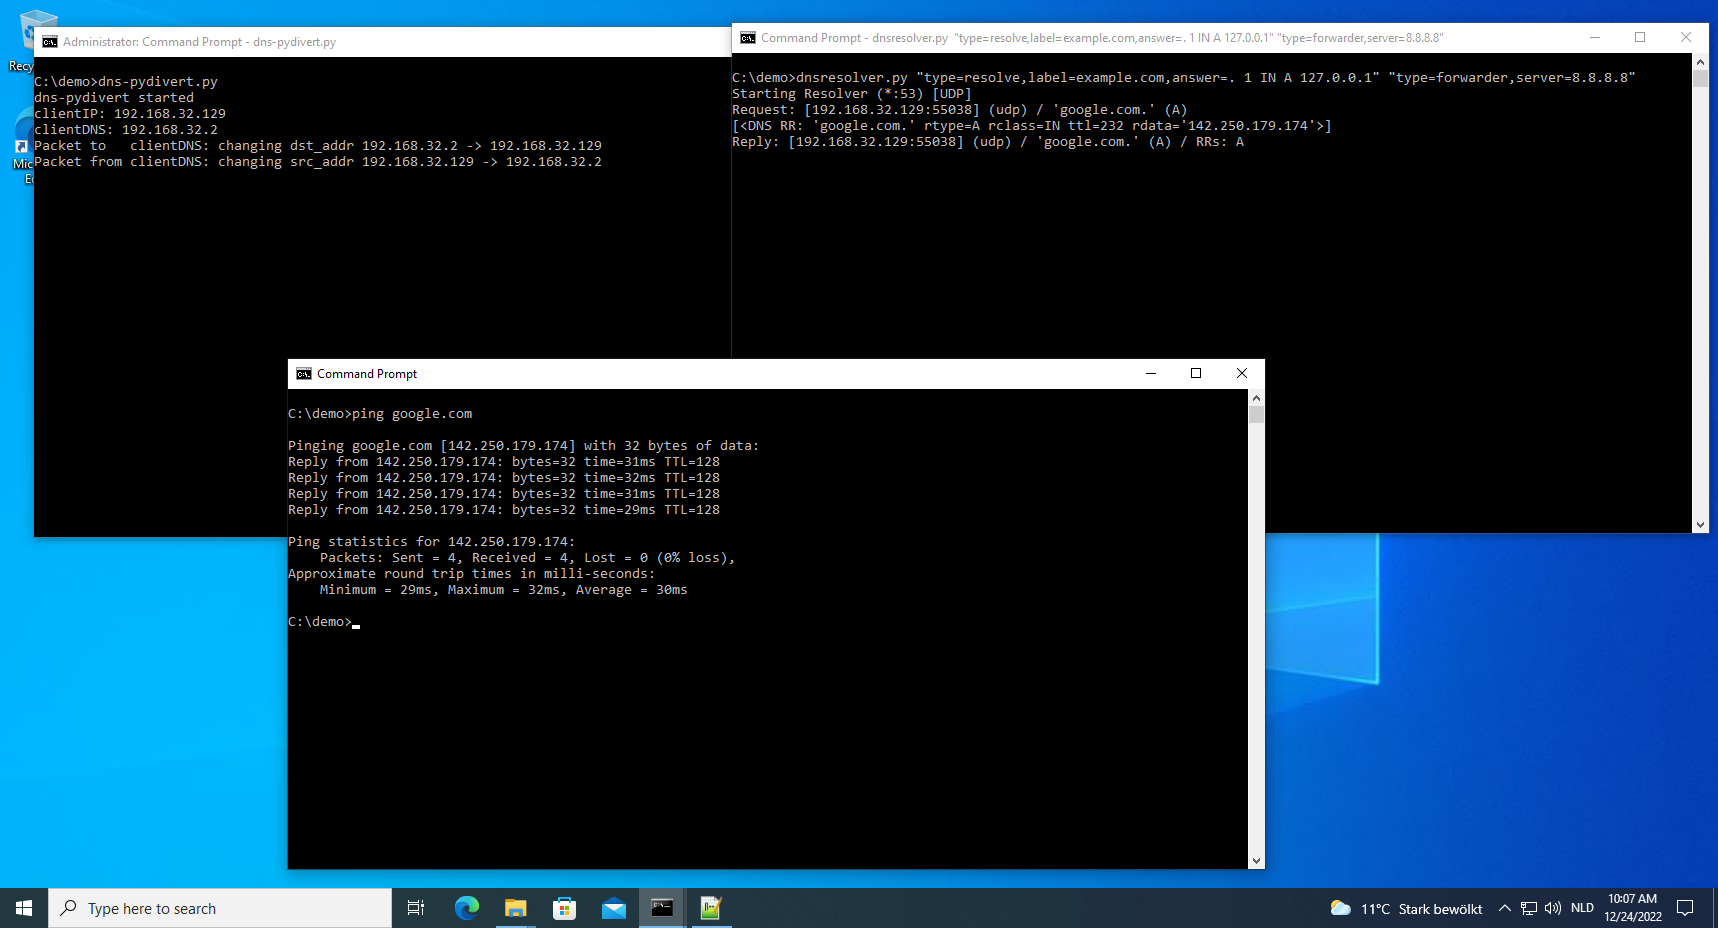
When dns-pydivert.py and dnsresolver.py are running, DNS traffic is altered according to our settings.
For example (picture above), when I issue a “ping google.com” command inside the VM, dns-pydivert sees this first DNS packet and configures itself with the addresses in this packet: 192.168.32.129 is the IPv4 address of the Windows VM and 192.168.32.2 is the IPv4 address of this Windows VM’s DNS server.
It alters this first request to be redirected to the VM itself (192.168.32.2 -> 192.168.32.129).
Then dnsresolver receives this packet, and forwards it to DNS server 8.8.8.8. It receives a reply from DNS server 8.8.8.8, and forwards it to the Windows VM (192.168.32.129).
Then dns-pydivert sees this reply, and changes its source from 192.168.32.129 to 192.168.32.2, so that it appears to come from the Windows VM’s default DNS server.
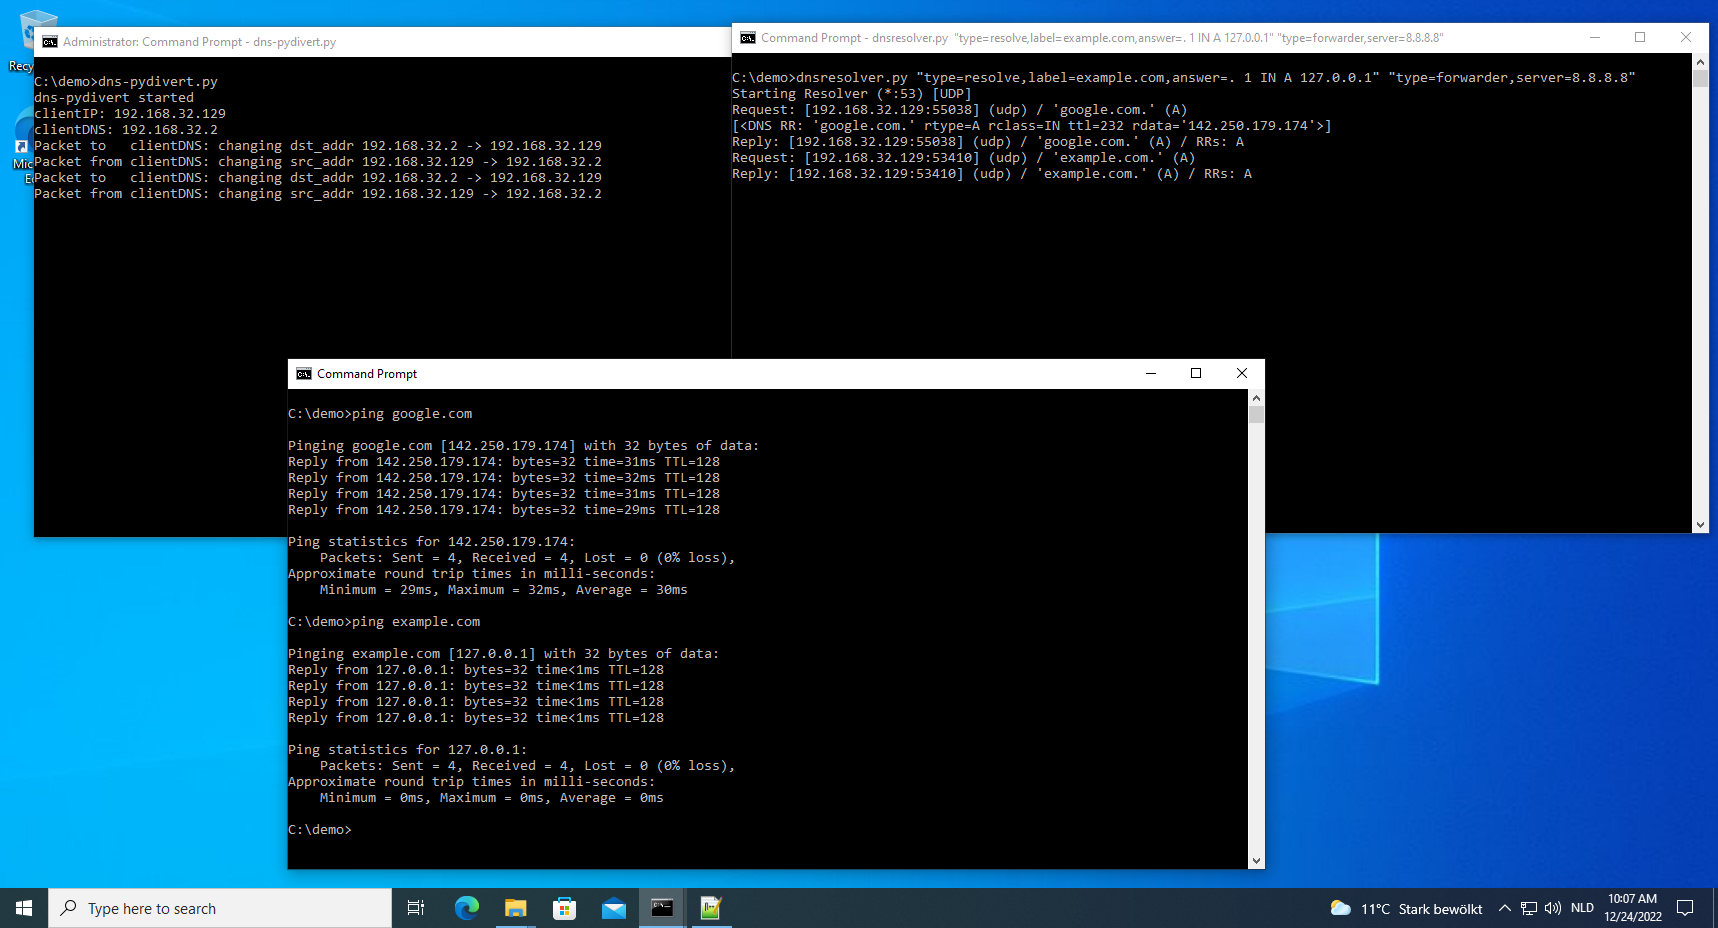
When I do the same (picture above) for example.com (ping example.com), the query is redirected to dnsresolver, which resolves this to 127.0.0.1 with a TTL of 1 minute (per resolve commands configuration).
Thus the ping command pings the localhost, instead of example.com’s web server.
And when I kill dns-pydivert (picture above) and issue a “ping example.com” again after waiting for 1 minute, the query is no longer redirected and example.com’s web server is pinged this time.
I used ping here to illustrate the process, but often it’s HTTP(S) traffic that I want to redirect, and then I also use my simple-listener.py tool to emulate simple web servers.
Remark that this will only redirect DNS traffic (per the configuration). This does not redirect traffic “directed” at IPv4 addresses (as opposed to hostnames).
This can be done too with pydivert, and I will probably release a tool for that too.
dns-pydivert is a tool that uses WinDivert, a “user-mode packet capture-and-divert package for Windows” to divert IPv4 DNS packets to and from the machine it is running on.
This tool requires admin rights.
When started, it listens for IPv4 UDP packets with source and/or destination port equal to 53. When this tools processes its first UDP packet with destination port 53, it considers the source address of this packet as the DNS client’s IPv4 address (e.g., the Windows machine this tool is running on) and the destination address to be the IPv4 address of the DNS server used by the client. From then on, all IPv4 UDP packets with source or destination port 53 (including that first packet) are altered by the tool. All IPv4 UDP packets with destination port 53, have their destination address changed to the IPv4 address of the client. All IPv4 UDP packets with source port 53, have their source address changed to the IPv4 address of the DNS server.
This tool can be used to redirect all DNS IPv4 traffic to the machine itself, where a tool like dnsresolver.py can handle the DNS requests.
Caveats:
This tool does not handle IPv6.
This tool does not check if the UDP packets to and/or from port 53 are actual DNS packets.
This tool ignores DNS traffic over TCP.
This tool does not handle queries to multiple DNS servers (different IPv4 addresses) correctly.
This new version brings extra statistics with option -f (fullread): counter for unique bytes, control bytes, printable bytes, high bytes. And lengths of the longest ASCII string, ASCII hexadecimal string and ASCII base64 string.
Remark that no check is made for hex string length being a multiple of 2 and base64 string length being a multiple of 4.
Rule DMP for minidumps was added.
And option -e now accepts multiple extensions (comma separated).
This new tool, teeplus.py, is an extension of the tee command.
The tools takes (binary) data from stdin, and sends it to stdout, while also writing the data to a file on disk.
While the tee command requires a filename as argument, teeplus.py takes no arguments (only options).
By default, teeplus.py will write the data to a file on disk, with filename equal to the sha256 of the data and extension .vir.
And it will also log this activity in a log file (teeplus.log by default).
Here is an example.
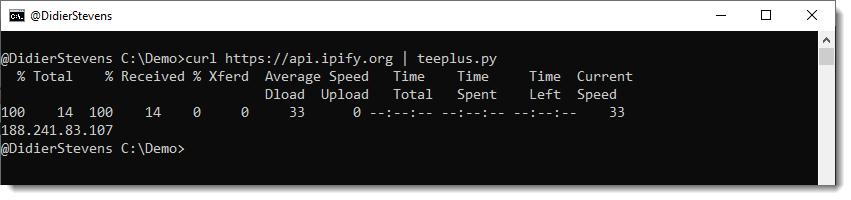
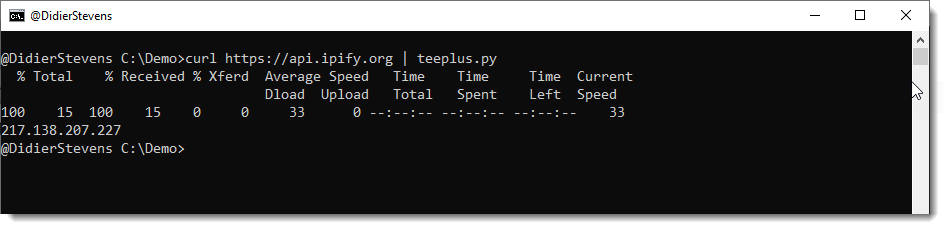
I run curl with a request to ipify to get my current public IPv4 address:
Then I pipe this output to teeplus.py:
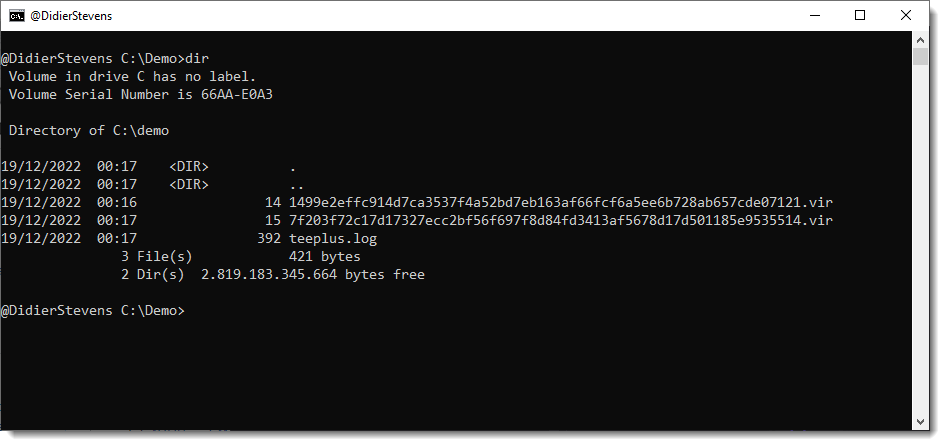
This results in the creation of two files inside the current directory:
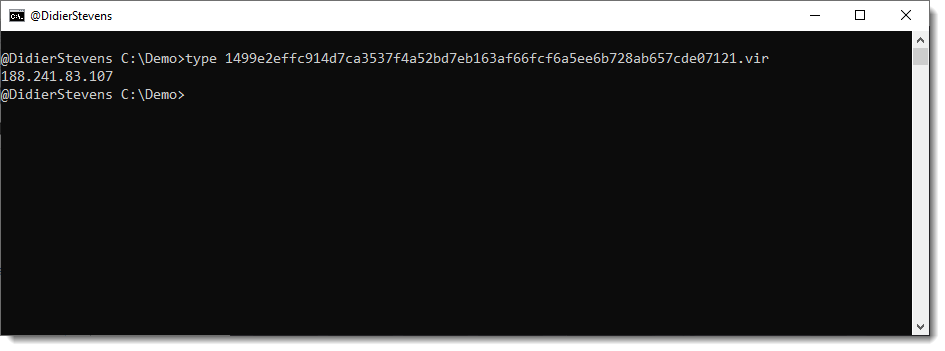
The first file it the output of the curl command:
The filename is the SHA256 hash of the data with extension .vir:
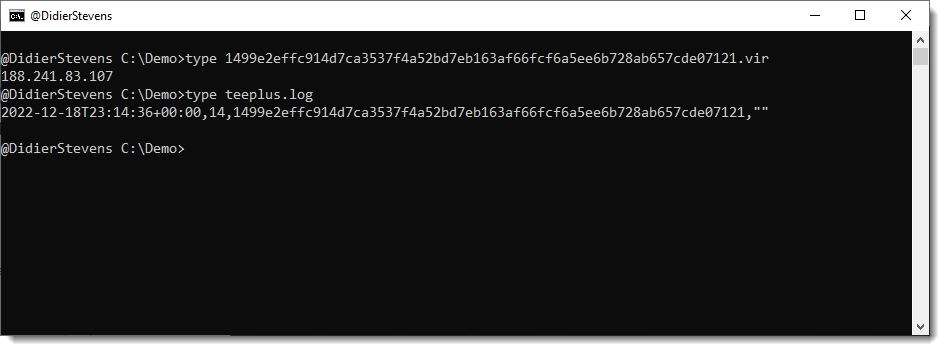
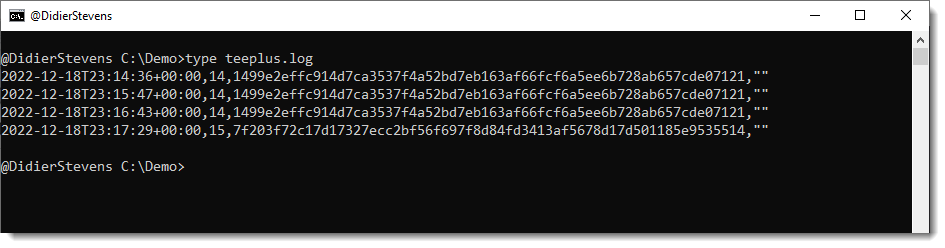
The second file, teeplus.log, is a log file:
Each line in teeplus.log has 4 fields (comma separated):
The ISO timestamp when the activity was logged
The length in bytes of the data
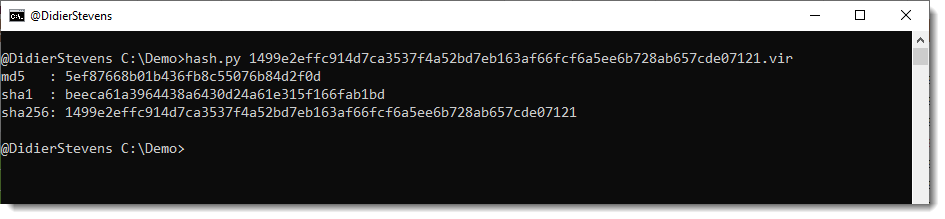
The SHA256 hash of the data
An error message (empty string when no error occured)
A line is created for each invocation of the teeplus.py command:
When the IPv4 address changes:
And the command is executed again, a new .vir file is created (since the received data changed):
And this is reflected in the log file:
This allows you to create a log of your public IPv4 address, for example (by scheduling this command as a recurrent task).
I use it for monitoring websites, and saving a copy of the HTML page I downloaded. I will explain how in an upcoming blog post.
teeplus.py has a couple of options: you can change the extension of the saved file, and the filename of the log file. And you can also us option -n to prevent the data to be piped to stdout (or you could redirect to /dev/null).
This is something I would do when the teeplus.py command is not followed by another command.