Didier Stevens

Thursday 6 March 2008

bpmtk: Replacing Gpdisable

Filed under: Hacking,My Software,Reverse Engineering — Didier Stevens @ 8:52

Gpdisable is a tool to bypass group policy as a limited user, posted by Marc Russinovich on his blog when he was still the owner of Sysinternals. But now that Sysinternals is owned by Microsoft, the tool is not available anymore.

My Basic Process Manipulation Tool Kit can replace Gpdisable, I’ll show how and give you one more trick.

LikeMarc did, you can inject a DLL that will patch the IAT to subvert NtQueryValueKey, but I’ll leave this technique for an upcoming post.

My example doesn’t require you to program a DLL to inject: since we want to hide the TransparentEnabled registry key, we will just rename the key in the process memory of the programs that impose Software Restriction Policies on us (like explorer.exe). Here is the bpmtk config file to achieve this goal:

dll-name advapi32.dll
#rename TransparentEnabled to AransparentEnabled
search-and-write module:. unicode:TransparentEnabled ascii:A

This will patch each process you’ve rights to and who has loaded advapi32.dll (this DLL enforces SRP).

But as Mark writes in his blog, this will not work for running processes because they have already cached the value of TransparentEnabled and are thus not querying the registry anymore. This is why many people reported that Gpdisable didn’t work for them. Gpupdate /force will force a refresh of the policies, and invalidate the cache.

But if you’re in a restricted environment, there’s a chance you’re prevented from doing a gpupdate. Here’s another way: set the variable _g_bInitializedFirstTime to 0, this will also invalidate the cache. For advapi32.dll version 5.1.2600.2180, this variable is at address 77E463C8. Our script becomes:

dll-name advapi32.dll
#rename TransparentEnabled to AransparentEnabled
search-and-write module:. unicode:TransparentEnabled ascii:A
write version:5.1.2600.2180 hex:77E463C8 hex:00

Thursday 28 February 2008

Introducing the Basic Process Manipulation Tool Kit

Filed under: Forensics,Hacking,My Software,Reverse Engineering — Didier Stevens @ 10:01

For about a month or two now, I’ve been working on a toolkit to manipulate processes (running programs) on Windows. I’ve been using it mainly to research security mechanisms implemented in user processes, like Microsoft .NET Code Access Security.

Here are some of the design goals of the toolkit:

  • the toolkit must support limited accounts (accounts that are not local administrators) as much as possible
  • flexibility: provide a set of commands that can be assembled in a configuration file to execute a given task
  • the toolkit must be able to operate as a single EXE, without requiring the installation of supporting environments like Python
  • it must be a command-line tool

The toolkit has commands to search and replace data inside the memory of processes, dump memory or strings, inject DLLs, patch import address tables, … I’ll be posting examples in the coming weeks, illustrating how these commands can be used.

I’m releasing a beta version of the toolkit now, you can download it here.

This is an example of a configuration file (disable-cas.txt) to disable CAS for a given program (exactly like CASToggle does):

process-name CASToggleDemoTargetApp.exe
write version:2.0.50727.42 hex:7A3822B0 hex:01000000
write version:2.0.50727.832 hex:7A38716C hex:01000000
write version:2.0.50727.1433 hex:7A3AD438 hex:01000000

It looks for processes with the name CASToggleDemoTargetApp.exe, and will then write to the memory of these processes to set a variable to 1 (hex:01000000). The address to write to depends upon the version of the DLL containing the variable. If the DLL has version 2.0.50727.42, we will write to address 7A3822B0. For version 2.0.50727.832, we will write to 7A38716C, … So in this configuration file, at most one write command will be successful and write to memory.

Launch the toolkit with the configuration file like this:

bpmtk disable-cas.txt

You can also use the toolkit to audit programs, for example to check if they protect secrets correctly. Let’s investigate how Firefox keeps passwords (I tested this with Firefox 2.0.0.12 English on Windows XP SP2):

I created a new Firefox profile, defined a master password and stored two passwords: one for Google (BigSecretGoogle) and one for WordPress (BigSecretWordpress).

This is the config file:

process-name firefox.exe
strings address:on memory:writable regex:BigSecret

This config file will search inside the memory (only the writable virtual memory) of Firefox for strings containing the string BigSecret, and dump them to the screen, together with the address where they were found.

Let’s start Firefox and search inside the memory (bpmtk demo-firefox-passwords.txt):

bpmtk-0009.png

No BigSecrets here. Now let’s navigate to Google mail. We are prompted for the master password, so that Firefox can complete our credentials on the login screen:

bpmtk-0010.png

bpmtk-0012.png

Let’s take another peek inside the memory of the Firefox process:

bpmtk-0013.png

It should be no surprise that we find our Google password in memory (at 2 different addresses, the U indicates that we found a Unicode string).

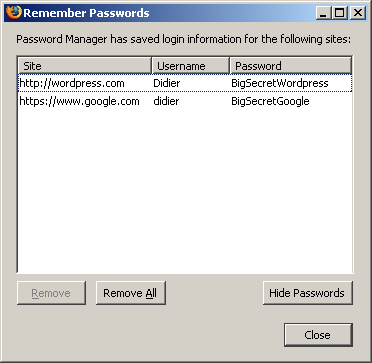
Now let’s go to Firefox’s options and display the passwords:

bpmtk-0014.png

bpmtk-0015.png

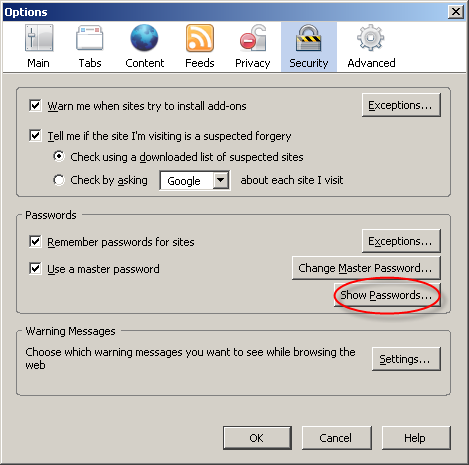
The password manager displays the stored URLs and the usernames, but not the passwords. Let’s take another peek inside the memory of the Firefox process:

bpmtk-0016.png

This time, Firefox has also decrypted our WordPress password (BigSecretWordpress), although it’s not displayed. It’s only displayed if we provide the master password a second time:

bpmtk-0017.png

bpmtk-0018.png

So although Firefox prompts you a second time for the master password to display all the passwords, the passwords have already been decrypted in memory before you provided the master password a second time.

Now I don’t have issues with this behavior of the password manager of Firefox, I don’t think it’s a security issue (I’ve an idea why it was programmed like this). But if Firefox was a perfect program, all passwords would only be decrypted when a user explicitly asks to display all passwords.

Do you make online payments with your credit card? Now that I’ve showed you how you can look for specific strings inside a running program with my toolkit, you should know how to use it to check how long your browser keeps your credit card number inside its memory. And can you find out how to use bpmtk to erase that number from your browser’s memory?

Let me finish with an appetizer: I’ve also developed a DLL that, once injected inside a process, will instantiate a scripting engine inside said process, and start executing a script inside the process. This allows you to inject a script inside a process, which can be handy for rapid prototyping or when you’re operating in a limited environment where you don’t have a C compiler to develop a custom DLL to inject. Of course, a script is not as powerful as a compiled C program, but I’m adding some objects to provide some missing functionality.

This script injector will be released with an upcoming version of the bpmtk.

Wednesday 20 February 2008

CASToggle and The Polymorphic Podcast

Filed under: .NET — Didier Stevens @ 10:15

Craig Shoemaker, a good friend, Microsoft MVP and host of The Polymorphic Podcast, sweetened my little CASToggle quiz by trowing in a license for a Microsoft .NET development tool. Check out hist post. Thanks Craig!

BTW, The Polymorphic Podcast is about object oriented development, not about polymorphic malware. Polymorphism is also a programming language concept.

When you look at the comments of my previous blogpost, you’ll read that we have a winner. Let me fill you in on the details.

Caspol requires administrative credentials to disable CAS enforcement:

caspol-local-admin.png

The reason is that the setting for disabled CAS enforcement is implemented with a mutex owned by the BUILTIN\Administrators group. As a non-admin user, you can also create this mutex, but it will be owned by your account, not by the administrator group. And the CLR checks the ownership of the mutex and will only acknowledge it when it is owned by BUILTIN\Administrators.

But my CASToggle tool does not use a mutex. CASToggle allows you to directly manipulate the variable in the CLR where the status of the mutex is stored. This variable can have 3 values:

  • 0: uninitialized, this means that the CLR has not yet looked for the presence of the mutex. This is the case when your .NET program starts to run.
  • 1: CAS enforcement disabled, this means that the CLR has found the mutex.
  • 2: CAS enforcement enabled, this means that the CLR has not found the mutex.

The CLR will only perform a single check for the presence of the mutex. That’s why changing the CAS enforcement policy with caspol has no effect on running .NET programs.

Did you know that the CLR runs in your own process memory? And did you know that in Windows, you have full control over your own processes, even as a limited user? To manipulate the process of another user (e.g. reading and writing to the virtual memory owned by the target process), you need the debug privilege (local admins have this privilege by default). But you don’t need this privilege for your own processes.

That’s what differentiates CASToggle from caspol. If you’re a local admin (or you have the debug privilege, to be more precise), you can use CASToggle on any process. But as a limited user, you can still use it to disable CAS enforcement for your own processes.

I’ve been doing some research on security mechanisms implemented in the user’s own process space. The design of these security mechanisms is fundamentally flawed, because a limited user has full control over his own processes and can thus bypass the security mechanism. He just needs internal knowledge about the mechanisms (or a tool), and then he can bypass it because he has the rights to do so.

Robust security mechanisms are implemented in process space that is off-limit to normal users. This can be inside the kernel (like the reference monitor) or inside user-land space of a protected account (like services that run under the local system account).

Tuesday 12 February 2008

Fine-Grained Control over Code Access Security

Filed under: .NET — Didier Stevens @ 7:12

With Code Access Security (CAS) in the .NET Framework, Microsoft introduced a whole new security layer on top of Windows security.

If you need to temporarily disable CAS, for example during a debugging session, you can use the caspol utility. The command caspol -security off will disable CAS enforcement as long as the caspol tool is running (this is true for .NET 2.0 and later). If you are interested in the implementation details: it’s done via a mutex.

One issue with caspol -security is that its effect is system-wide. If you need to unit test .NET assemblies by repeatedly toggling CAS enforcement, the caspol utility lacks some control. Not only your assembly will be affected by the toggle, but every other assembly on the machine. And the setting only takes effect for assemblies started after the caspol command was issued. When you re-enable CAS enforcement, it will only affect new processes. Running programs continue to ignore CAS, they have to be restarted for the new setting to take effect.

My new utility, CASToggle, gives you more control over CAS enforcement. First of all, it operates on a per-process basis. You have to specify the process ID of the program for which you want to switch CAS enforcement. Second: the effect is immediate, you don’t have to restart the program.

Example:

  • castoggle 123 1 – this will immediately disable CAS enforcement for process 123
  • castoggle 123 2 – this will immediately enable CAS enforcement for process 123

CASToggle controls CAS enforcement by directly manipulating the appropriate variable in the process memory of the targeted program. So it’s best to use CASToggle only for testing purposes. When you look at the source code of CASToggle, you’ll notice that most of the code is there to ensure that it manipulates the correct memory location. For example, it will check the version of mscorwks.dll before it attempts to access the process memory. But if the DLL is not loaded at its base address (e.g. because of ASLR on Vista or Windows 2008), the program could manipulate the wrong memory location and cause the program to crash. Unknown DLL versions cause the tool to break-off without accessing the process memory. I’ve tested CASToggle on Windows XP SP2, Windows 2003 and Vista with different versions of .NET (2.0 and up).

To see CASToggle at work, take a look here on YouTube, hires (XviD) version here.

Oh, and there is one more thing that differentiates CASToggle from caspol, but I’m not going to tell you right now. Can you figure it out? Post a comment! First one to figure it out gets the honors! 😉

Tuesday 5 February 2008

Hiding Inside a Rainbow, Part 3

Filed under: Hacking — Didier Stevens @ 9:37

(IN)SECURE Magazine has published my research on steganography with rainbow tables. As promised, I publish my last algorithm now (my previous posts: part 1, part 2).

This steganographic technique is based on the fact that a rainbow table contains chains with the same hash index but with a different start index.

A rainbow table is just a sequence of records. Each record has 2 fields of 8 bytes each, this makes a record 16 bytes wide. Therefore the size of a rainbow table is a multiple of 16. A record represents a chain. The first field is the password that started the chain. Actually, the first field is an index into the keyspace of all possible passwords for the given rainbow table set. It is a random number between 0 and the size of the keyspace – 1. The second field is the hash of the last password in the chain (actually, this is also an index and not the real hash). The rainbow table is sorted on the second field: the record with the lowest hash is first in the table and the one with the highest hash is last.

pict1.png

This is the hex dump of a rainbow table (the first 16 chains). The green box highlights the random data, notice that the 3 most significant bytes are 0. The blue box highlights the hash, notice that this column is sorted.
My steganographic technique is based on the fact that a rainbow table contains chains with the same hash index but with a different start index.

Take the rainbow table I’ve used in my tests. It’s 1 GB large and has 67.108.864 chains. It contains 9.513.435 pairs of chains with the same hash index but with a different start index. For 4.756.561 of these pairs, the first chain has a higher start index than the second chain. And for 4.756.874 of these pairs, the opposite is true: the first chain has a lower start index than the second chain. This even distribution should be no surprise, as the rainbow table is only sorted on the hash index and not on the start index.

We can change the order of these pairs without breaking the chain and without disrupting the order of the rainbow table. This will allow us to encode 1 bit per chain. I define the following encoding convention:

  • a pair of chains with the same hash index and with the start index of the first chain smaller than the second chain represents a bit equal to zero
  • a pair of chains with the same hash index and with the start index of the first chain greater than the second chain represents a bit equal to one

pict2.png

In our test table, the pair in the green box represents a 0 (0x1C7F02C85E < 0x2D1AB4B674) and the pair in the red box represents a 1 (0x94BD2F41F2 > 0x65616DC547).

Use this algorithm to hide a file in a sorted rainbow table:

  • start a sequential search of chain pairs with equal hash indexes and different start indexes
  • for each bit of the file to hide
    • if the bit is 0 and the chain pair has a first start index higher than the second, swap the order of the chains
    • if the bit is 1 and the chain pair has a first start index lower than the second, swap the order of the chains

To extract the hidden file, use this algorithm:

  • start a sequential search of chain pairs with equal hash indexes and different start indexes
  • if a chain pair has a first start index lower than the second, write a bit equal to 0
  • if a chain pair has a first start index higher than the second, write a bit equal to 1

PoC code to store and retrieve data in rainbow tables using this technique can be found here.

Use rthide2 to hide data in a rainbow table, it takes 3 arguments:

  • the rainbow table (remains unchanged)
  • the file to hide (remains unchanged)
  • the new rainbow table

To hide a file data.zip inside a rainbow table called lm_alpha-numeric-symbol14-space#1-7_0_5400x67108864_0.rt, use this command:

rthide2 lm_alpha-numeric-symbol14-space#1-7_0_5400x67108864_0.rt data.zip lm_alpha-numeric-symbol14-space#1-7_0_5400x67108864_0.rt.stego

This will create a new rainbow table called lm_alpha-numeric-symbol14-space#1-7_0_5400x67108864_0.rt.stego

Use rtreveal2 to extract data from a rainbow table, it takes 3 arguments:

  • the rainbow table
  • the file to create
  • the size of the hidden file

To extract the data, issue this command (you have to know the length of the hidden file, my PoC program doesn’t store this).
rtreveal2 lm_alpha-numeric-symbol14-space#1-7_0_5400x67108864_0.rt.stego data.zip 1620

1620 is the length of file data.zip

The advantages of this technique over the previous techniques I developed is that it creates sorted rainbow tables without broken links, and that it is fast. The disadvantage is that it stores much less hidden data. In my example, a maximum of about 1 MB (9.513.435 bits) can be hidden in a rainbow table of 1 GB. Statistical analysis is the only way to detect the hidden data, but you can foil this by making your data appear random, for example with strong encryption.

Monday 28 January 2008

Update: A Windows Live CD plugin for my UserAssist utility

Filed under: Forensics,My Software — Didier Stevens @ 8:16

I noticed that I forget to update the Windows Live CD plugin for UserAssist.

From now on, I’ll update it each time I release a new version of my UserAssist utility.

You can download the plugin for the latest version here (https).

Wednesday 23 January 2008

Quickpost: The Digital Signature of a Cryptographic Service Provider

Filed under: Encryption,Quickpost — Didier Stevens @ 9:43

This post is the result of additional research started by this comment. A Cryptographic Service Provider (CSP) must be digitally signed by Microsoft before it can be installed and used on Windows. But this digital signature is technically very different from AuthentiCode and serves another goal.

AuthentiCode uses digital certificates, a certificate is a digitally signed document which links a public key to an identity. Code signing is performed to link software to its author and to allow detection of program alteration. AuthentiCode is also used by Microsoft to digitally sign device drivers. In this case, the signature is used to show that the driver passed Microsoft’s testing program (the signer is Microsoft Windows Hardware Compatibility Publisher)

A CSP must also be signed by Microsoft, but the technique is different from AuthentiCode. Microsoft will sign the hash of the CSP. This signature can be stored inside the file as a resource (ID 0x29A or 666) that is 144 bytes long, or inside the registry as a blob of 136 bytes. When I looked at several signatures inside CSPs, I noticed that the first 8 bytes were almost always identical and hence are probably not part of the actual signature (144 – 8 = 136).

Since the length of the signature is constant and very short, it cannot be a certificate. Neither can it be decoded as a certificate. My educated guess is that this signature is nothing more than the cryptographic hash of the file encrypted with a private key kept by Microsoft. Checking the signature is thus done in Windows by calculating the hash of the file, decrypting the signature with the public key and comparing the hash with the decrypted signature. Equality shows that the signature is valid. The use of the cryptographic hash ensures that is virtually impossible to modify the file while keeping the same hash, and the use of the private key guards the hash from forgery.

This is an example of the signature inside CSP rsaenh.dll viewed with the free XN Resource Editor:

666-resource.png

A signature for a CSP can only be obtained by providing documents to Microsoft promising to obey various legal restrictions and giving valid contact information. Thus the goal of the signature is to proof that Microsoft and the CSP author promise to obey the restrictions on cryptography. But I’m not a lawyer, the formulation of this goal is the result of my inadequate legal skills.

I was also told that Microsoft will perform some testing, but I haven’t yet received confirmation or details about this.


Quickpost info


Wednesday 16 January 2008

XORSearch V1.3.0

Filed under: My Software — Didier Stevens @ 7:57

Maarten Van Horenbeecks’s post gave me the idea for a new feature for my XORSearch tool: searching for a list of strings. This is achieved with the -f option, like this:

XORSearch -f urls malware.exe

urls is a text file containing a list of URLs to search for.

You’ll still have to use a script if you want to search in more than one file.

And there is something new about the XORSearch.exe in the ZIP file. First one to post a comment with the correct answer gets an honorable mention 😉

Monday 14 January 2008

Quickpost: GUI vs. CUI

Filed under: Quickpost — Didier Stevens @ 9:47

Sometimes I read the following programmer’s question:

When I launch my program from the command line, I get a new prompt immediately. What API should I call to let my program display a new prompt only when it is done?

This is often related to scripting: calling this kind of program from a BAT file is a problem, because the BAT file will continue executing while the program is still running.

In fact, this behavior is not defined through coding in the program itself, but by a setting in the header of the program. For WIN32 applications, the value of the SUBSYSTEM parameter is 2 (IMAGE_SUBSYSTEM_WINDOWS_GUI) for a GUI application and 3 (IMAGE_SUBSYSTEM_WINDOWS_CUI) for a console application. A programmer can change this setting by selecting the appropriate option for his compiler. And if one can’t recompile the program, just use a binary editor or a PE file editor. It’s important to understand that console applications are not limited to console interaction, and GUI applications are not limited to GUI interaction. A console application can create windows and a GUI application can create consoles.

It is the shell (cmd.exe) that decides if it waits for the end of the launched program or not, based on the value of the SUBSYSTEM parameter. Take a look at the source code of cmd.exe for ReactOS (this is Open Source):

reactos-cmd.png

After your program is successfully started (CreateProcess), the shell will check if the new process is a console or GUI application (IsConsoleProcess). If it’s a console application, the shell will wait for the program to terminate (WaitForSingleObject), and then it will set the ErrorLevel to the return code. But if it’s a GUI application, it will not wait and it will set the ErrorLevel immediately to 0. That is why you immediately get a new command prompt when you launch a GUI application from the shell: it’s the shell itself that decides not to wait.

So if a programmer wants cmd.exe to wait for the end of its program, he has to declare it as a console application, even if it uses a GUI. There is a drawback however, because when this program is launched from explorer.exe (and not cmd.exe), a console will be automatically created by Windows. The only trick I found to avoid this is to hide the console programmaticaly (but it will still appear briefly when your program is stared).

You can try the following experiment to better understand the SUBSYSTEM parameter without resorting to programming:

  • take a copy of notepad.exe
  • change the SUBSYSTEM parameter of this copy from 2 to 3
  • launch the copy from Windows Explorer
  • launch the copy from cmd.exe
  • launch the copy from a BAT file

Quickpost info


Friday 11 January 2008

The Case of the Missing Digital Signatures Tab

Filed under: Encryption — Didier Stevens @ 9:07

The title of this post is inspired by Mark Russinovich‘s posts. I explain why there is a category of executables with a digital signature that don’t show a “Digital Signatures” tab in the properties dialog, and I release a tool to manipulate digital signatures.

Executables (PE files) can have a digital signature, Microsoft calls this signature AuthentiCode. There are 2 different ways to sign a PE file: by adding a digital signature to the PE file (embedded digital signature) or by adding a hash of the PE file to a security catalog file (filetype .CAT).

The Properties dialog of a file hosts a Digital Signatures tab when the PE file has an embedded digital signature, like this Windows patch from Microsoft:

patch-properties.png

But when a file is signed via a security catalog file, the Digital Signatures tab is not displayed. Notepad is a good example:

notepad-properties.png

To check the digital signature of this category of files, one uses Microsoft’s signtool or Mark’s sigcheck utility:

notepad-signcheck.png

These tools will calculate the hash of the file, look it up in the appropriate security catalog file and check the signature of the security catalog file. One can find security catalog files in directory C:\windows\system32\catroot:

sp2-cat-tab1.png

sp2-cat-tab2.png

For an embedded digital signature, the location of the signature is at the end of the signed file. Look for DATA_DIR Security in IMAGE_DATA_DIRECTORIES of the optional PE header. It has a pointer (4 bytes) to the signature and the length (4 bytes) of the signature. The pointer is just the offset in the binary file. When these bytes are all zero (0x00), the PE file has no embedded digital signature.
Here is the PE header of another Windows patch:

pe_header.png

In this patch, the signature entry can be found at offset 0xF4E00 in the file and is 0x2428 bytes long:

der-signature.png

The first 4 bytes of the signature entry is the size, the following 4 bytes is a constant (0x00020200), and the rest is the PKCS7 signature. This signature can be extracted with a binary editor and parsed with openssl:

openssl.png

Finally, I wrote a small Python program to manipulate embedded digital signatures. Features of disitool:

  • delete a signature: disitool.py delete signed-file unsigned-file
  • copy a signature: disitool.py copy signed-source-file unsigned-file signed-file
  • extract a signature: disitool.py extract signed-file signature
  • add a signature: disitool.py add signature unsigned-file signed-file
« Previous PageNext Page »

Blog at WordPress.com.