This is how I deploy and configure ClamAV on Windows:
I download the portable Windows x64 version in a ZIP file (clamav-0.99.2-x64.zip).
I extract the content of this ZIP file to folder c:\portable\, this will create a subfolder ClamAV-x64 containing ClamAV.
Then I copy the 2 samples for the config files:
copy c:\portable\ClamAV-x64\conf_examples\clamd.conf.sample c:\portable\ClamAV-x64\clamd.conf
copy c:\portable\ClamAV-x64\conf_examples\freshclam.conf.sample c:\portable\ClamAV-x64\freshclam.conf
I create a database folder (to contain the signature files):
mkdir c:\portable\ClamAV-x64\database
I edit file c:\portable\ClamAV-x64\freshclam.conf:
Line 8: #example
Line 13: DatabaseDirectory c:\portable\ClamAV-x64\database
Now I can run freshclam.exe to download the latest signatures:

Then I edit file c:\portable\ClamAV-x64\clamd.conf:
Line 8: #example
Line 74: DatabaseDirectory c:\portable\ClamAV-x64\database
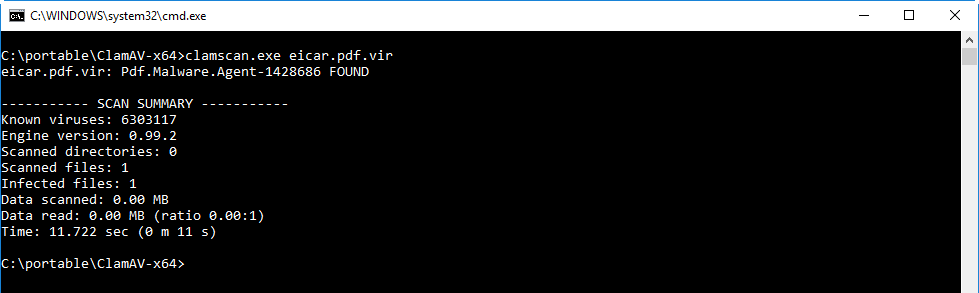
And now I can run clamscan.exe to scan a sample:

[…] Quickpost: Using ClamAV On Windows […]
Pingback by Overview of Content Published In August | Didier Stevens — Wednesday 6 September 2017 @ 19:54
Just a quick question, i have a bunch of file (.odt for example) that appen to have error and can’t be read: LibClamAV Warning: Can’t open file And the path to the file with some error in the encodage.
Comment by Anonymous — Monday 14 March 2022 @ 10:19
And you are running inside the clamav folder?
Comment by Didier Stevens — Saturday 19 March 2022 @ 18:35